Build A T-14
I've always liked
the basic design of the T-14. It's a good house for martins and the
design is just a little different than the normal looking purple martin
house. The vertical compartments allow for a more compact style and a person can make them as tall as he or she wishes,
assuming the pole will hold the load. Likewise, with a little imaginations
and ingenuity, they can do a number of different things to enhance the looks of
the house. If you don't want such a tall house, it can be turned into a
T-10 with compartments shortened to 3 and 2, respectively.
The T-14 was originally designed by an Amish man named Andrew Troyer from Conneaultville, Penn. Andrew has hosted martins for many years and really knows his stuff when it comes to taking care of them. However, his design simply uses round holes and no porches. The original design also mounts to a wooden pole and I'm just not a fan of wood for a martin pole; much too cumbersome to work with and often warps or twists and will eventually rot.
It's not a hard house to build at all, but when I made mine, I made some changes. Instead of a wooden pole, this one mounts to a 12' tall, Sched 80 Steel pole. I much prefer steel poles, no worries about warping, twisting or rotting. However, to mount a martin house to a round steel pole, a separate slide had to be designed and I show how to make that on this page. I simply took the basic vertical design concept and then I added a few enhancements:
- I added porches with built-in owl guards. Great Horned/Barred owls are everywhere and can be major problems in martin colonies.
- I added extra perching rods to the top of the house. Purple martins love places to sit and chat.
- I don't use nesting trays. I feel they cut down on nesting compartment size so I eliminated them.
- I added in an enhancement of my own to hold nesting materials in place.
- I used plastic molded inserts for the entrances with SREH's. European Starlings are also a major issue with purple martin housing. Although the 2" round holes are cut directly into the door, if starlings are an issue, then I strongly suggest using them.
Please note: I'm
not going to give full detailed dimensions and instructions but instead, will
give the basic dimensions I used on this house or show a few pieces with dimensions
on them to give the 'idea' of what I did. It is assumed that the person
wishing to build this unit has some basic wood working knowledge and skills and
I'm assuming they know most woodworking terms and know what is meant by, and
how to 'pre-drill' clearance holes for screws.
A Few Comments:
As you work thru
the project you will notice there are a number of "Notes:"
given throughout this page. They are there simply to help with how or why
I did something. Maybe you know a better way...if so, then use it.
If not, then mine does work.
To prevent this
page from getting huge, I designed it using mostly 'thumbnails' for the
pictures. To see the 'full size' picture, simply click on the thumbnail
and a full version of the picture will activate. If it's something with
dimensions on it, then you can simply print it out and take it out to the shop. As we progress thru the
build cycle, I'll describe what I've done and maybe even a tip or two on how to
make things easier for the average T-14 house builder.
I know that some
folks are going to be 'cost conscious', but I suggest using materials that are
strong enough to, not only be safe for the birds, but safe for the humans as
well. I will not skimp on a winch just to save a few bucks if my own
safety (or anyone else's for that matter) is at stake. I'm one that
simply likes quality.
I built this house
using Western Cedar. It's plenty strong and will last forever out in the
elements, even without painting if so desired. If you can find it, Cypress
will also work nicely.
White Pine will
also work, but remember, it must be treated with a preservative such as
Thompson's Water Sealer. Let it set for a couple of days to allow it to
fully sink into
the pine and then some good primer and paint if it is expected to last for any
time out in the elements. Most lumber yards/home improvement stores sell
shelving material and it's the same size as the
Western Cedar and is a little cheaper, but usually has a lot more knots, so get
a little extra just in case.
Sorry, but I am NOT a big fan of ‘Plywood’
for this type of construction. It’s
much too difficult to work with since the thickness is multiple thin layers of thinner
wood (usually southern yellow pine) and will eventually separate when out in the elements, even if it is
treated and painted. Plus, it’s
much heavier. ALL holes drilled
into the edge of it must be predrilled and even so, the screw will still
separate the individual plies thus; allowing water to get into the wood. Some have said they used it with good
results, but I for one, didn’t have those same results on the very first martin
house I built
from plywood. Oh, it looked great for about a year or two, but eventually,
it began to come apart, so I no longer advocate using it.
Materials:
The following is a materials list for all the things needed to build this T-14:
Approx 80 feet of 1 x 12 lumber (depending on knots)
1 - 8 ft long treated 2 x 4
Decking Screws- (self drilling, easy to use, especially the square drive)
You will need...
-2 lbs of 1 5/8", (used throughout the house)
-1 lb of 3", (actually, only about a dozen of these are needed for the mounting frame)
-1 lb of 2 1/2" (again, only about a dozen or so are needed)
-1 lb of 1" sheet rock screws (about 3 dozen are needed)
4 - sets of 2" door hinges
4 - self locking door hooks
14 - tunnel entrance inserts. More on how to obtain them further down the page.
1 - gallon of latex primer
1 - gallon of white exterior latex paint
1 - quart of trim paint, (color, your preference)
1 - 1000 lb min load winch
1 - ground socket
1 - pulley as described below plus the mounting brackets.
1 - 'steel' pole to mount the house on.
Enough concrete to fill the hole you will have to dig for the pipe.
Obvious things such as paint brushes, tape, etc.
Tools required:
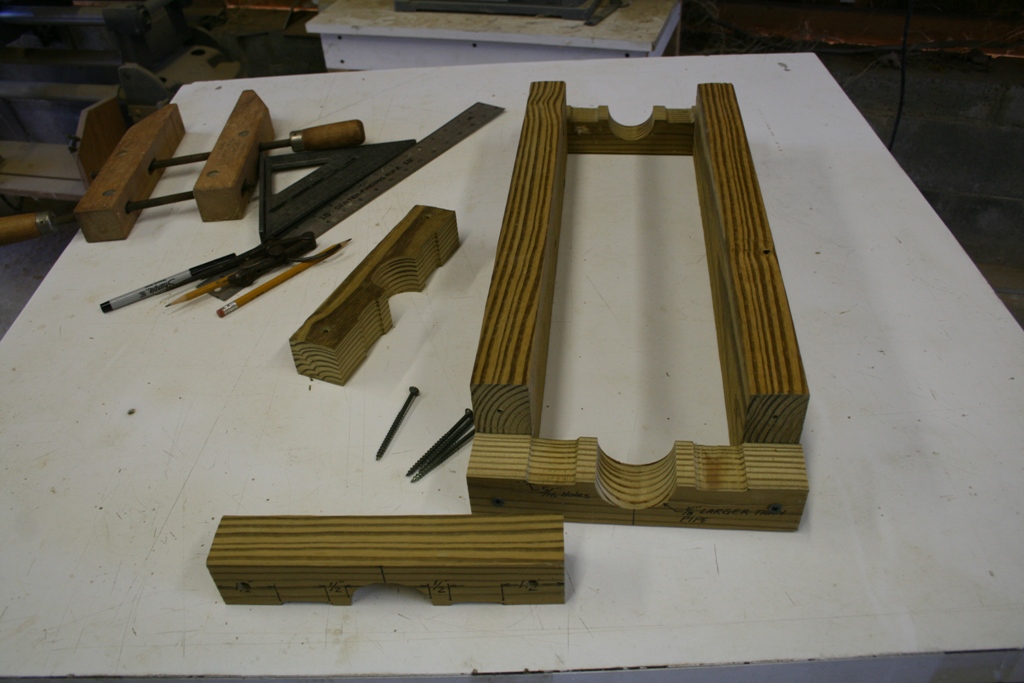
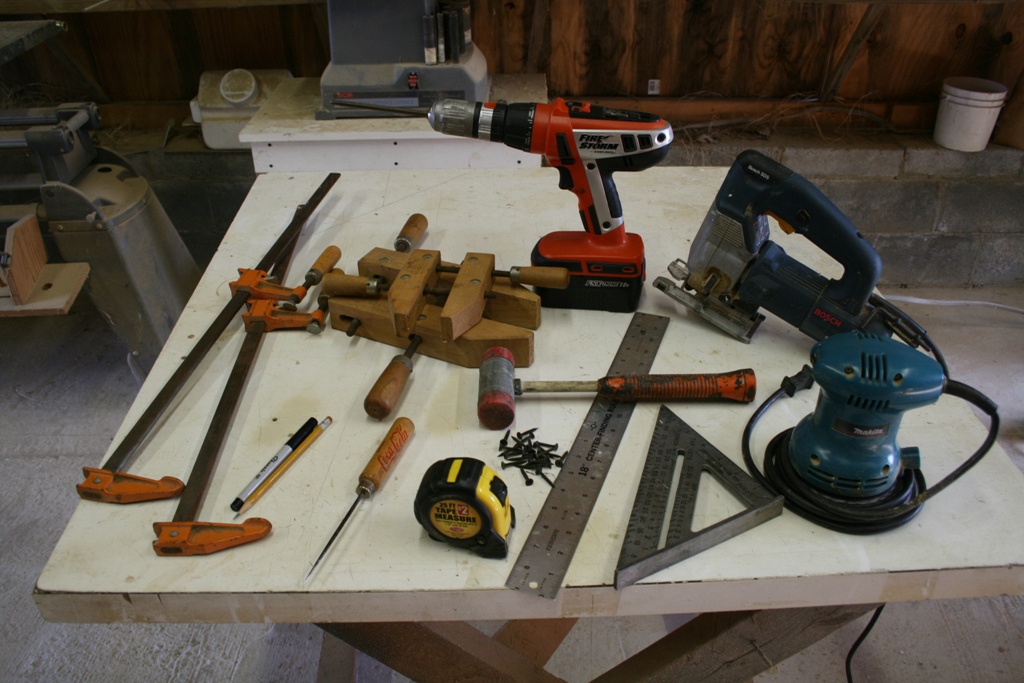 Shown
here are a
few of the basic tools that I used to build this T-14. There are of course
more, but this should give you an idea of what is needed.
Shown
here are a
few of the basic tools that I used to build this T-14. There are of course
more, but this should give you an idea of what is needed.
Some of the tools are standard in any workshop or garage. The picture shows most of them, but there are a few more that will make life a whole lot easier or are a downright necessity in any woodshop.
-A stable flat work surface. Shown in the photo are old tables from a restaurant that were given to me when they remodeled. I built a sturdy frame under them with casters one them and they work great. (I even draw plans for BB houses on mine). If you don't have a shop bench/table, then slip a piece of 3/4" thick plywood over a couple of saw horses.
-And of course a table saw will go a long way in making things a whole lot easier.
-A Band Saw, not necessary, but they make easy work of small or curved pieces.
-A Jig Saw is a must have. A little harder to work with on the very small pieces, but required for some parts.
-Wood Clamps. There's an old woodworking adage that states, "you can never have enough wood clamps". How true that is. I may have a bunch, but I've had times when I could use even more. If you work alone a lot like I do, a variety of wood clamps will come in very handy.
-A soft faced (rubber) Mallet/Dead Blow. They work great to 'urge' some pieces in place without damaging the surfaces of the wood.
-A stiff scale. I like to use a variety of scales (or rulers if you like) when I work with wood. It makes life a whole lot easier when trying to get those 'exact' dimensions or draw straight lines on my work pieces. One of mine even has cork glued to the back side to prevent slipping.
-A little palm sander comes in handy to get rid of any rough edges or splinters. A block of wood with sand paper wrapped around it works equally well. Also, if you have curves, sandpaper wrapped around a piece of thick polystyrene foam works great to 'soften' the edges.
-The Ice Pick. I have a bunch of these of different sizes. I make them on a grinder from old screw drivers or screw a long decking screw into the end of a cut off broom handle and then grind the head off to a fine point. I use them to punch small center marks for screws such as in the hinges or anywhere else that a puncture mark is required. Makes starting some kinds of screws much easier.
-A good measuring tape. One that clips to your belt or pocket (although I think they all do that now).
-A compass, speed square, lots of pencils and marking tools and yes, a very 'sharp' cutting instrument or two. There are a number of varieties on the market. I use the utility type that folds up and clips to my pocket and if the blade ever gets dull, I simply change out to a new blade.
-A long driver to fit your drill. In this case you will be reaching thru the house to screw it to the pole and the drill just won't fit in far enough.
For the most part, most folks will have a variety of these tools around their shops and can fit them to their needs.
Please Note:
In case you've visited this page before, since the original creation of this web page, I've made a change in the entrance holes for this house. I now make round 2" holes in my front doors and you'll see why a little further down the page. I believe the change is for the better and have eliminated much of the original rectangular entrance hole stuff.
So, with all that said, let's build a T-14.
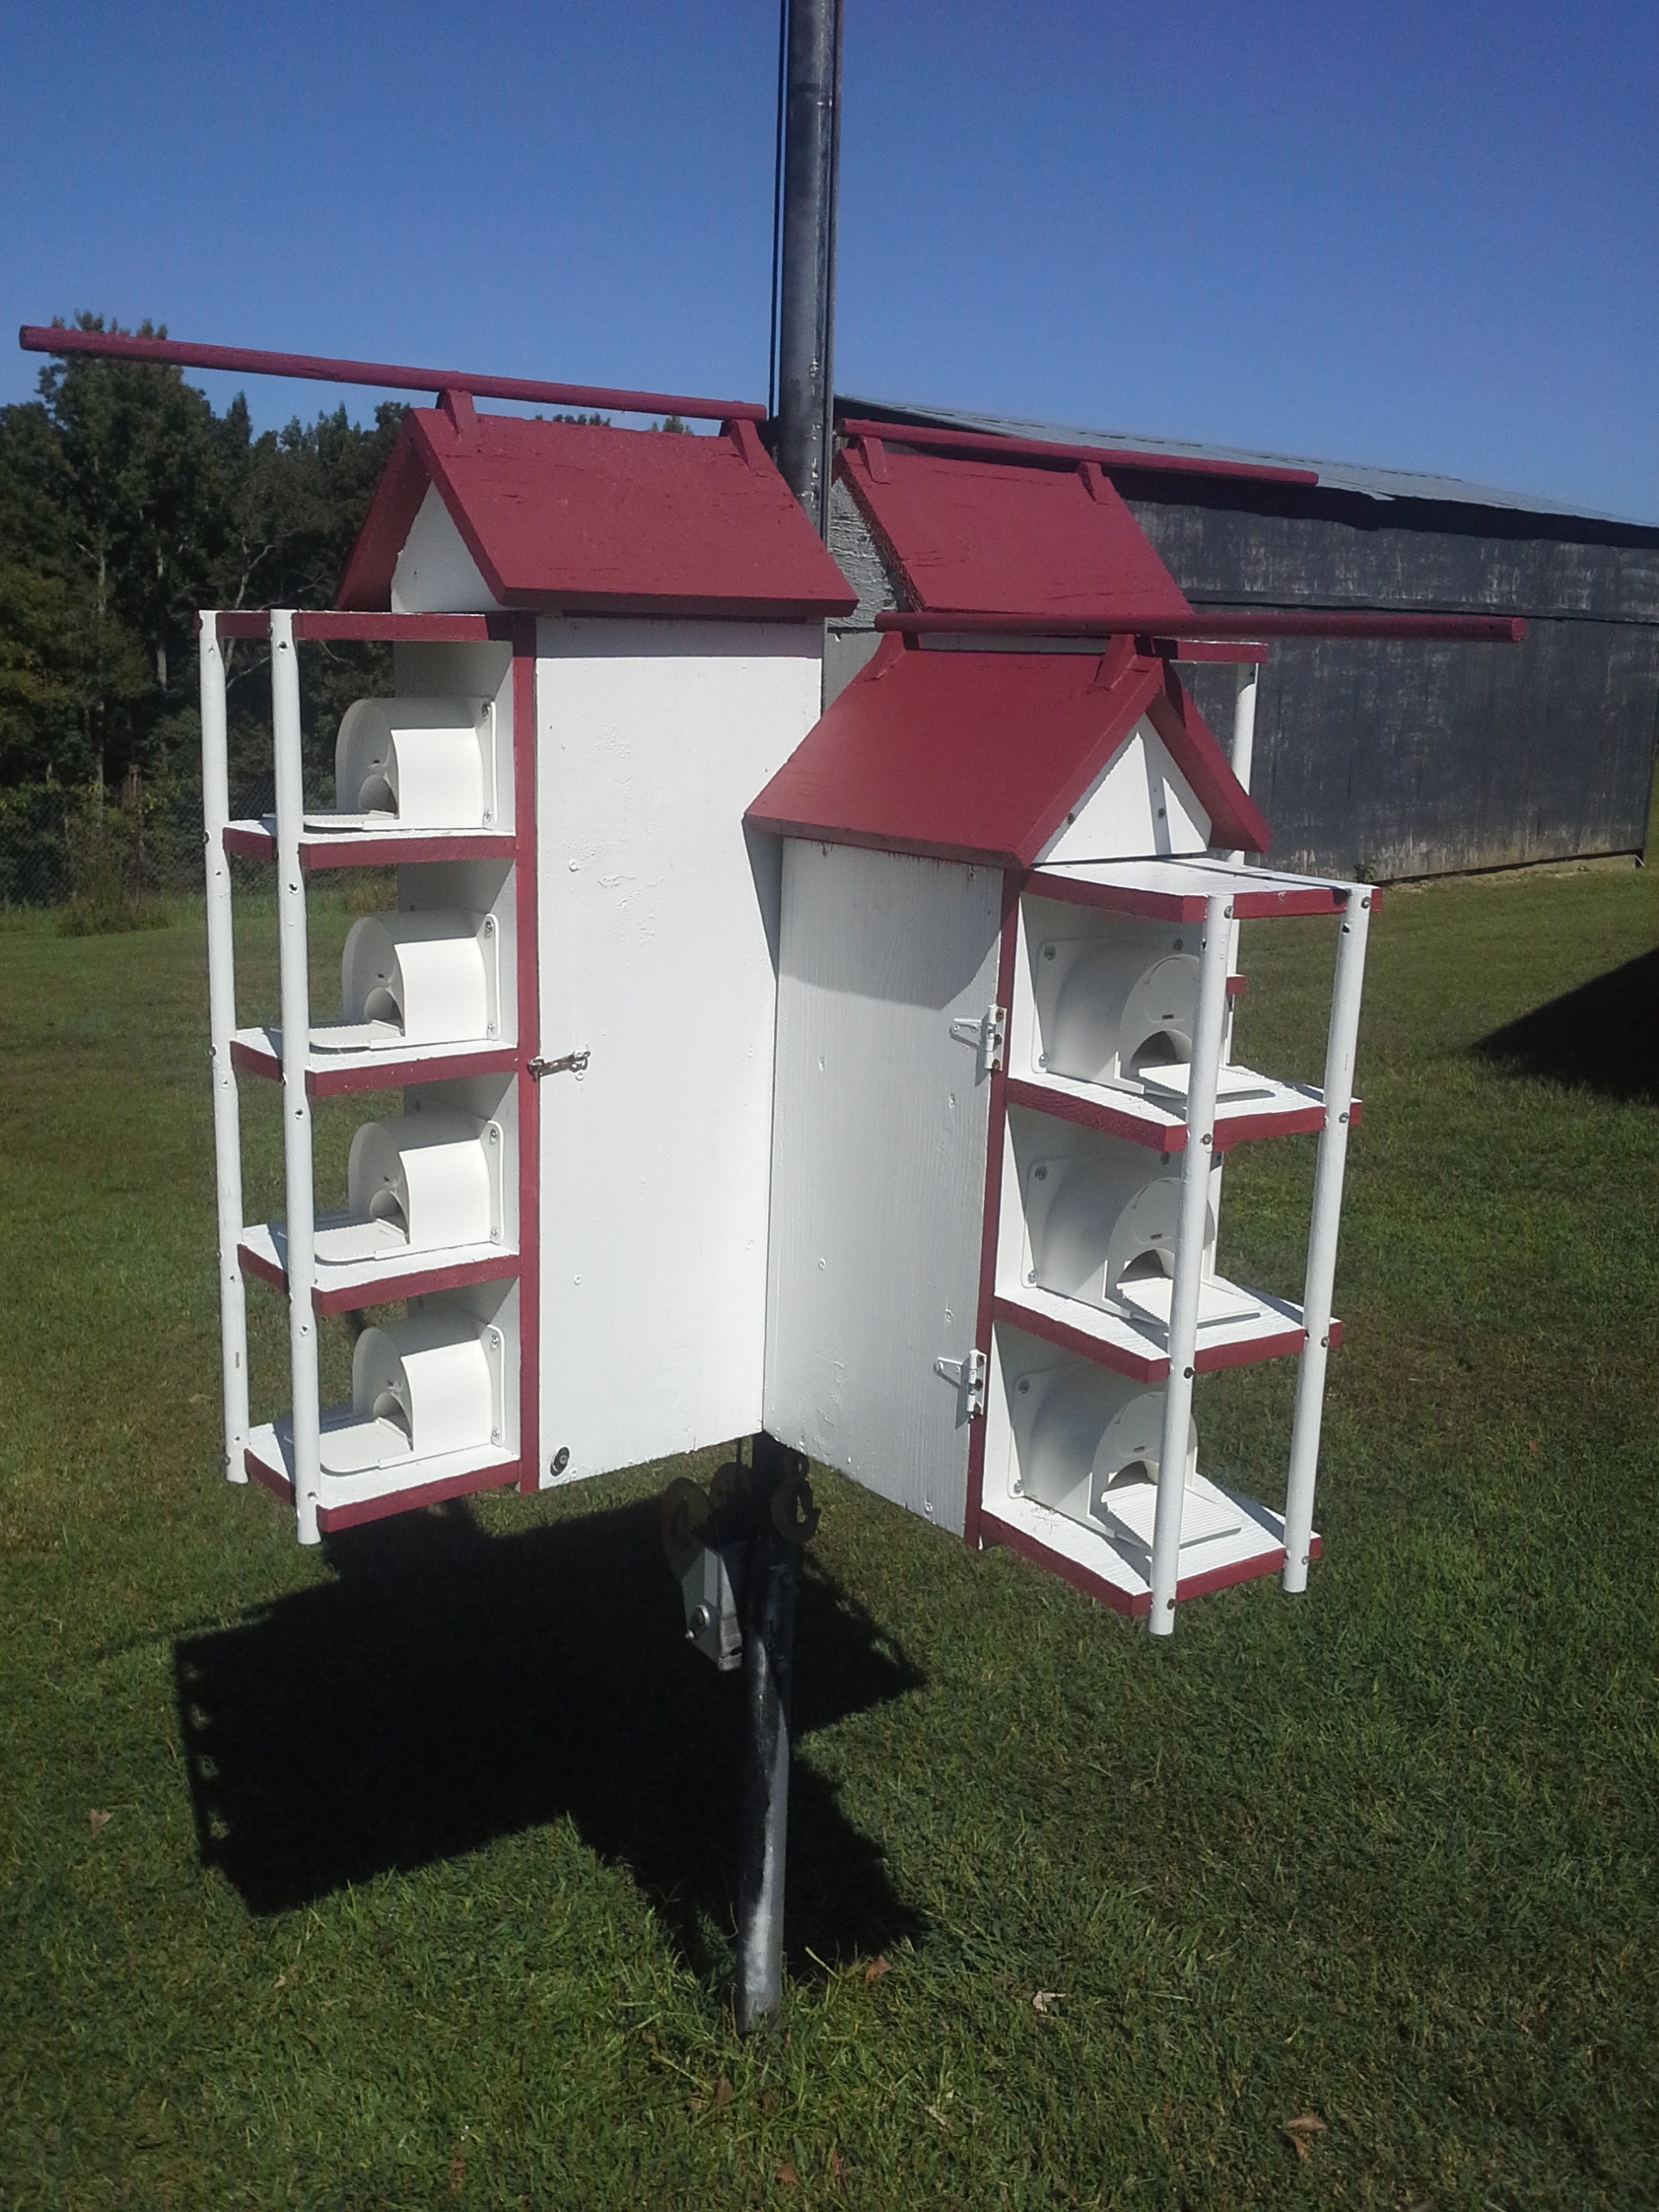
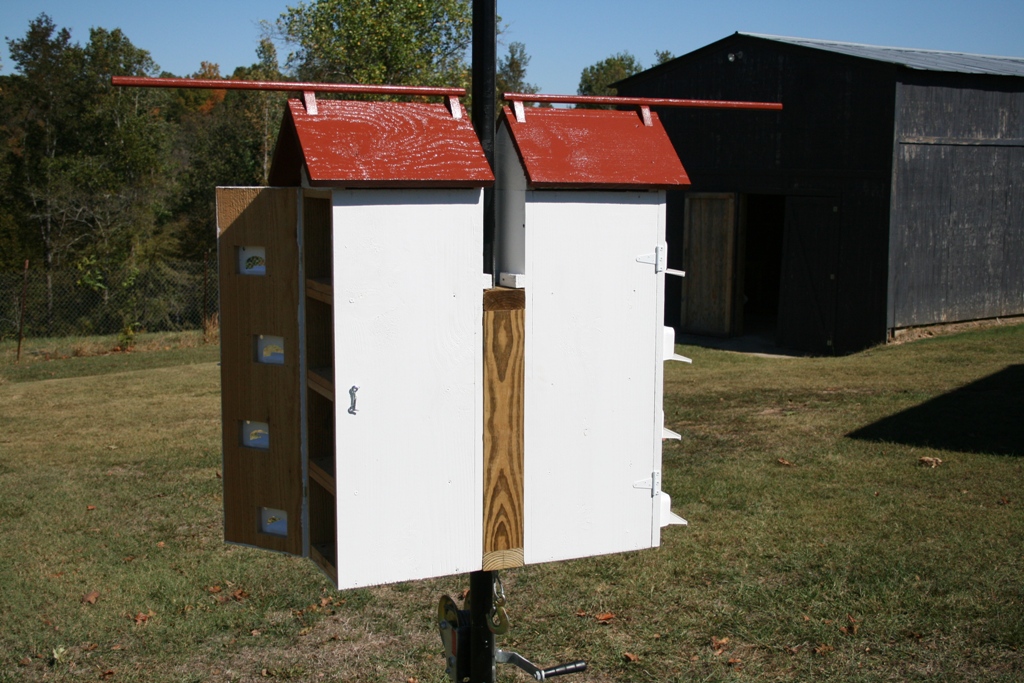
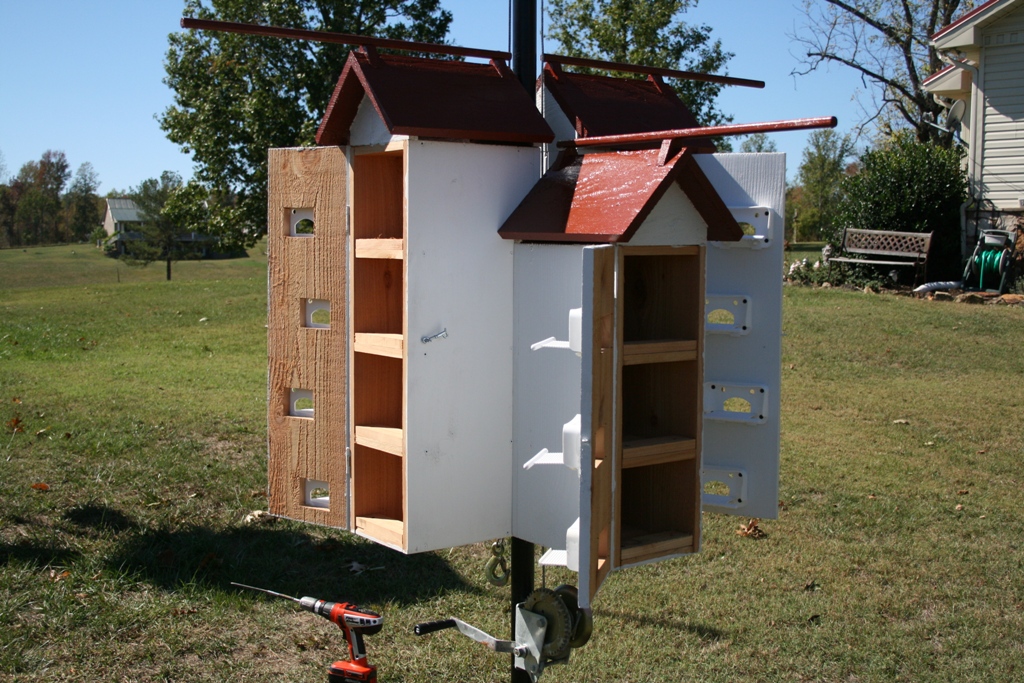
 As you notice in the
opening photo at the top of this page, the T-14 is a 4 sectioned house, having two different height
sections. Two have 3 compartments and two have 4 compartments. This
allows you to put all 4 of them close together in a cluster on a single pole. Hence,
from this point on, they will be called the 'short' and 'tall' boxes, respectively.
As you notice in the
opening photo at the top of this page, the T-14 is a 4 sectioned house, having two different height
sections. Two have 3 compartments and two have 4 compartments. This
allows you to put all 4 of them close together in a cluster on a single pole. Hence,
from this point on, they will be called the 'short' and 'tall' boxes, respectively.
The dimensions for the sides for the 'short' boxes are 11 1/4" wide x 22 1/2" tall. (4 ea are required).
The dimensions for the sides for the 'tall' boxes are 11 1/4" wide x 29 3/4" tall. (4 ea are required).
The dimensions for the backs and doors for the short boxes are the same, 8 1/2" wide x 22 1/2" tall. (2 ea required).
And finally, the dimensions for the backs and doors for the tall boxes are 8 1/2" wide x 29 3/4" tall. (2 ea required).
Of the pieces cut for the doors and backs, pick the best 2 pieces for each size to be used for the doors since the doors will be the parts that are seen.
You will also need to cut out the individual compartment floors. They are 7" wide x 11 1/8" deep. (A total of 18 will be required).
One note here. Good woodworking practices dictate always drilling pilot holes for screws, especially if they are close to an edge. This prevents splitting of the wood plus it helps give the screws a good lead in direction, keeping them straight.
To begin, start with a short section. Take 2 sides and a back and stand them in position against one another, the side edges going against the back. This is where the clamps will come in handy.
Note: Western Cedar usually comes with one rough side and one planed side. The un-planed side should ALWAYS be directed towards the birds. The rough side allows them to get good 'gription' with their claws. If you build from pine or some other wood that is planed on both sides, it might help to actually use some very 'course' grit sandpaper and rough up the inside surfaces a little.
Now, mark the back where you want to put the screws. I used 3 along each side of the short boxes and 4 on the tall boxes. Pre-drill your holes and then screw the back onto each side with 1 5/8" decking screws.
Next, stand up the box. Take one of the compartment floors and slide it into the bottom of the box, rough side up. Tap in place. Pre-drill the sides and then put two screws into each edge of the floors. Turn the box upside down and repeat for the top.
Next, turn the box back upright and each individual floor needs to be added.
Note: Since my compartments are 6 1/2" high, I cut a couple plywood spacers that were 6 1/2" wide and stood them on either side of the box (inside) and then set the floor on them. This gave me the same distance every time, and each time I added a floor, I simply moved the spacers up to the next floor.
Each time you add a floor, use a speed square to draw lines on the outside of the sides indicating the center of the floor edge. Pre-drill and put in screws. Repeat for each floor.
 Next,
I added what I call 'nest keepers'. These are nothing more than 2 1/2" wide blocks
with a 45 degree bevel (angle) cut along one side.
They set in the front of each compartment with the beveled edge towards the back
of the compartment and are used to keep nesting materials to the back of the compartment preventing the material from
blocking the front entrance hole. 14 are needed and can be simply screwed
in place with 1" sheet rock screws. No pre-drilling required for these.
You should now have what is shown in the picture.
Next,
I added what I call 'nest keepers'. These are nothing more than 2 1/2" wide blocks
with a 45 degree bevel (angle) cut along one side.
They set in the front of each compartment with the beveled edge towards the back
of the compartment and are used to keep nesting materials to the back of the compartment preventing the material from
blocking the front entrance hole. 14 are needed and can be simply screwed
in place with 1" sheet rock screws. No pre-drilling required for these.
You should now have what is shown in the picture.
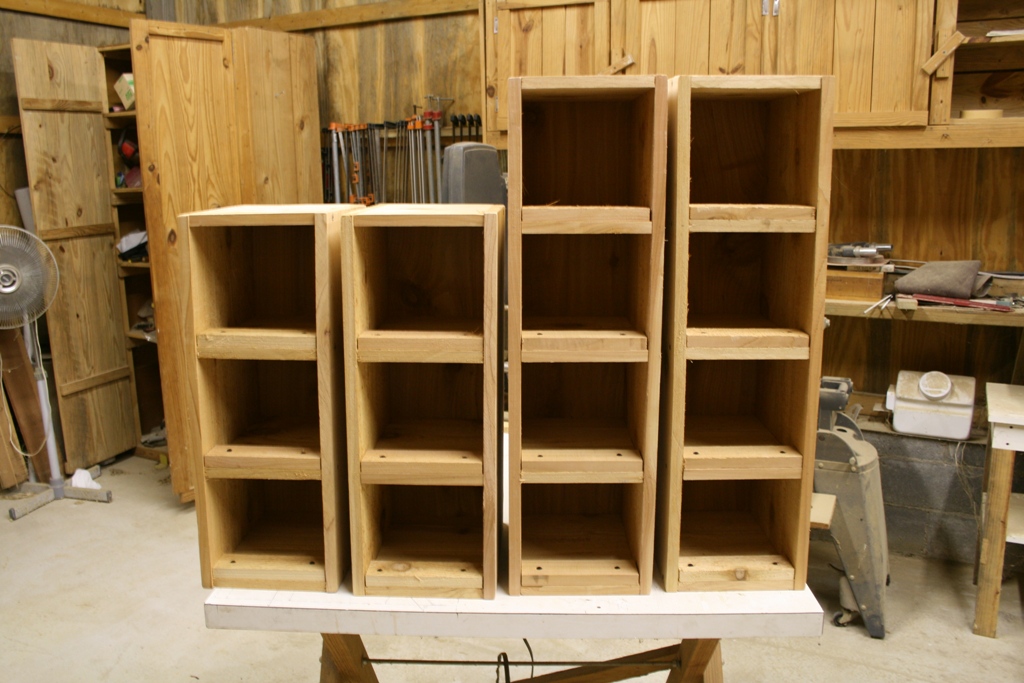 When
done you should have 4 boxes with all the floors and keepers in them.
When
done you should have 4 boxes with all the floors and keepers in them.
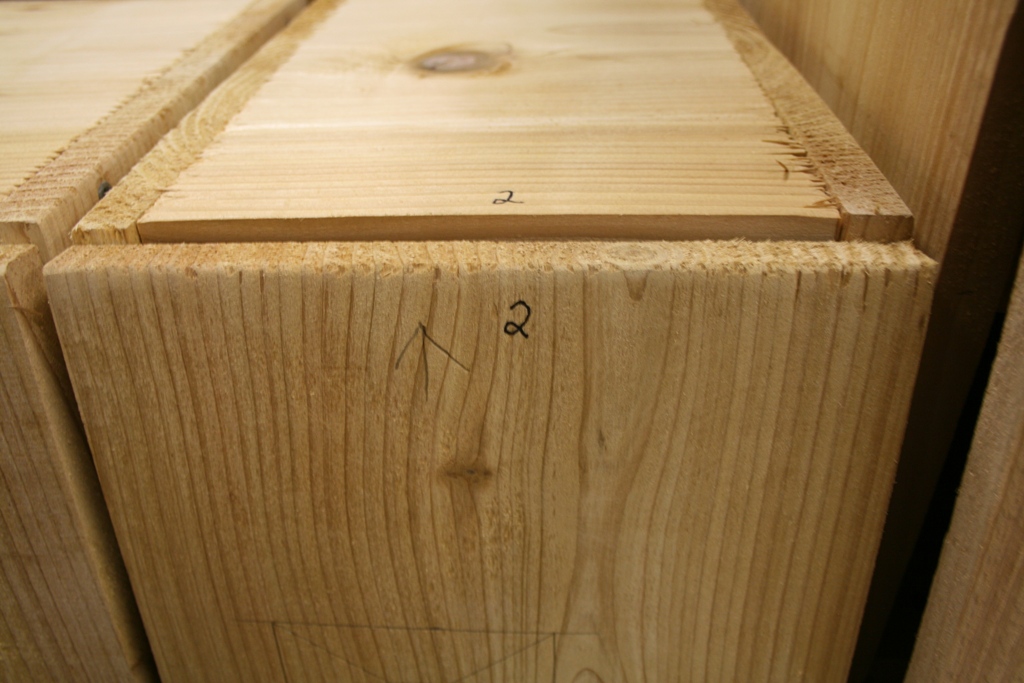 Next we'll add the doors. I match my doors to my boxes. Because this
is not a piece of furniture, but instead a birdhouse, there might be some slight
differences between boxes, so just for that reason, I match the doors to the
boxes before I do any hole cutting....then by adding a number at the top of each
door and box, I'm always sure the correct door will go on the correct box in the
correct orientation. Now, on the doors only, cut 1/8" off the end of
each. This will allow clearance with the soffit later in the build.
Next we'll add the doors. I match my doors to my boxes. Because this
is not a piece of furniture, but instead a birdhouse, there might be some slight
differences between boxes, so just for that reason, I match the doors to the
boxes before I do any hole cutting....then by adding a number at the top of each
door and box, I'm always sure the correct door will go on the correct box in the
correct orientation. Now, on the doors only, cut 1/8" off the end of
each. This will allow clearance with the soffit later in the build.
Update note here:
 OK, here's where
(and why) I made the change to the original page.
OK, here's where
(and why) I made the change to the original page.
Everybody that's read my page knows that European Starlings are a big problem in my area and thus, any martin housing requires some sort of SREH for entrances. Originally I used a face-mounted insert that screwed directly to the front of the door (as shown in some of the following photos) but those inserts required a rectangular cutout in the door for them to work.
However; being one that likes to try new things, since the original creation of this page, I tried a couple of molded tunnels on my houses and found that my martins actually preferred these tunnels to the face mounted inserts. To test them, I put 4 of them on each of my houses and to my surprise, they were the first ones chosen over the face-mounted version. So... I have since changed all my face mounted inserts (and this web page) over to tunnel inserts, as seen here. (I'm not about to argue with my martins). The tunnels apparently make the compartment even deeper, and the martins seem to like that even more.
I've come to love these things and here
are a couple of reasons why.
-they come
in a couple of different entrance hole options.
-they are
molded to exact specifications and every one of them is the same size and, since
I use strictly SREH entrances in my entire colony, I
don't have to worry about whether or not the entrance size is correct or not.
-they are
easily screwed onto the front of the door and if for any reason another hole
style insert is desired, they can simply be 'unscrewed' and a different one screwed in
its place.
-Or, if you
don't have a starling issue in your area, you could simply use the round holes
all by themselves.
-they are relatively inexpensive and are made to last a long time before needing replacing.
-they
actually help in deterring owls because the owls simply can't see into the nest
when they are used.
-and
finally, the martins have no problems using them and that is a biggie...
If you are interested in using these inserts, they are the UTRS version and can be found here at S&K Mfg
 Unlike the original
face-mounted inserts, these tunnel
inserts, because of their design, allow for the use of 2" diameter round holes, much easier,
cleaner and faster than rectangular
holes in the original design.
Unlike the original
face-mounted inserts, these tunnel
inserts, because of their design, allow for the use of 2" diameter round holes, much easier,
cleaner and faster than rectangular
holes in the original design.
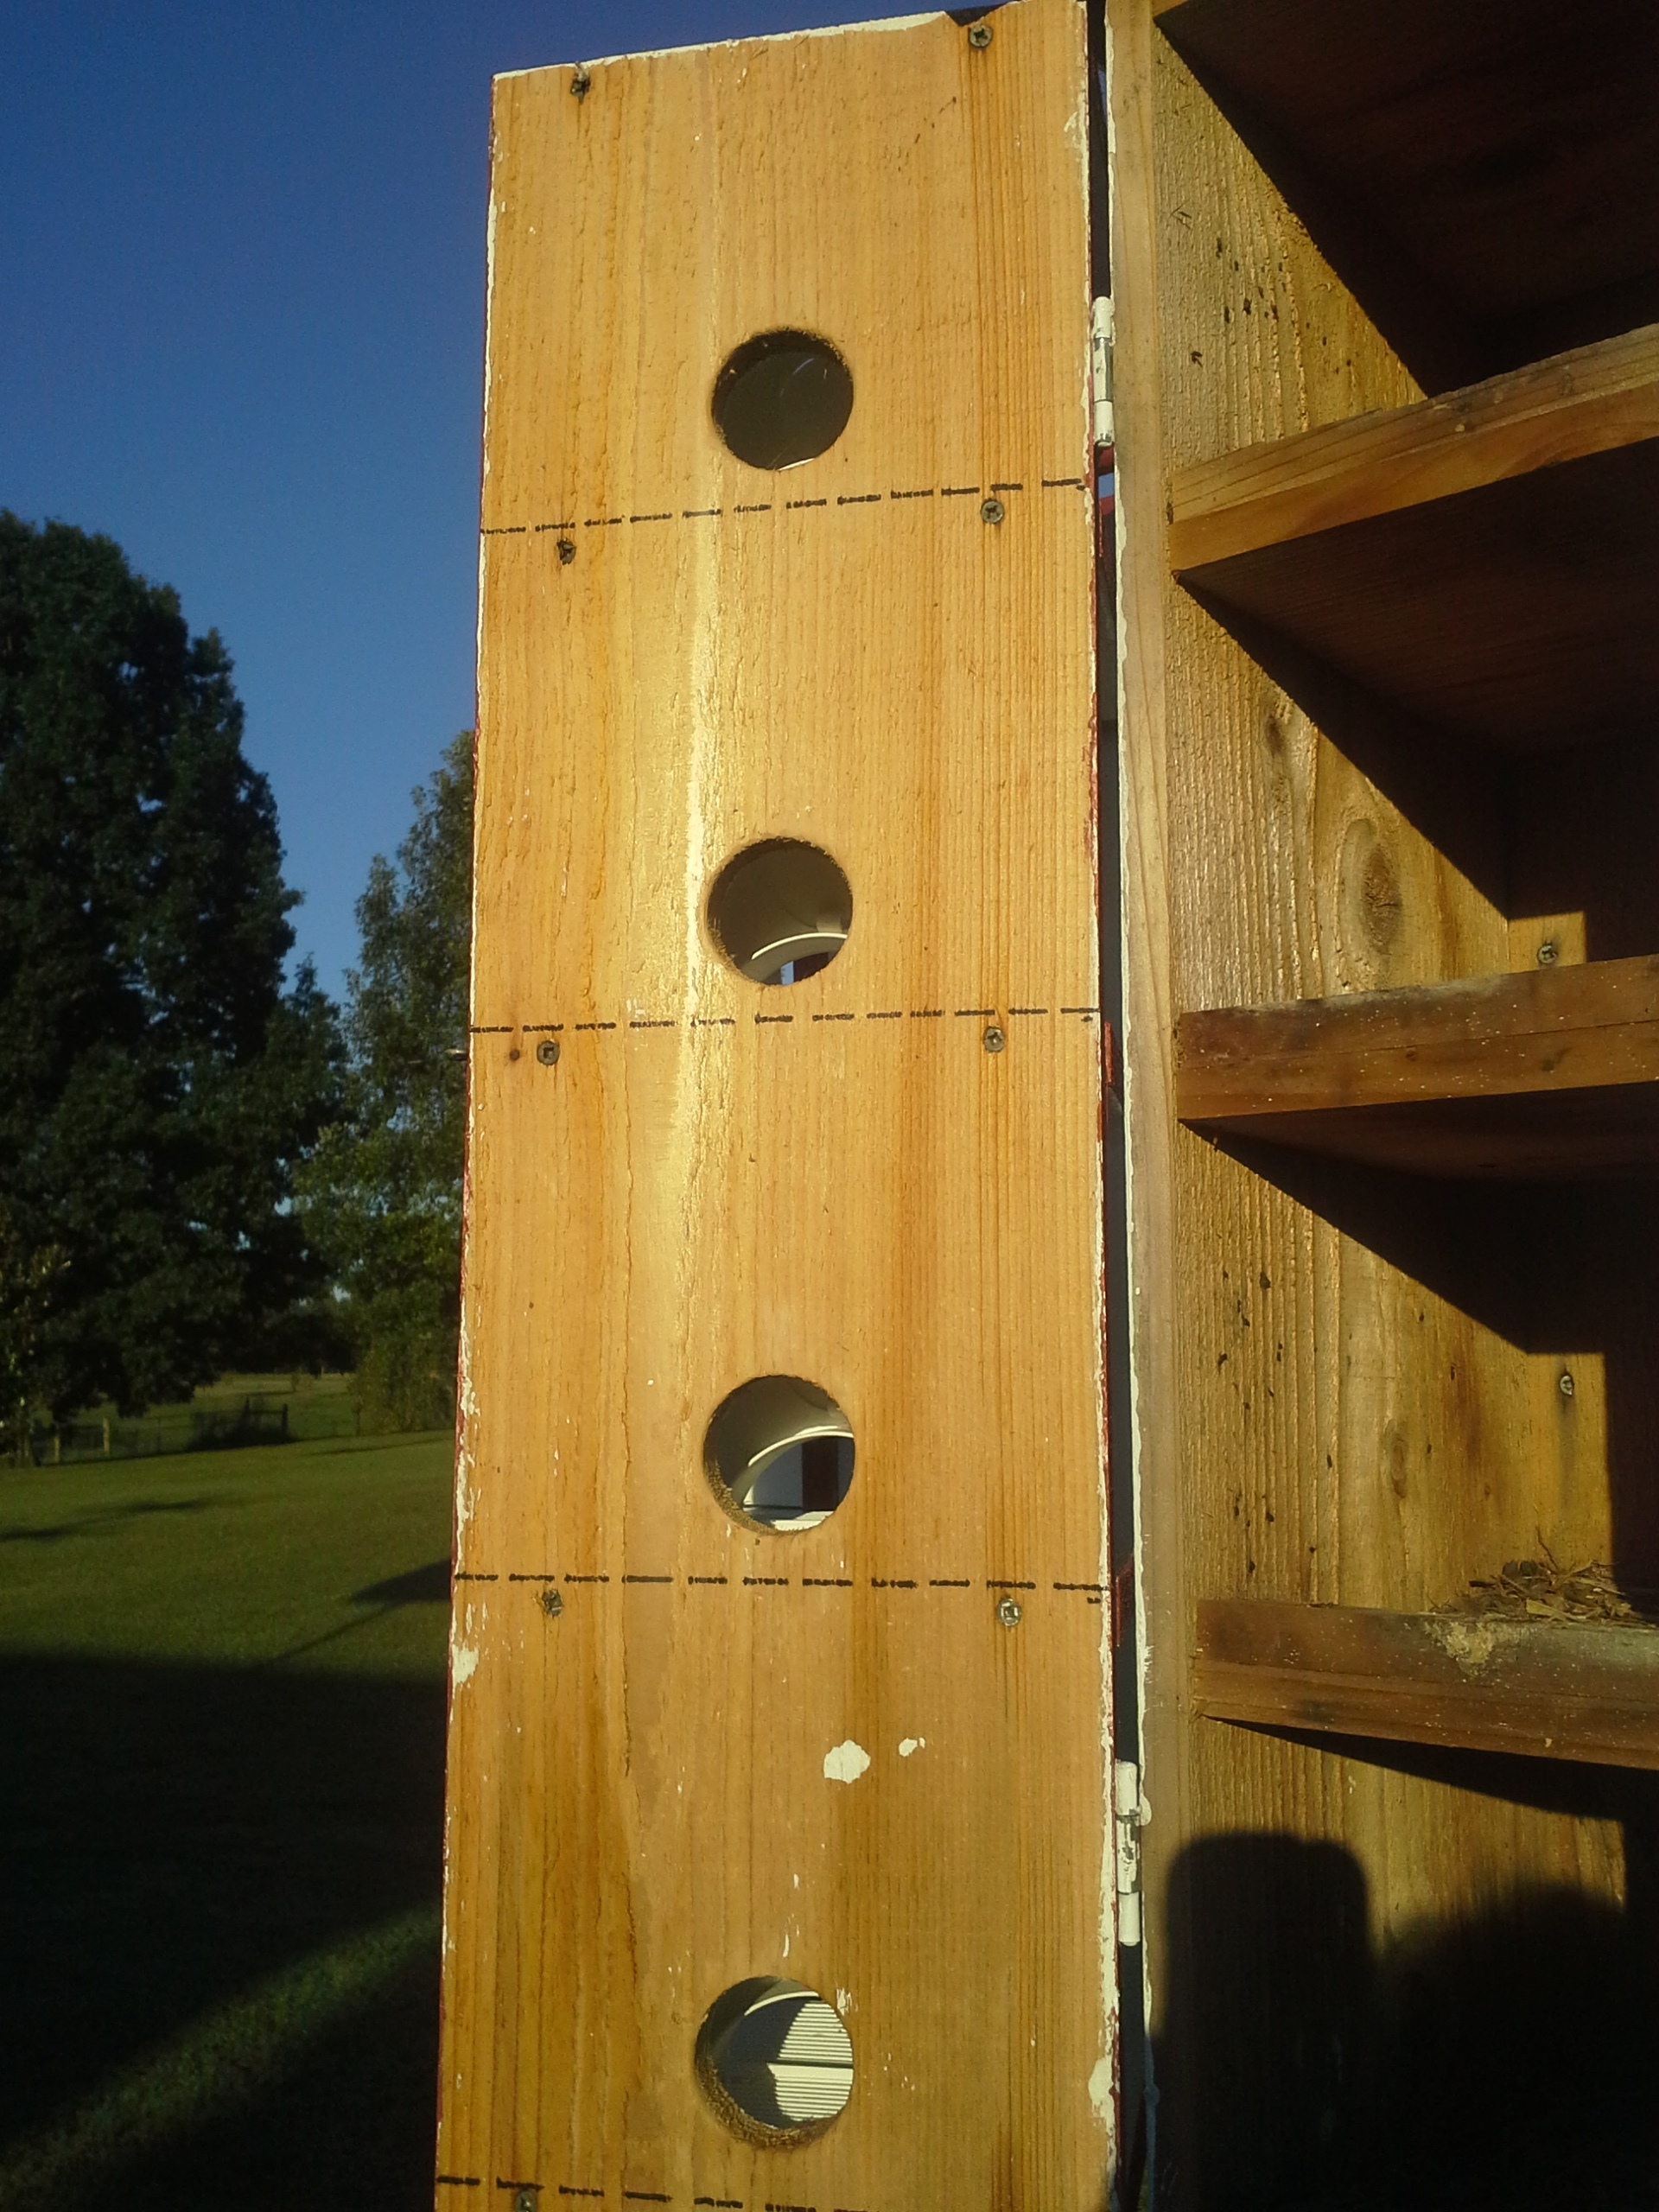
The holes are centered, left to right in the door and the bottom of the hole is 1/2" up from the top of the nest keeper (indicated by the dotted lines in the photo). To get the top of your nest keepers, simply set a door up against face of a box and slide it to the left a little. Then simply mark the top of the nest keepers on the door and then transfer that line across the door.
The top of the outside owl guard porch is also at the same level as the dotted line, or 1/2" below the bottom of the round hole.
When your drilling out your 2" holes, drill 2 screw clearance holes 3/8" below each of the dotted lines approx where shown in the photo and one last pair at the very top of the door. These will be used to mount the front porches/owl guards.
Now as stated above...that's not to say you have to use these tunnels. IF...starlings are not an issue where you live and because 2" holes are now in the door instead of rectangular holes, the house can simply be used with the 2" entrance holes just as it was originally intended to be. And...should starlings ever become a problem, it's just a matter of obtaining the tunnel entrances, setting them in place on the owl guard porches and screwing them in place. Simple as that.
Adding the doors:
 Now
lay the box and matching door on it's side with the side you want the hinge on
facing up.
Now
lay the box and matching door on it's side with the side you want the hinge on
facing up.
Next measure down 3" (or whatever distance you'd like your hinges to be at) from the top of the door. This line is the top of your hinge. Likewise, opposite for the bottom hinge.
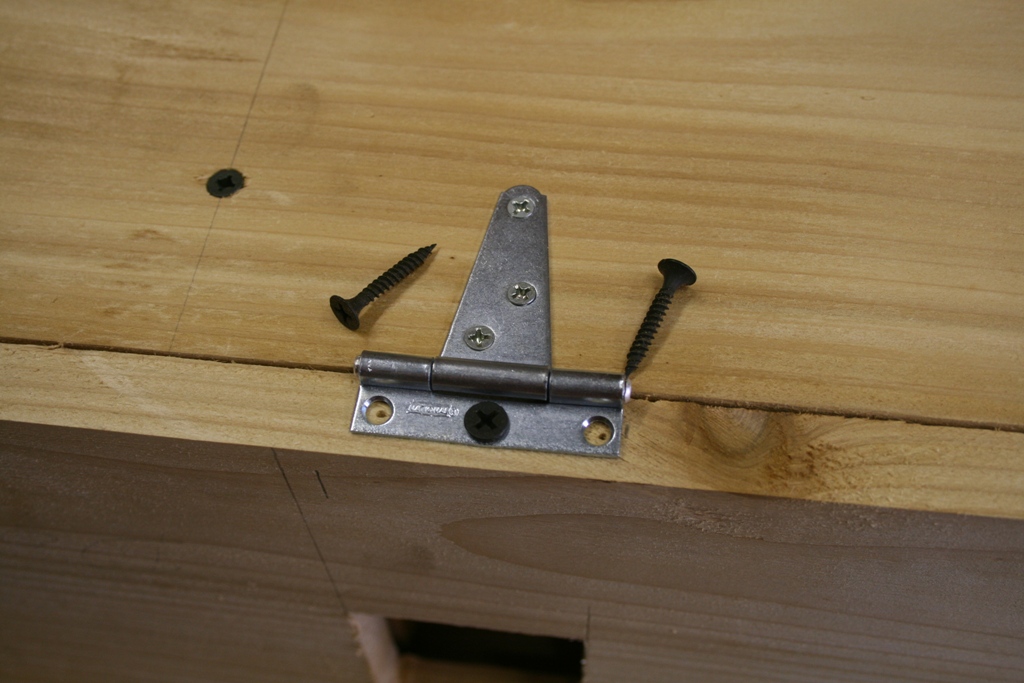
Now, clamp the door in place with the bottom of the box and door flush with each other and position a hinge as shown in the picture.
Note: I replace the screws that come with the hinges with some 1" long sheet rock screws. I just don't feel that the original screws would have enough strength to hold the door if for some reason a wind were to suddenly take hold of it. However, the 1" long sheetrock screws have plenty of holding power. Notice the 'puncture' holes made by my ice pick! If you feel that the original screws would do the trick, then have at it. It's your house...
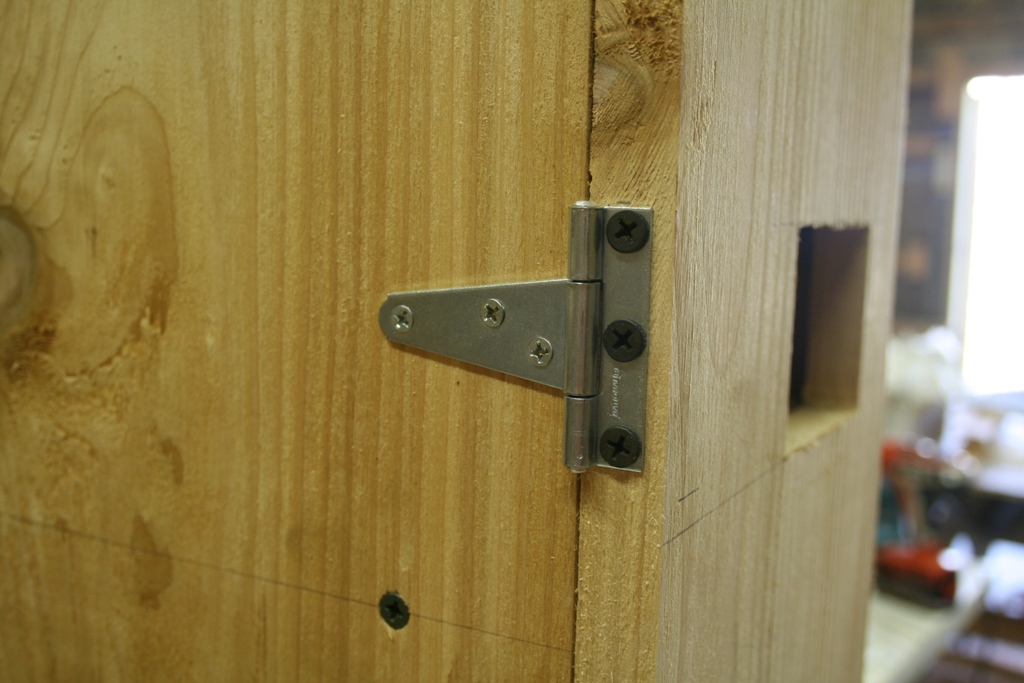 The
finished look...
The
finished look...
 I
like to use these little self locking clasps to keep my doors shut. That
way, I feel the doors aren't going to pop open because the clasp mysteriously
opened... Call me crazy, but they work. If you have a better idea,
then again, have at it.
I
like to use these little self locking clasps to keep my doors shut. That
way, I feel the doors aren't going to pop open because the clasp mysteriously
opened... Call me crazy, but they work. If you have a better idea,
then again, have at it.
 Double
check everything and make sure it works...
Double
check everything and make sure it works...
The roof
 Now
we can build the roof.
Now
we can build the roof.
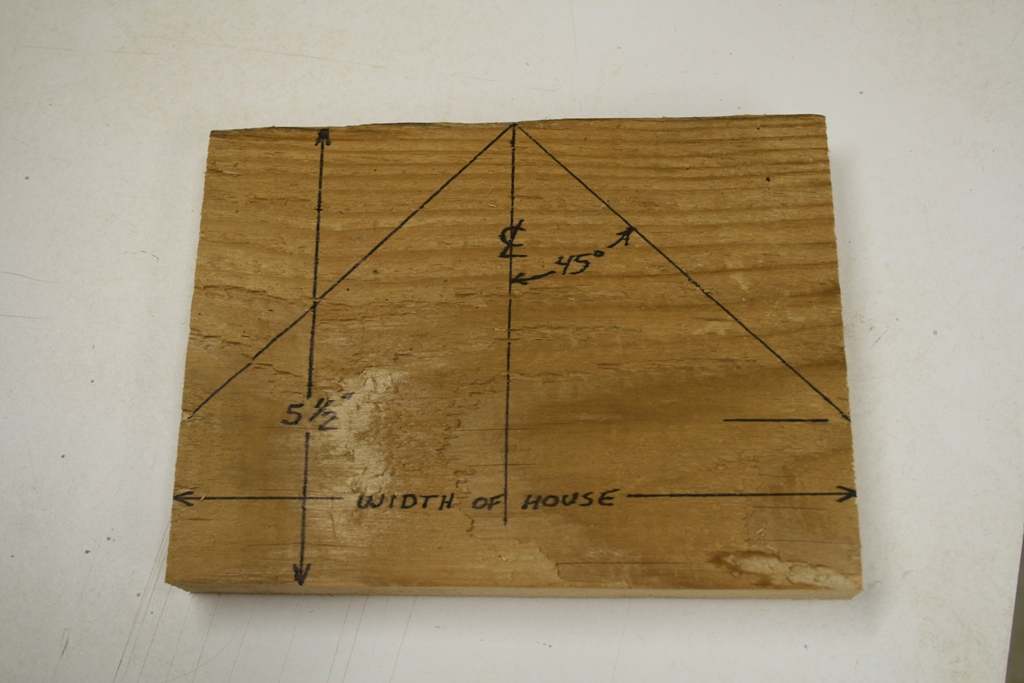
Cut 12 boards to the dimensions given in the photo and then add the roof marks as shown. Then, cut off the angled sides. DO NOT throw those little corner pieces away. They will be used later.
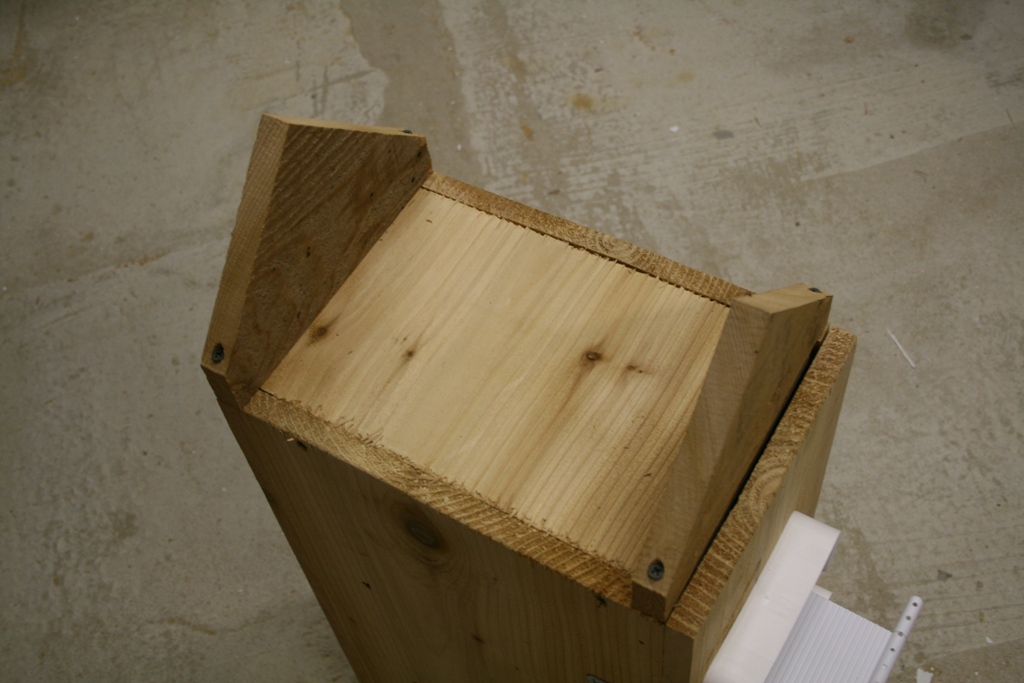 Next,
drill a hole downward in the angled edge of each piece. Then, simply screw
them to the top of the boxes as shown using the 2 1/2" screws.
Next,
drill a hole downward in the angled edge of each piece. Then, simply screw
them to the top of the boxes as shown using the 2 1/2" screws.
Note: The way I show the mounting of these pieces sets them back one board thickness from the face of the door. The 4 extras will be added to the front face of these soffits (after the roof has been added) so that the face of your house will be even with the face of the door. The reason for doing it this way, to make sure your door opens without interfering with the soffit. If there is interference, then shorten the soffit a little. They are mounted by slipping them up tight under the roof and then screwing them right onto the face of these first pieces.
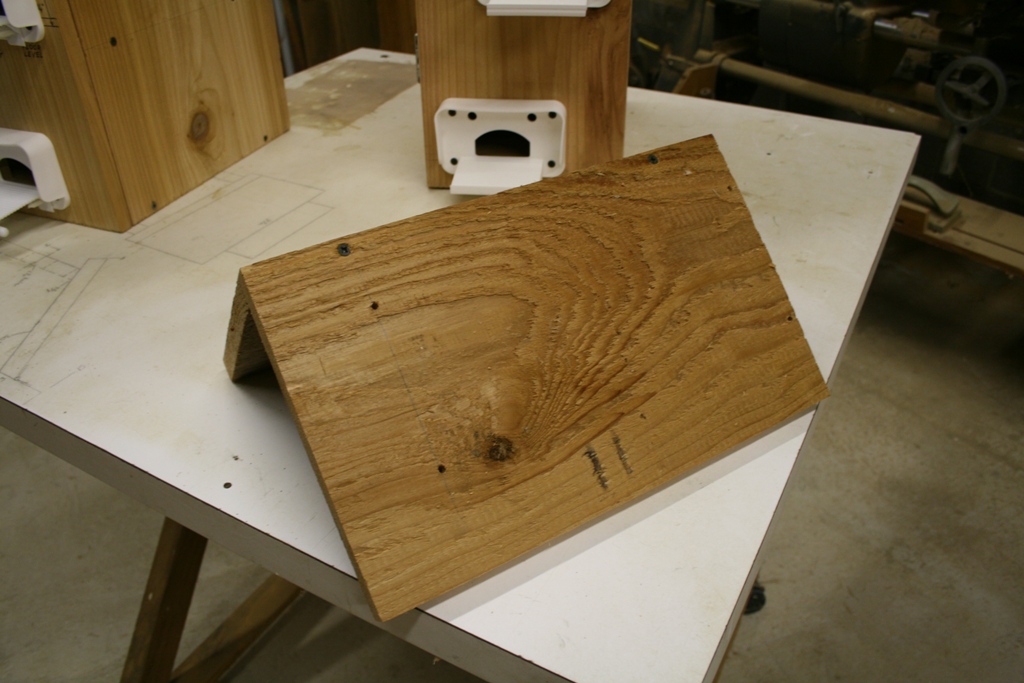
 Now
for the roof. Cut two boards 8 1/2" wide by 14" long (or as long
as you want your roof to be), then screw one onto
the edge of the other. For the aesthetics of the roof, I decided to put
the rough side out. You do as you wish with yours. If you don't like
the way it looks, then simply unscrew them, turn them around and screw them back
together.
Now
for the roof. Cut two boards 8 1/2" wide by 14" long (or as long
as you want your roof to be), then screw one onto
the edge of the other. For the aesthetics of the roof, I decided to put
the rough side out. You do as you wish with yours. If you don't like
the way it looks, then simply unscrew them, turn them around and screw them back
together.
Then, take the assembly to the table saw and run it thru the saw set at 8 1/4". Flip it for the other side and run it thru again. This will give both sides of the roof the same dimensions. Why 8 1/4"? Because any longer and the door would hit the eave of the roof when fully opened.
 Now
place the roof on the box, flush with the back of the box, mark and drill for the holes to mount it.
Now
place the roof on the box, flush with the back of the box, mark and drill for the holes to mount it.
Yes, I know there's about an inch opening under the roof eves. I like the idea of air flowing thru the attic of the house. If you don't like the opening to be wide open because of other small birds or insects such as 'mud-dobbers', (if you live in the south), then two things can be done. I fashioned some window screen to fill in the gap still allowing for air flow, or if you prefer, another piece of wood can be added to fill in the gap before you add the roof, closing it off period. Your choice.
Now for the front porches and owl guards.
 The first thing you'll need to do is make some 3/4" dowels (or buy them if
you can't make them).
The first thing you'll need to do is make some 3/4" dowels (or buy them if
you can't make them).
If you plan to make some, (router table pretty much required) cut some long 3/4" square strips of wood that are the same length as the front doors. Then set up the router table, add a 3/8" round over bit with a bearing and then simple run the strips thru, turning them 90 degrees each time. When you're done, you'll have some long 3/4" diameter dowels, or in this case, owl guards. Make (or buy) 4 extras, you'll need them later.
Note: Since I have to make a setup with the router, I always make a few extras, just in case.
 Next
we have to make the front porches. What I've done is designed the owl
guards right into the front porch using half holes.
Next
we have to make the front porches. What I've done is designed the owl
guards right into the front porch using half holes.
First cut 14 boards as shown on the left except make them 7" wide instead of the 6" shown. The tunnels are a little longer and require that extra inch.
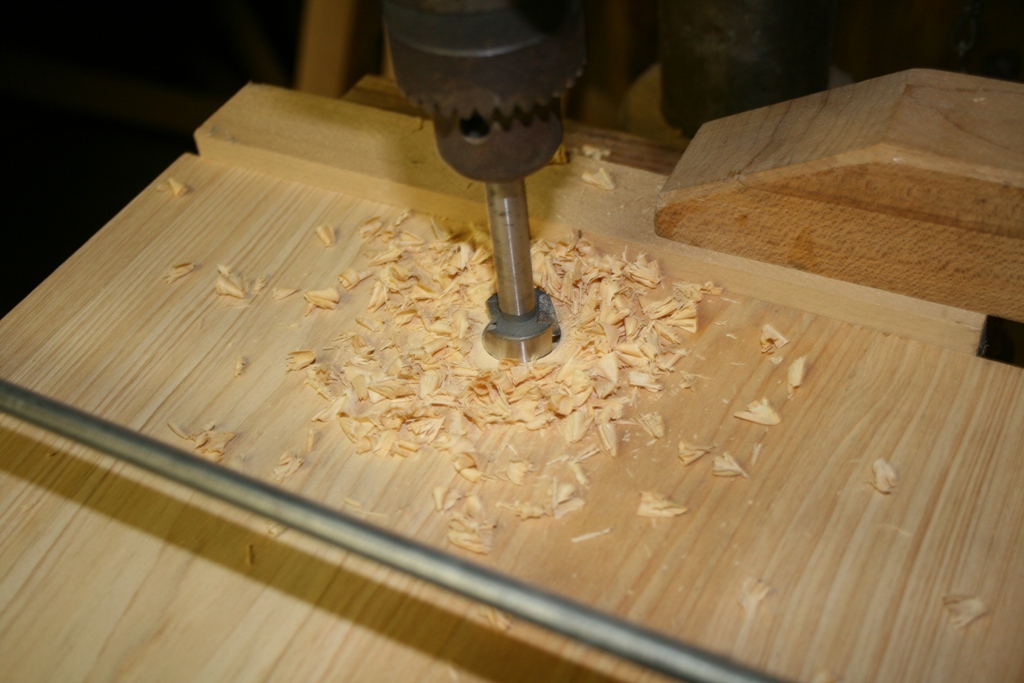 Next,
clamp 2 boards together, edge to edge. Mark the 5-1/2" location on
the boards where they meet, centered about the boards. Then simply drill 2
- 3/4" holes right on those marks.
Next,
clamp 2 boards together, edge to edge. Mark the 5-1/2" location on
the boards where they meet, centered about the boards. Then simply drill 2
- 3/4" holes right on those marks.
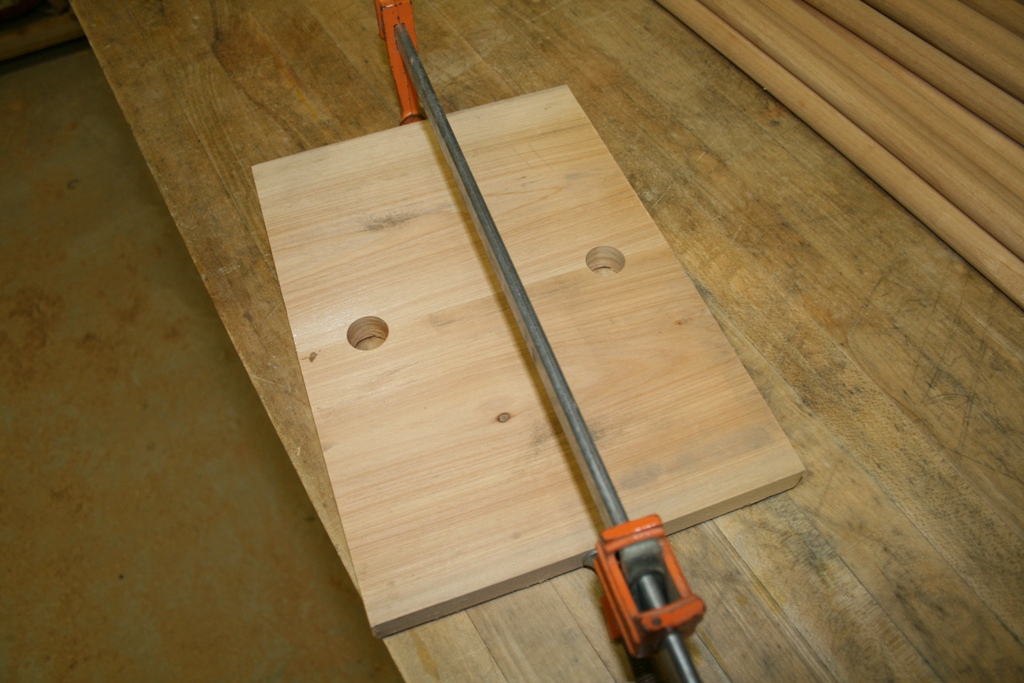 When
you get done, take the boards out of the clamps and what you have is 2 half
holes in each board, perfectly matched with each other. If you want to add
the chamfer on the two outer corners, then have at it. If not, then that's
fine, too.
When
you get done, take the boards out of the clamps and what you have is 2 half
holes in each board, perfectly matched with each other. If you want to add
the chamfer on the two outer corners, then have at it. If not, then that's
fine, too.
Now these porches can be added to the front doors, rough side up, being sure to align the top of them with the top of the nest keepers. (The dotted line in the above photo of my door).
Now simply cut the dowels to the same length as the door, set it in the porch half holes, mark and drill the clearance holes and then simply screw them to the front porches being careful not to over tighten them and split the dowels.
And finally, simply add the tunnel inserts with 3/4" long #8 screws and flat washers (to prevent the screws from passing thru the holes).
Finished? Not quite!
Purple martins love to perch while socializing or just plain sunning themselves.
So with that in mind, let's add some rooftop perches.
 In
the picture I show the components to make a perch to fit on top of your house
roof. These are my ideas. If you want to try something a little
different, then by all means, have at it. Maybe your tastes or imagination
is a little different (or better) than mine.
In
the picture I show the components to make a perch to fit on top of your house
roof. These are my ideas. If you want to try something a little
different, then by all means, have at it. Maybe your tastes or imagination
is a little different (or better) than mine.
Here's where the extra dowels you made (or purchased) come into play.
Now, remember those pieces I told you not to throw away!
Starting in the upper left section of the picture, take one of those pieces, section it in half with a speed square and then cut it in half. Next, set the table saw to 1 3/4" and 'top' the angle off those smaller pieces. Next, and I used my metal ruler for this, mark a 90 degree area that will fit down over the roof. Then, I simply connected the corners giving me the shape you see in the photo. Lastly, drill a screw hole down thru the middle of the piece to mount it to the roof. (A jigsaw will work here, but a band saw/scroll saw really comes in handy here). Now, simply cut away anything that doesn't look like a perch rod support, like the ones shown in the photo, and viola, you have some perch rod supports.
For pictorial explanation, look at the opening photo to see what I'm saying here.
Place 2 of the perch rod supports on the roof, one flush with the back of the box and the other, somewhere towards the front that looks appealing to you. (Mine set right over the front soffit). Set the perch rod in the holders, mark and drill the two screw holes to correlate with the perch rod support holes. Now, all you have to do is set the perch rod on top of them and add these pieces to the roof with 2 1'2" screws, screwing down thru the rod, thru the perch rod support and into the roof.
The mounting frame
 Now,
we have to build the frame to mount the house to the round steel pole.
Most of these houses are built to go on square 4 x 4 wood posts, but I just
don't like wood in this situation. It can warp or twist and it's just too
much trouble to dig it out of the ground and then put a new one in, so I use
round steel pipes for all my poles.
Now,
we have to build the frame to mount the house to the round steel pole.
Most of these houses are built to go on square 4 x 4 wood posts, but I just
don't like wood in this situation. It can warp or twist and it's just too
much trouble to dig it out of the ground and then put a new one in, so I use
round steel pipes for all my poles.
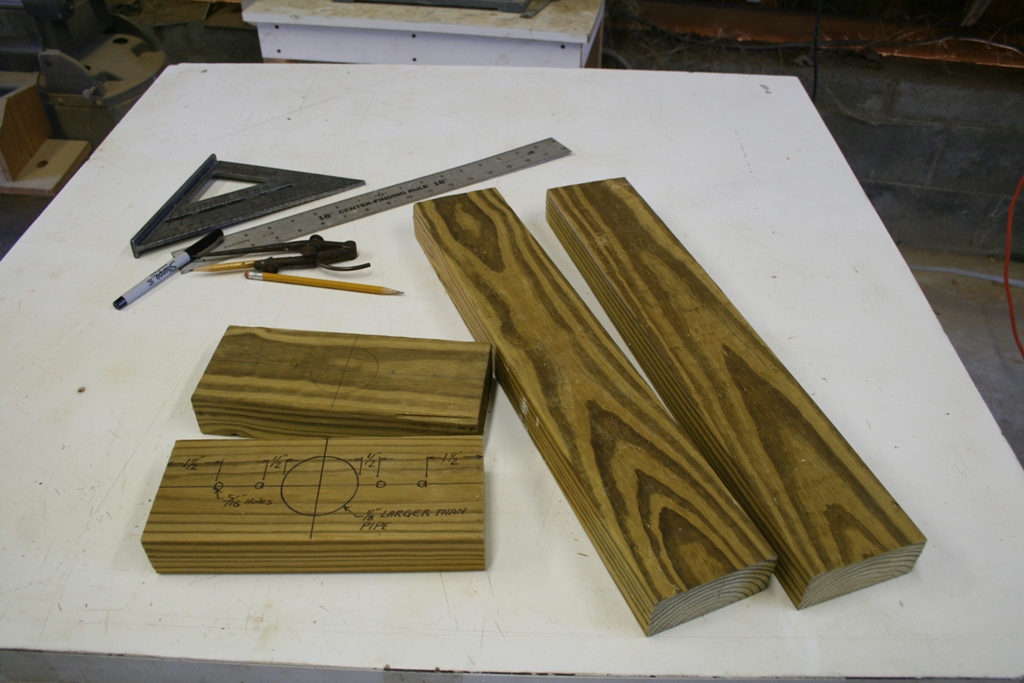
You need to cut the 2 x 4 in pieces as I have shown. The long ones are the same height as the short box which is 22 1/2".
The short ones are the same length as the width of the house, or 8 1/2" long.
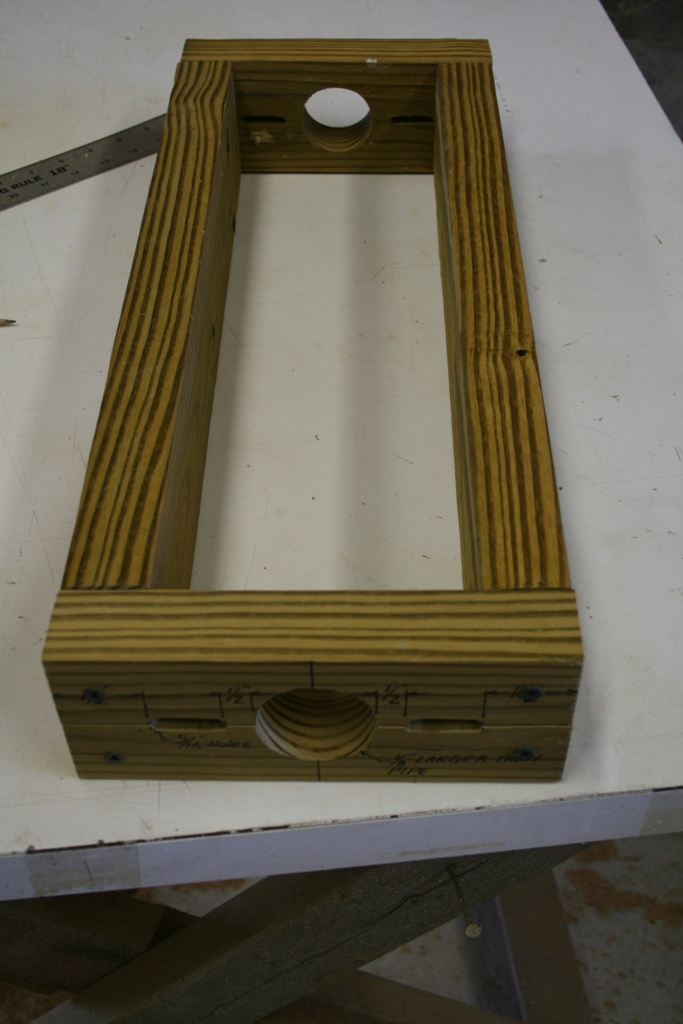
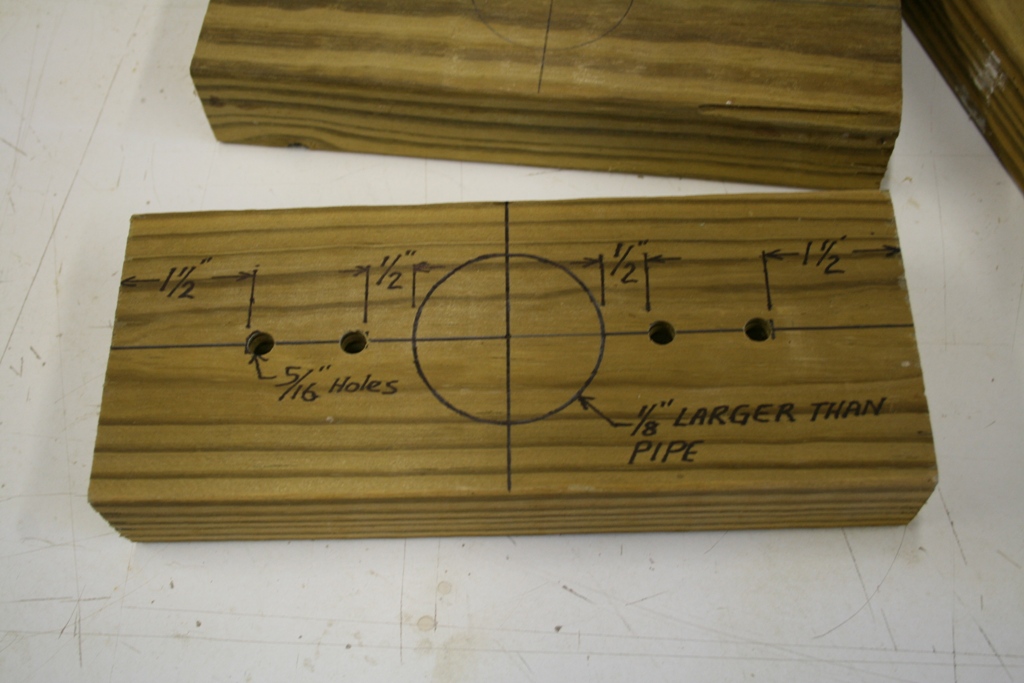 Nothing
needs to be done with the long pieces, but the short ones need to be marked as I
have shown in the picture.
Nothing
needs to be done with the long pieces, but the short ones need to be marked as I
have shown in the picture.
Drill 4 - 5/16" holes as I have shown.
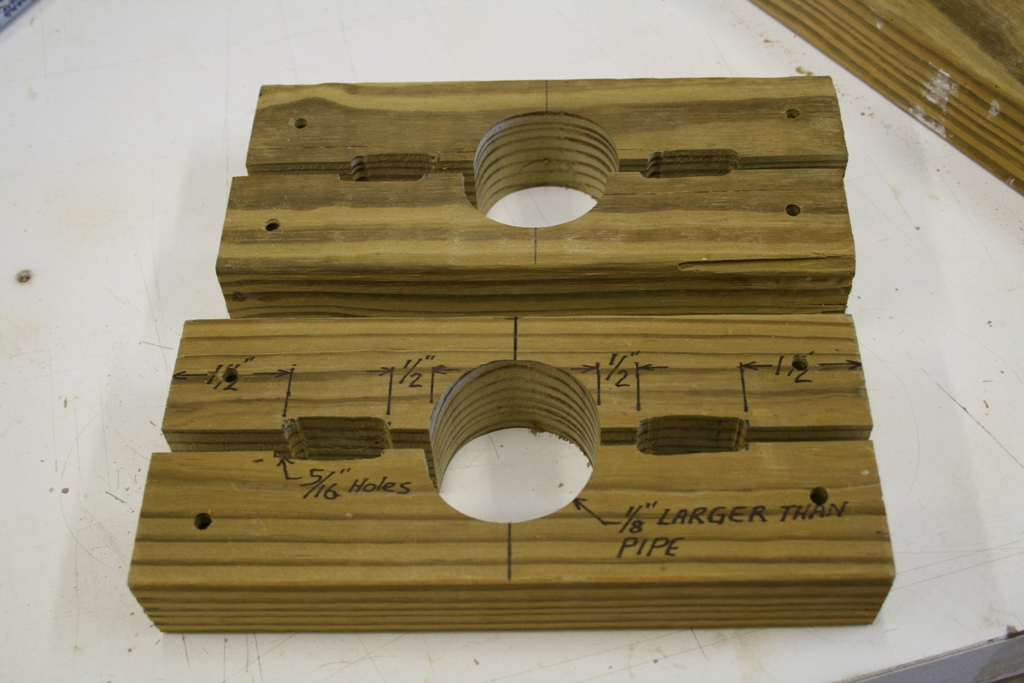 Next,
using a band saw or jigsaw, cut down the middle and then cut out the hole and
then clean out the material between the two 5/16" holes. The order in which you do
these is up to you. You may want to do the hole and slot cutting before
you cut it in half. The large hole is obviously for the pole to go thru.
The slots are for the cable to run thru. You'll also need to drill a screw
clearance hole
in each corner of the block. These are to assemble the frame.
Next,
using a band saw or jigsaw, cut down the middle and then cut out the hole and
then clean out the material between the two 5/16" holes. The order in which you do
these is up to you. You may want to do the hole and slot cutting before
you cut it in half. The large hole is obviously for the pole to go thru.
The slots are for the cable to run thru. You'll also need to drill a screw
clearance hole
in each corner of the block. These are to assemble the frame.
 Next,
screw the unit together as shown using the 3" long screws. Screw the
entire frame together so that the holes are in the correct positions. Make
sure they draw down good.
Next,
screw the unit together as shown using the 3" long screws. Screw the
entire frame together so that the holes are in the correct positions. Make
sure they draw down good.
 Now,
remove both end pieces from one side of the frame. So why did we screw the
whole thing together only to take part of it back apart? Because it makes
it easier when this frame is added to the pole. The holes will already be
there aligning the screws and the screws will go back in much easier
Now,
remove both end pieces from one side of the frame. So why did we screw the
whole thing together only to take part of it back apart? Because it makes
it easier when this frame is added to the pole. The holes will already be
there aligning the screws and the screws will go back in much easier
Adding the frame to the boxes:
 We
now have to fit the frame to the boxes, or vice-versa. The boxes will be
individually screwed to the frame once it is mounted to the pole, so we are
going to make provisions for that now.
We
now have to fit the frame to the boxes, or vice-versa. The boxes will be
individually screwed to the frame once it is mounted to the pole, so we are
going to make provisions for that now.
Lay the frame up against the back of the 'tall' boxes first. Then take a pencil and outline the 'inside' of the frame on the back of the box.
Also, draw a line across the box at the outside top of the frame.
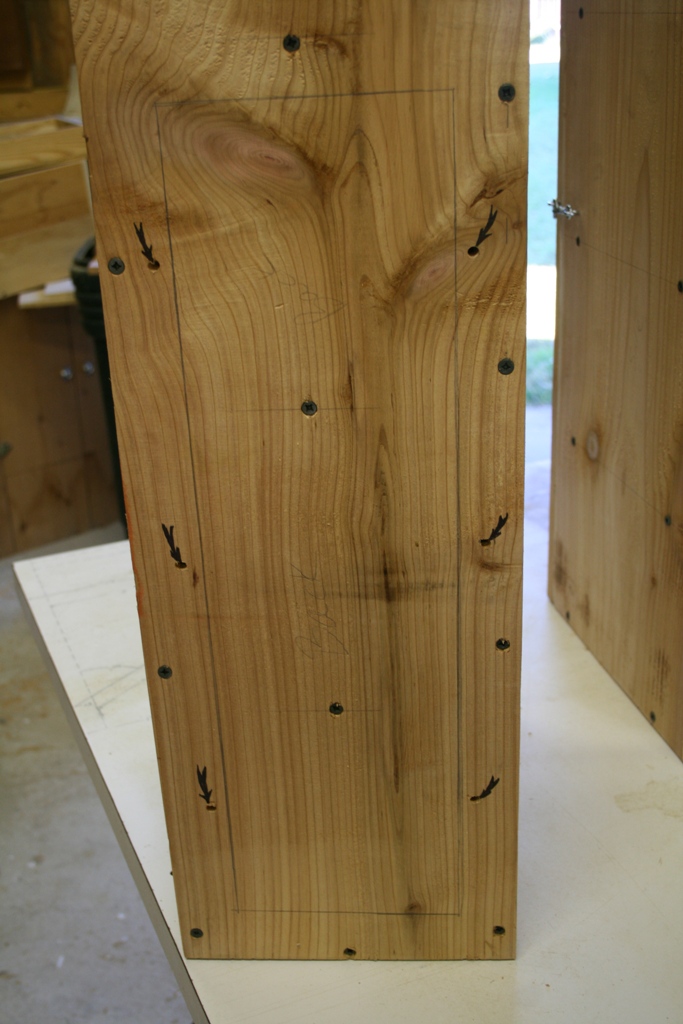 Now
you can easily see where the holes need to be drilled so that the screws will go
into the frame from the 'inside' of the box compartments. These holes can
be drilled from the outside back of the box and when doing so, slightly angle
them in at about 15 degrees. Remember, you are going to be working in a
small confined space and it's easier to angle into the frame than to try to come
straight in.
Now
you can easily see where the holes need to be drilled so that the screws will go
into the frame from the 'inside' of the box compartments. These holes can
be drilled from the outside back of the box and when doing so, slightly angle
them in at about 15 degrees. Remember, you are going to be working in a
small confined space and it's easier to angle into the frame than to try to come
straight in.
Take a look at the picture and and you can see where I drilled my holes, one on either side of each compartment. No, the upper compartment will not get holes.
On the short boxes, all you need to do is drill 3 holes right down the center of the back since they will be going into the frame from the side.
 Now,
one last thing to do to the boxes. When we get the frame mounted on the
pole, we are going to need some way to hold the boxes in place while we are
screwing them into the frame.
Now,
one last thing to do to the boxes. When we get the frame mounted on the
pole, we are going to need some way to hold the boxes in place while we are
screwing them into the frame.
Cut some small pieces as shown, drill a couple of holes in them and mount them to the back of the box.
Remember that line we drew at the top of the frame. The bottom of these blocks will be placed right level with that line and flush with the outside of the box and screwed in place. Then, when we set the box up to the frame on the pole, the blocks rest on the top of the frame, only needing one hand to hold the box in place while we use the other hand to do the screwing.
Why the split blocks? To clear the pipe, simple as that!
The small boxes only get one block, right in the middle. That bloc needs to be less than 1 1/2" long or it won't fit between the other blocks that are already mounted with the tall boxes. This small block also helps center the top of the short box when it's mounted to the frame.
And that's it. The house construction is all done.
Finishing:
I'm assuming everyone doesn't need to be told how to paint a martin house. However, I will add one little tip here. I'm no Leonardo Di Vinci when it comes to painting and it's because of people like me that they invented 'painter's tape'. It works wonders when painting one drastic color against another. Make the main house white, with the trim being what ever color suits your fancy.
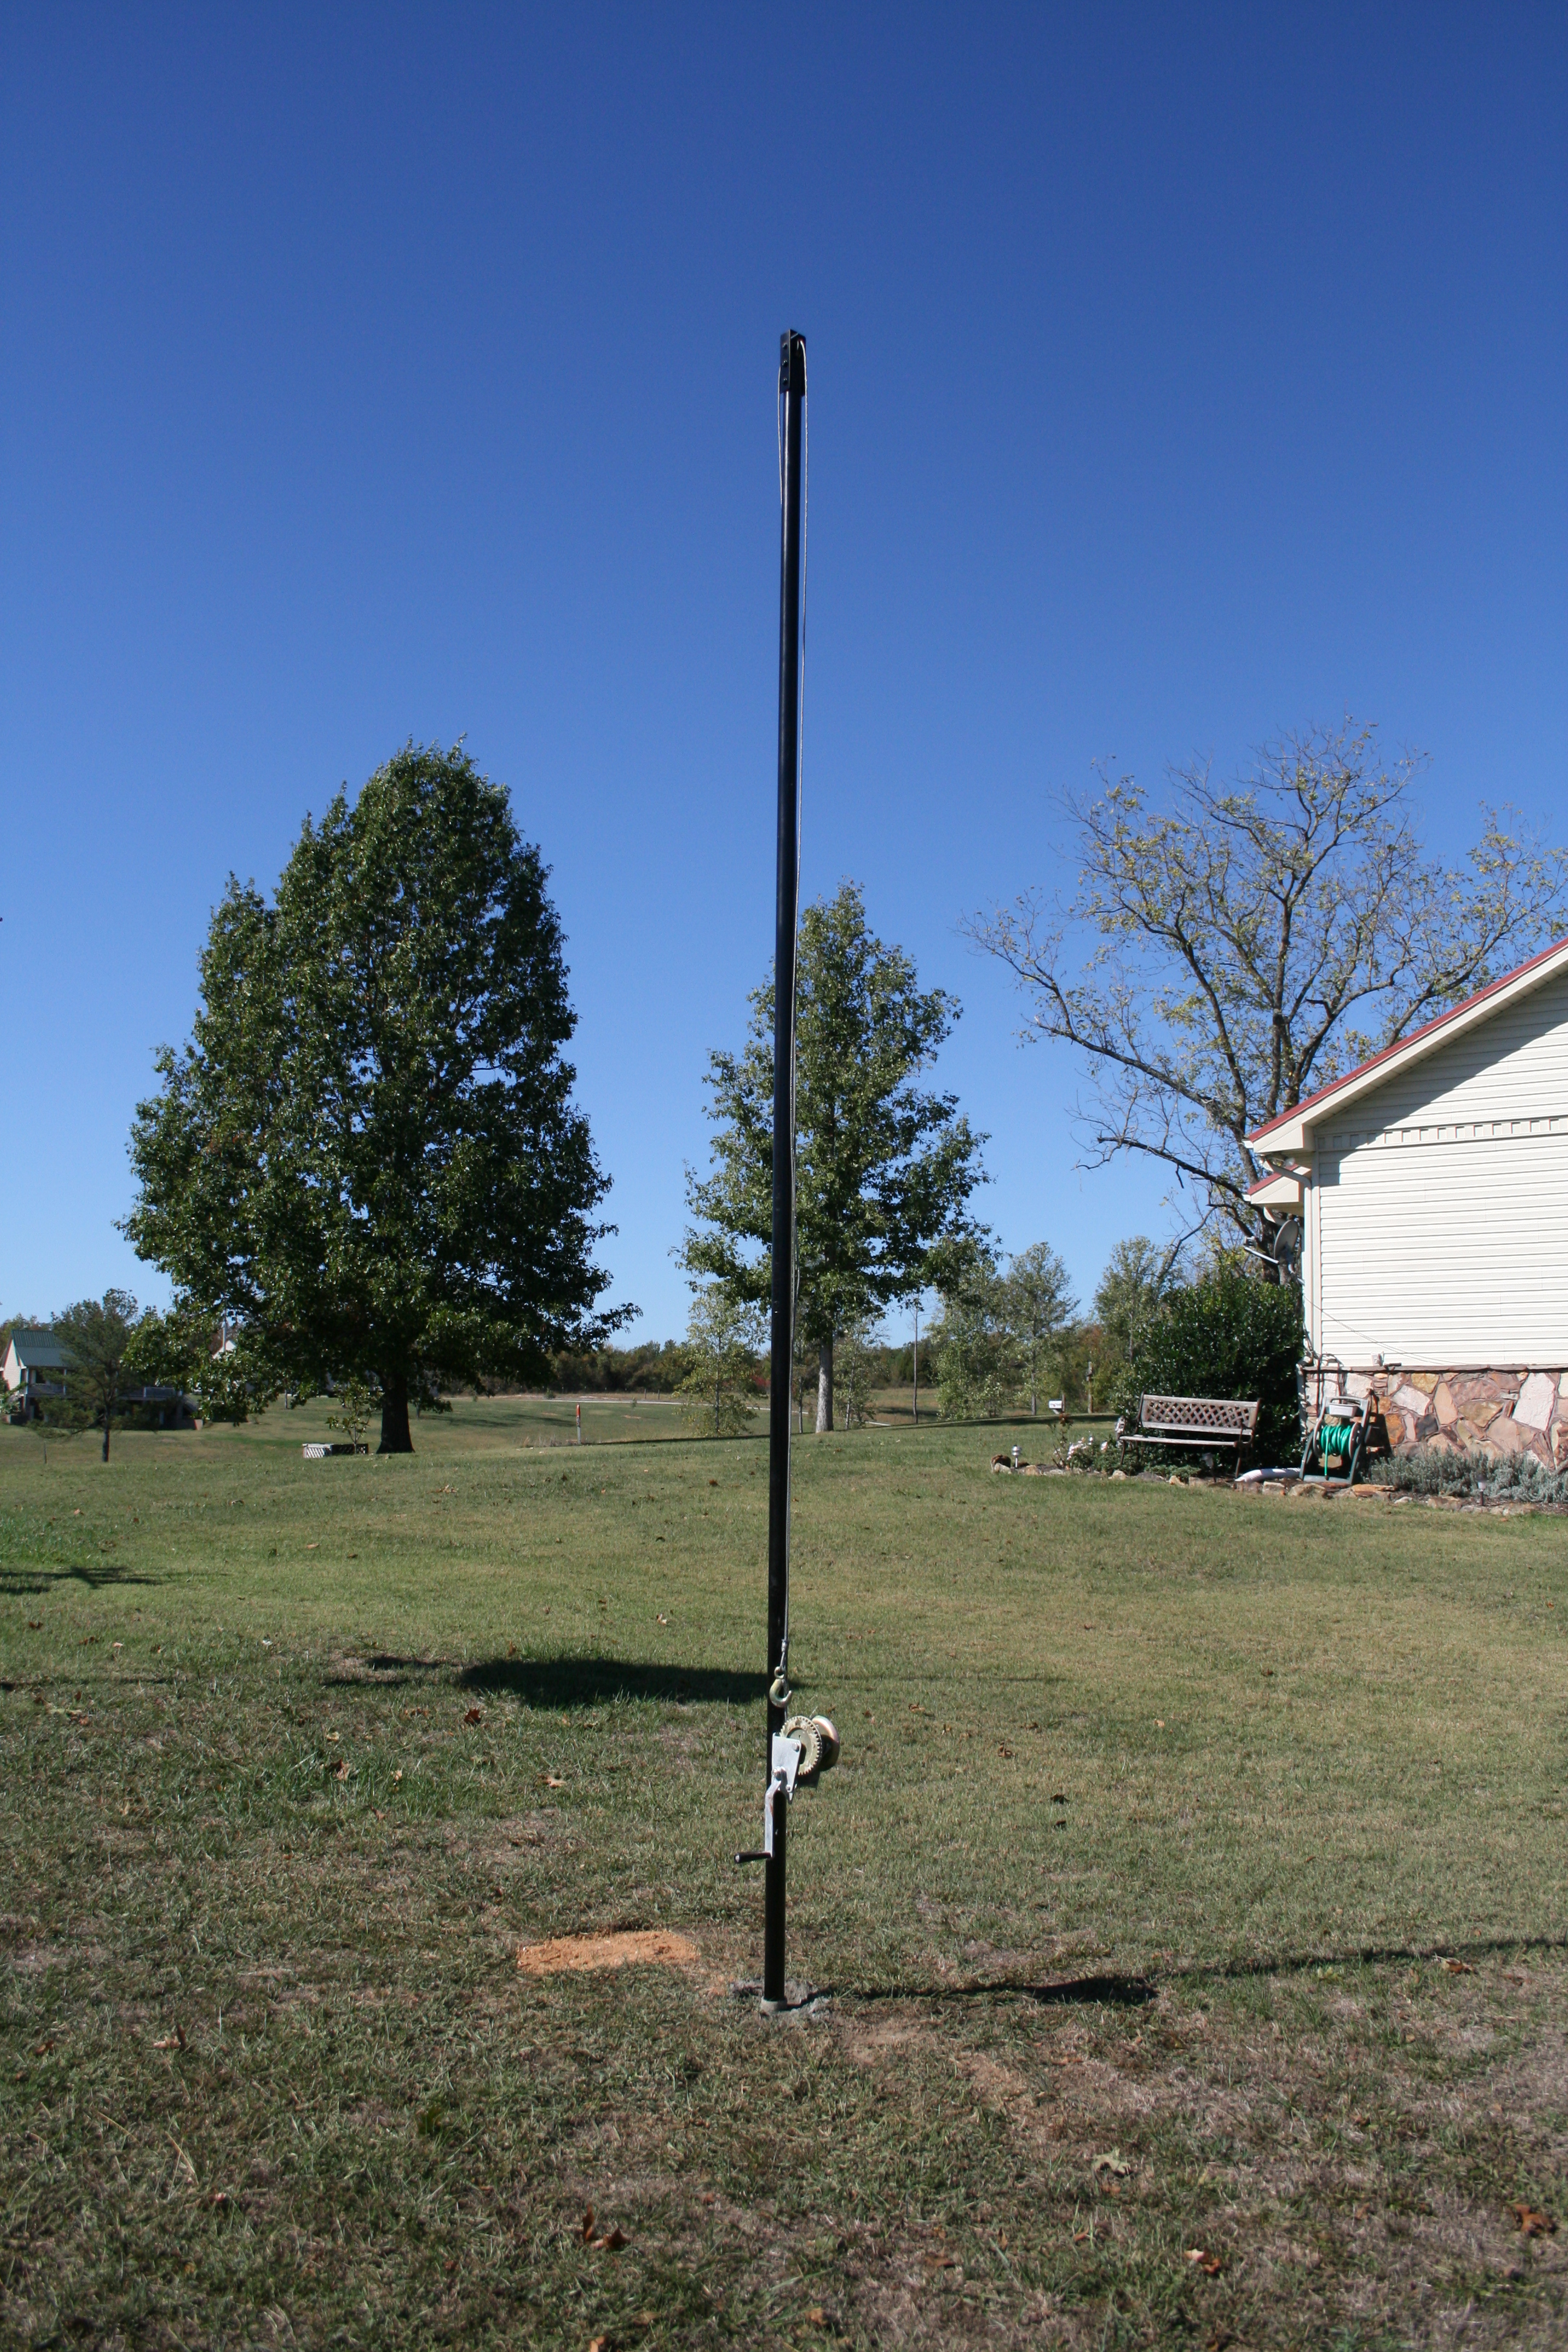
Here's the pole in the ground, winch and pulley added and ready for the frame.
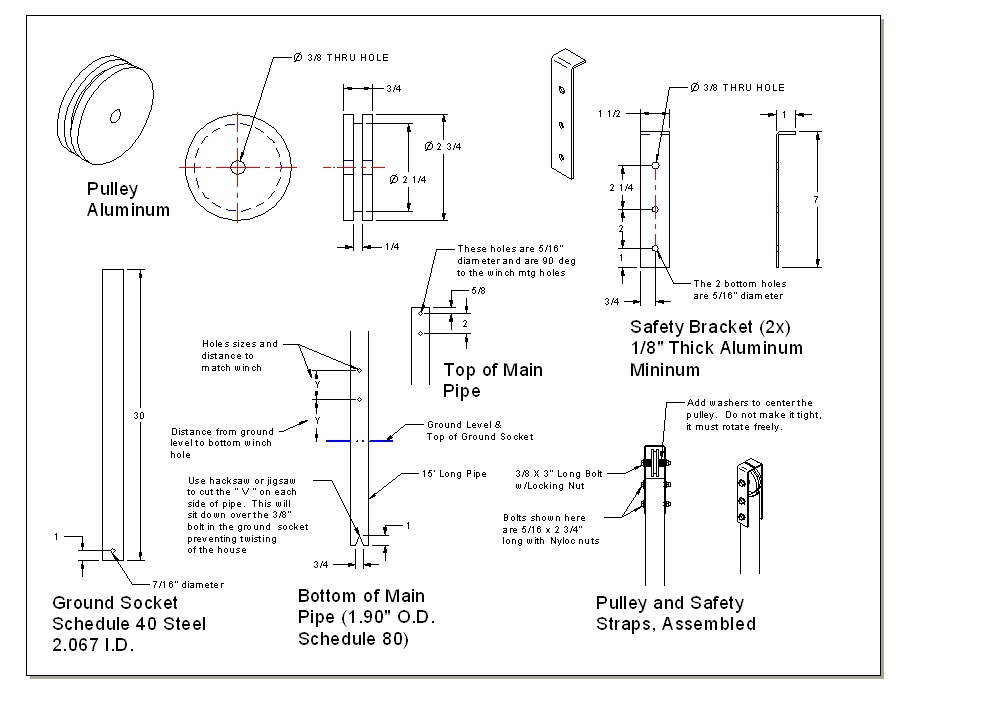 As for the pulley and safety brackets, I have mine made. If it'll help you
out, here is a drawing that shows all the dimensions if you decide to either
make your own or have yours
made. If you're going to have them made, simply print out a copy of it and then hand it to a machinist and he can
make as many as you like. The pulley is centered with washers and the
brackets have flanges on them fitting over the pulley to prevent the cable from
ever coming down...just in case something happened...
As for the pulley and safety brackets, I have mine made. If it'll help you
out, here is a drawing that shows all the dimensions if you decide to either
make your own or have yours
made. If you're going to have them made, simply print out a copy of it and then hand it to a machinist and he can
make as many as you like. The pulley is centered with washers and the
brackets have flanges on them fitting over the pulley to prevent the cable from
ever coming down...just in case something happened...
If you can make your own brackets, but do not have the option to have a pulley made, then there are a number of different places where the pulleys can be purchased. Heavy duty ones can be gotten or ordered at many hardware stores or auto parts store. Make sure they are made for 'steel cable'. You just have to adapt the mounting in the brackets to fit the bore of the pulley.
Also, McMaster Carr has pulleys. http://www.mcmaster.com
Click on the link given and once you get on the page, in the search box on the left, enter this number: 3168T25
This will take you to a pulley that will work for this project.
The pulley:
�is made of cast iron for good strength.
�will take a �� diameter cable.
�will hold 1500 lbs.
�has a 3/8� bore.
�has a 2 - 3/8� thread diameter (the distance required to get the cable outside of your 2� diameter pole).
�at the time of this writing the cost was around $29� (I said these things weren�t cheap).
Along with the one I suggest, a number of other different options will also be displayed and if you decide you don�t want the one I suggested, then you can find and use something different. However, I� STRONGLY �suggest that SAFETY be a concern in any alternate selections. Weight, pulley material, pulley size, cable size and UV rays from the sun all need to be considered in any selection. Plastic is not a good choice in this case. In some instances, cheap isn�t a good idea and this is one of them�
The Winch:
IF you cannot find a winch, McMaster Carr also has those. Again, go to McMaster Carr and in the search box at the top left, type in 3196T56. You'll be brought to the page for Lifting Winches and the exact winch required for this project. It's rated for 800 lbs and uses 3/16" steel cable. Please note, they often use the phrase 'ROPE', but they are talking about WIRE ROPE (steel cable). NEVER use fibrous rope of any kind in a situation like this. It's just not strong enough, will break and and the house will come down.
They also state to not use it to lift anything above a human's head, but alas, in this case we are raising a martin house up a pole, so you'll just have to ignore that statement.
Although they do have them with cable already installed, if at all possible, I suggest finding a general hardware store and ordering 30 feet of 3/16" diameter cable. It's much cheaper.
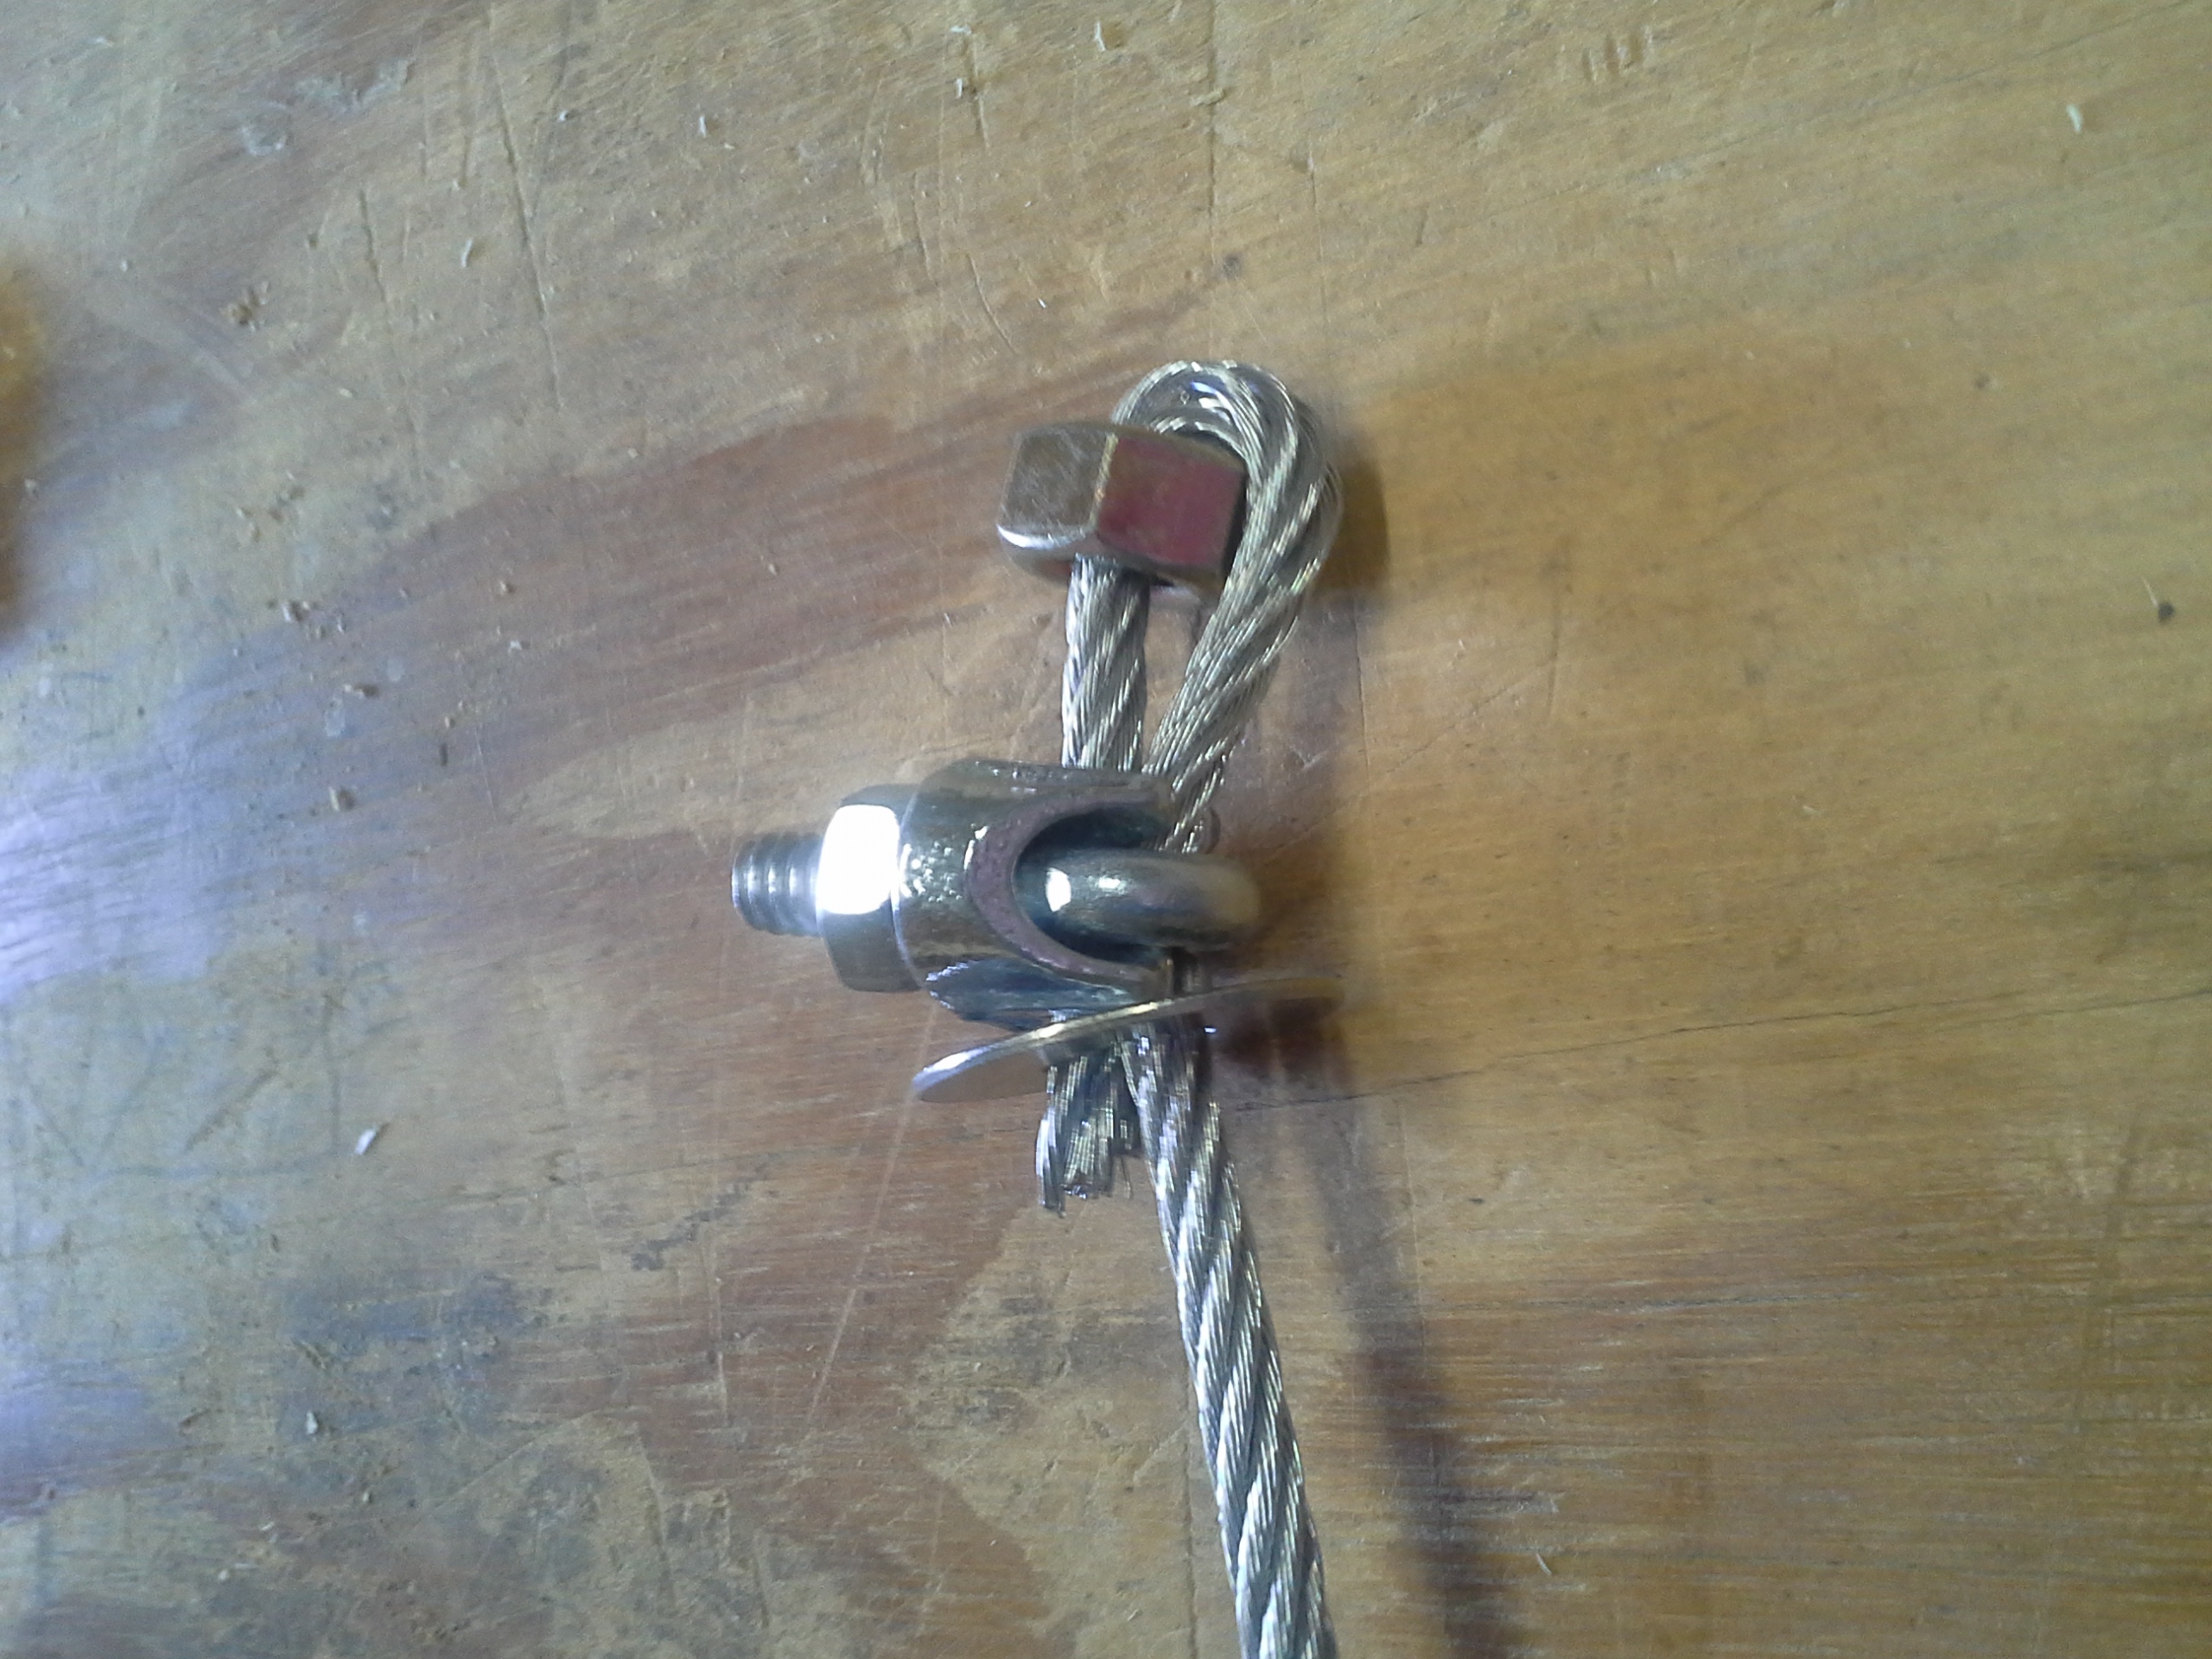
If you do it this way, the cable will be cut at both ends, so you'll need a couple of extra things. A 3/8" flat washer, a 3/8 hex nut and a clamp for the 3/16" diameter cable. In this design, the cable does not attach to the house but instead, works with gravity. What you'll have to do is add the clamp to the end of the cable that isn't attached to the winch. What you do is:
-slip the washer onto the cable.
-then slip the nut onto the end of the cable.
-fold about 1 1/2" of the cable back over the nut. (A set of vice grip pliers come in handy here, they hold the cable while you're adding the clamp).
-clamp the cable together with the cable clamp, tightening it good.
-then slip the washer back down over both layers of cable.
Since pictures are worth a thousand words, this might help with what I'm trying to say. The nut is nothing more than a second level of security. Should the clamp slide down the cable, the nut will prevent it from coming off. When you add the house to the pole, gravity takes over and it will set down onto the washer. It's as simple as that.
You'll need a Sched 80, Steel pole, 15' long, 30" is going to go into the ground socket in the ground.
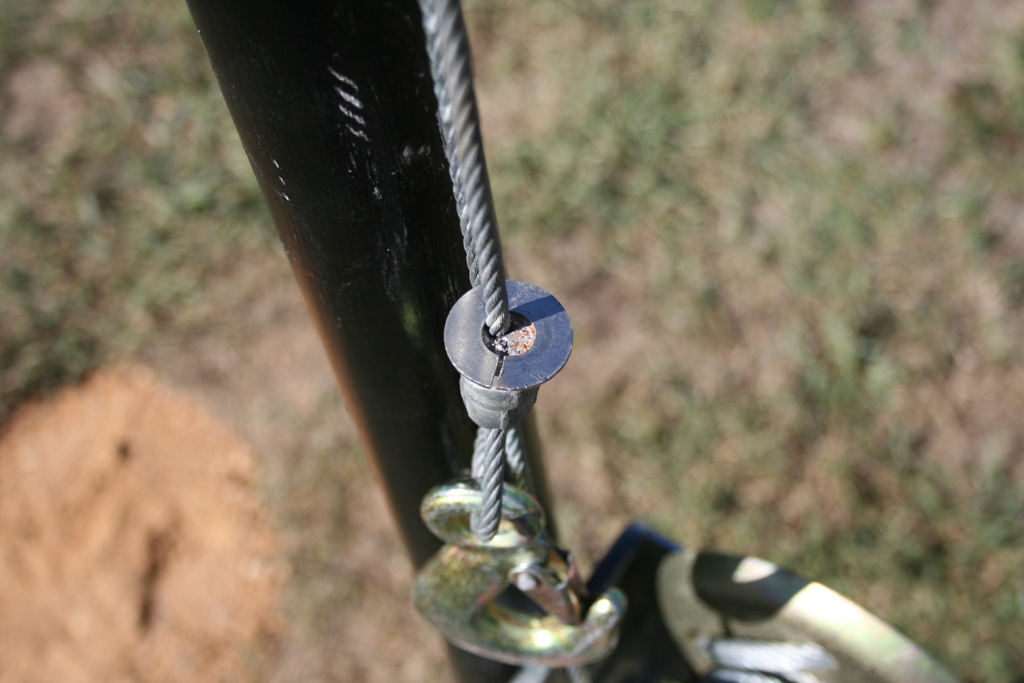 OK, if your cable
already has a hook on the end of it, then simply take a heavy washer, cut a slot in
it, give it a twist with some pliers and then slip it onto the cable.
Then flatten it back out to what you see here. This washer will allow
the cable to set against the bottom of the frame without the cable 'wallering'
out the wood of the frame. Not really necessary, but more of a preventative.
OK, if your cable
already has a hook on the end of it, then simply take a heavy washer, cut a slot in
it, give it a twist with some pliers and then slip it onto the cable.
Then flatten it back out to what you see here. This washer will allow
the cable to set against the bottom of the frame without the cable 'wallering'
out the wood of the frame. Not really necessary, but more of a preventative.
 Now the frame can be
be added to the pole.
Now the frame can be
be added to the pole.
To mount the frame, simply slide it in from the rear of the pole, fitting the cables in the slots. Add the bottom part of the frame and hold it in place with a clamp, or someone else's hands if they are available. Then, simply screw it together just as was done back on the work bench.
Make sure it easily slides up and down the pole.
Now is the time we've been waiting for, adding the house to the pole.
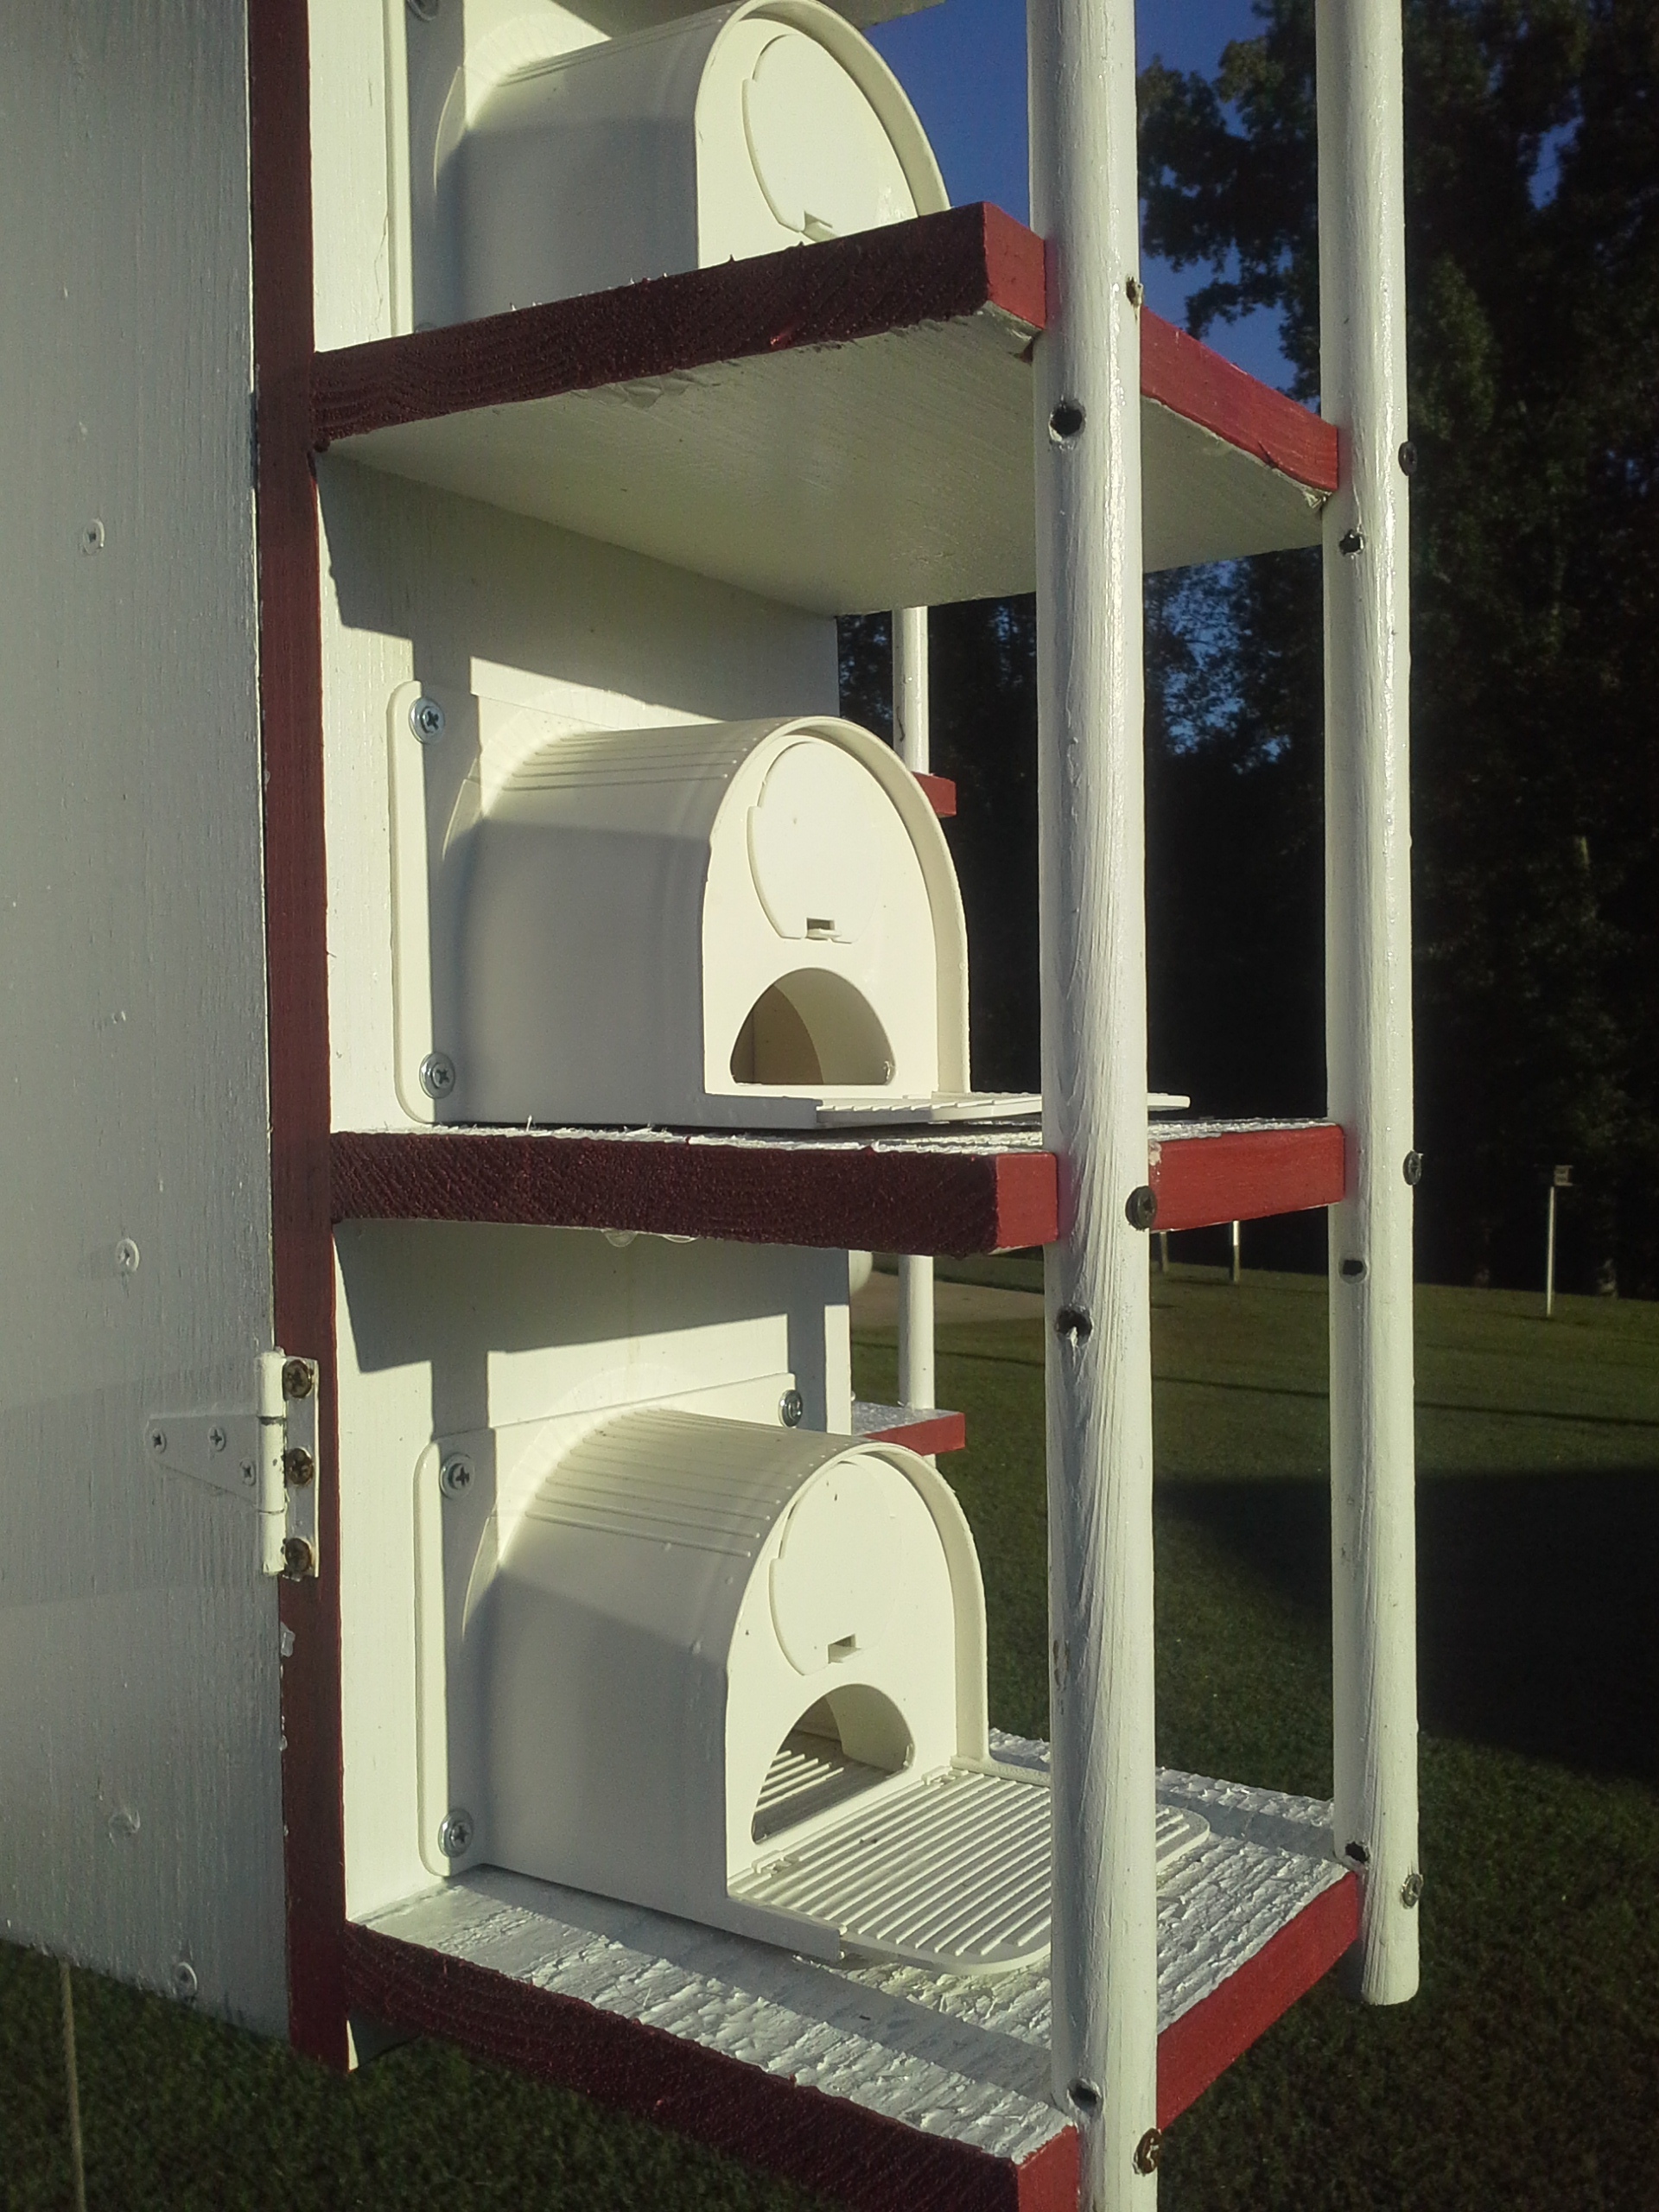
 Please
note: From this point on, the photos show the house with the original face mounted inserts and before
the owl guards. I just didn't feel like making all new photos. Obviously the
updated design will have porches and owl guards, but the instructions for
mounting it are still the same.
Please
note: From this point on, the photos show the house with the original face mounted inserts and before
the owl guards. I just didn't feel like making all new photos. Obviously the
updated design will have porches and owl guards, but the instructions for
mounting it are still the same.
Grab a tall box, 6 - 1 5/8" screws and a drill with a long driver extension in it and head to the pole. Start by setting the box on the frame, resting on the little blocks that were added to the back of the box. Make sure it is centered at the top. In the 3rd compartment up, add one screw to one of the two holes there. Now, check the box for square on the frame. Once satisfied, add the other 5 screws.
 Repeat the procedure for tall box # 2, insuring it is square with the frame.
 Now, one of the short boxes can be added. When you slip it up to the
frame, the top should be automatically squared (aligned) to the pole because of the short
hanging block on the back. Notice it fits right between the other hanging
blocks on the tall boxes. Now add one screw to the top hole in the box.
Now, one of the short boxes can be added. When you slip it up to the
frame, the top should be automatically squared (aligned) to the pole because of the short
hanging block on the back. Notice it fits right between the other hanging
blocks on the tall boxes. Now add one screw to the top hole in the box.
Now check the bottom of the box for square and when satisfied, add the other 2 screws.
 And finally, the last box following the same procedure as above.
Now, you can test the winch system to make sure it works. Run it all the way to the top and let it all the way back down. It should run smoothly with no hitches.
Tip: A little grease on the winch gears each spring will make it run much smoother and will also help protect the gear teeth from wear and the elements.
Now you have a T-14 ready for martins to show up. Add just a little bit of nesting materials in each compartment and they'll have something to sit on for those first few cool nights. They'll also use this material to start their nests with. (Wheat straw or pine straw works wonderfully).
So, there you have it. A T-14 with owl guards and (in this case) molded SREH tunnels!
This project took me a total of 5 days. Although the house was built in just 2 days, I allowed time for paint to dry.
The cost was around $400. Wood, pole, winch, pulley & brackets and paint, they all added up. The cost might be more or less in your area.
A fun project and a good future home for some martins that I expect will appreciate it when they return next spring.