I get all kinds of questions about snake guards
all the time. "Where do I get them?" "Do I really NEED to use
them?
Well, my answer to them is a
resounding YES... And the following is my reasoning for
doing so.
Snakes are EVERYWHERE: I don't care if you've never seen one, they're
around, and they will take advantage of a martin house without hesitating one
single bit.
Basic Snake Biology:
Snakes of all kinds have a very good sense of smell and in
fact, it's better than ours. We've all seen how a snake flicks it tongue
and it's this flicking of the tongue that is picking up minute molecules of
scent on the air. The tongue then delivers the scent to an olfactory
device called a "Jacobson's organ", (named for the man that discovered
it) and once that scent is picked up, they'll zero in on it and begin their trek to it and if it means climbing
a pole to get it, then so be it. Food is food;
no matter where it is.
Rat snakes (AKA; Chicken snakes, Pine snakes and Corn snakes, depending on which part of the country you come from) are restrictors, killing their food by latching onto it with their mouth and then restricting their bodies around it and suffocating it. NO, they are not poisonous, but their bite can hurt for awhile. They have very strong bodies and YES, they can climb a slippery steel pole without any trouble at all, (even with grease on them) as many martin landlords have found out the hard way. They climb by restricting their bodies around the pole and then simply hitching their bodies up the pole to get to the house. Fortunately for us, most poisonous snakes do not climb.
Snakes also do a lot of their
dirty work at night, especially during the heat of summer, so we often don't see
them because we are in our own homes, sleeping. Many times the snake will
climb the pole, clean out the house and simply slither back down the pole and
we'll NEVER know they were even there, until we do a nest check and find that
our martin house has mysteriously been cleaned out.
I cannot tell you the number
of emails I've gotten with people asking me, "What happened to my
martins?"
I've also gotten a LOT of them where folks have found a snake in their houses/gourds and I'm sorry, but by then, it's too late.
When folks put up a martin house, one of the last things they think about is snakes attacking it. Be proactive BEFORE the snakes do their dirty work.
Sorry, but I AM NOT a fan of
many of the commercial snake guards that are available from different sources. They are much too
small and too short to be effective and a long rat snake has absolutely no
problems bypassing them. (I've personally witnessed this). In fact, they don't even slow them down.
Rat snakes can grow to over 6 feet long and a short guard is no problem for them
at all. There's pictorial proof all over the internet showing snakes getting over these
guards and I don't know why they are continued to be sold.
My own tubular snake guard
design:
A number of folks have
written and said that they can't find a short piece of the drainage tile that I
call out for in my other snake guard page and yes; I know an entire 20' stick of
the stuff is expensive. So I decided to see what else would work and be a
lot less costly.
In my travels over the years I've seen and
talked with many landlords that have bird netting for snake guards and every one
to a person said, "It works". In fact, I myself have used it and
know firsthand what happens to a snake that tries to bypass it.
However, just plain bird netting is difficult to add to a pole, especially if you want to remove it to do nest checks. So I decided to do a little shop work and come up with one that utilizes this bird netting, is inexpensive, simple to make, and EASILY removed and replaced on a pole, while at the same time, being effective against snakes and thus; this guard.
AND; let me say that,
once a snake gets tangled in it, the snake usually has to be dispatched...and...
the guard netting might even have to be replaced with
new netting, hence the reason I use SCREWS.
The following is a simple
pictorial of what to do to make one of these guards. No dimensions are
required, since 'almost' will work for this project. The only things that
are important are the hole around the pole and the rope/cable hole.
Parts/Materials List:
1 - 2
foot piece of 1" X 12" board. (Per
guard). Western Cedar or Cypress works best, but White Pine will
also do.
7 foot
of bird netting. (I used 3/4" opening).
1 - 1 1/2" hinge.
1 - screen
door clasp.
6 - 1 1/2" long decking
screws (to screw the guard together).
4 - 1" long sheet rock
screws (to mount the hinge).
1 - hose
clamp to go around the pole.
1 - or
2 short pieces of old garden hose. (Any hose that the clamp will fit thru
will do for this project, if you have it).
1 - can
of spray Paint (I used black).
Tools:
Other than the usual, work
bench and shop/garage tools, only a couple of tools are required, so ANYBODY can
make it. A jig saw, a hand drill with drills and drivers, a straight edge,
a staple gun and
a compass to draw circles.
My shop tools are shown in the photos, because that's what I have, but they really aren't necessary. A temporary work bench can be made by placing a �� thick piece of plywood across 2 saw-horses.
If you have more than one pole,
make them all at the same time. In fact, make an extra and stick it
somewhere, just in case. That way,
if a snake does show up, you�ll have it to replace the original one till you get
it repaired.
I made this page with thumbnails to keep it smaller, so simply click on the thumbnail to open a full sized photo.
Pine shelving boards are very inexpensive and come in 12� widths (11 �� actual width) and will work wonderfully for this project and that's what I show in these photos. You'll need 2 pieces for each guard. An 8 footer will make 4 guards.
One note, the bigger; the better.
First, cut out all the parts for the number of guards you are going to build. In this case, all pieces are 11 1/4" square.

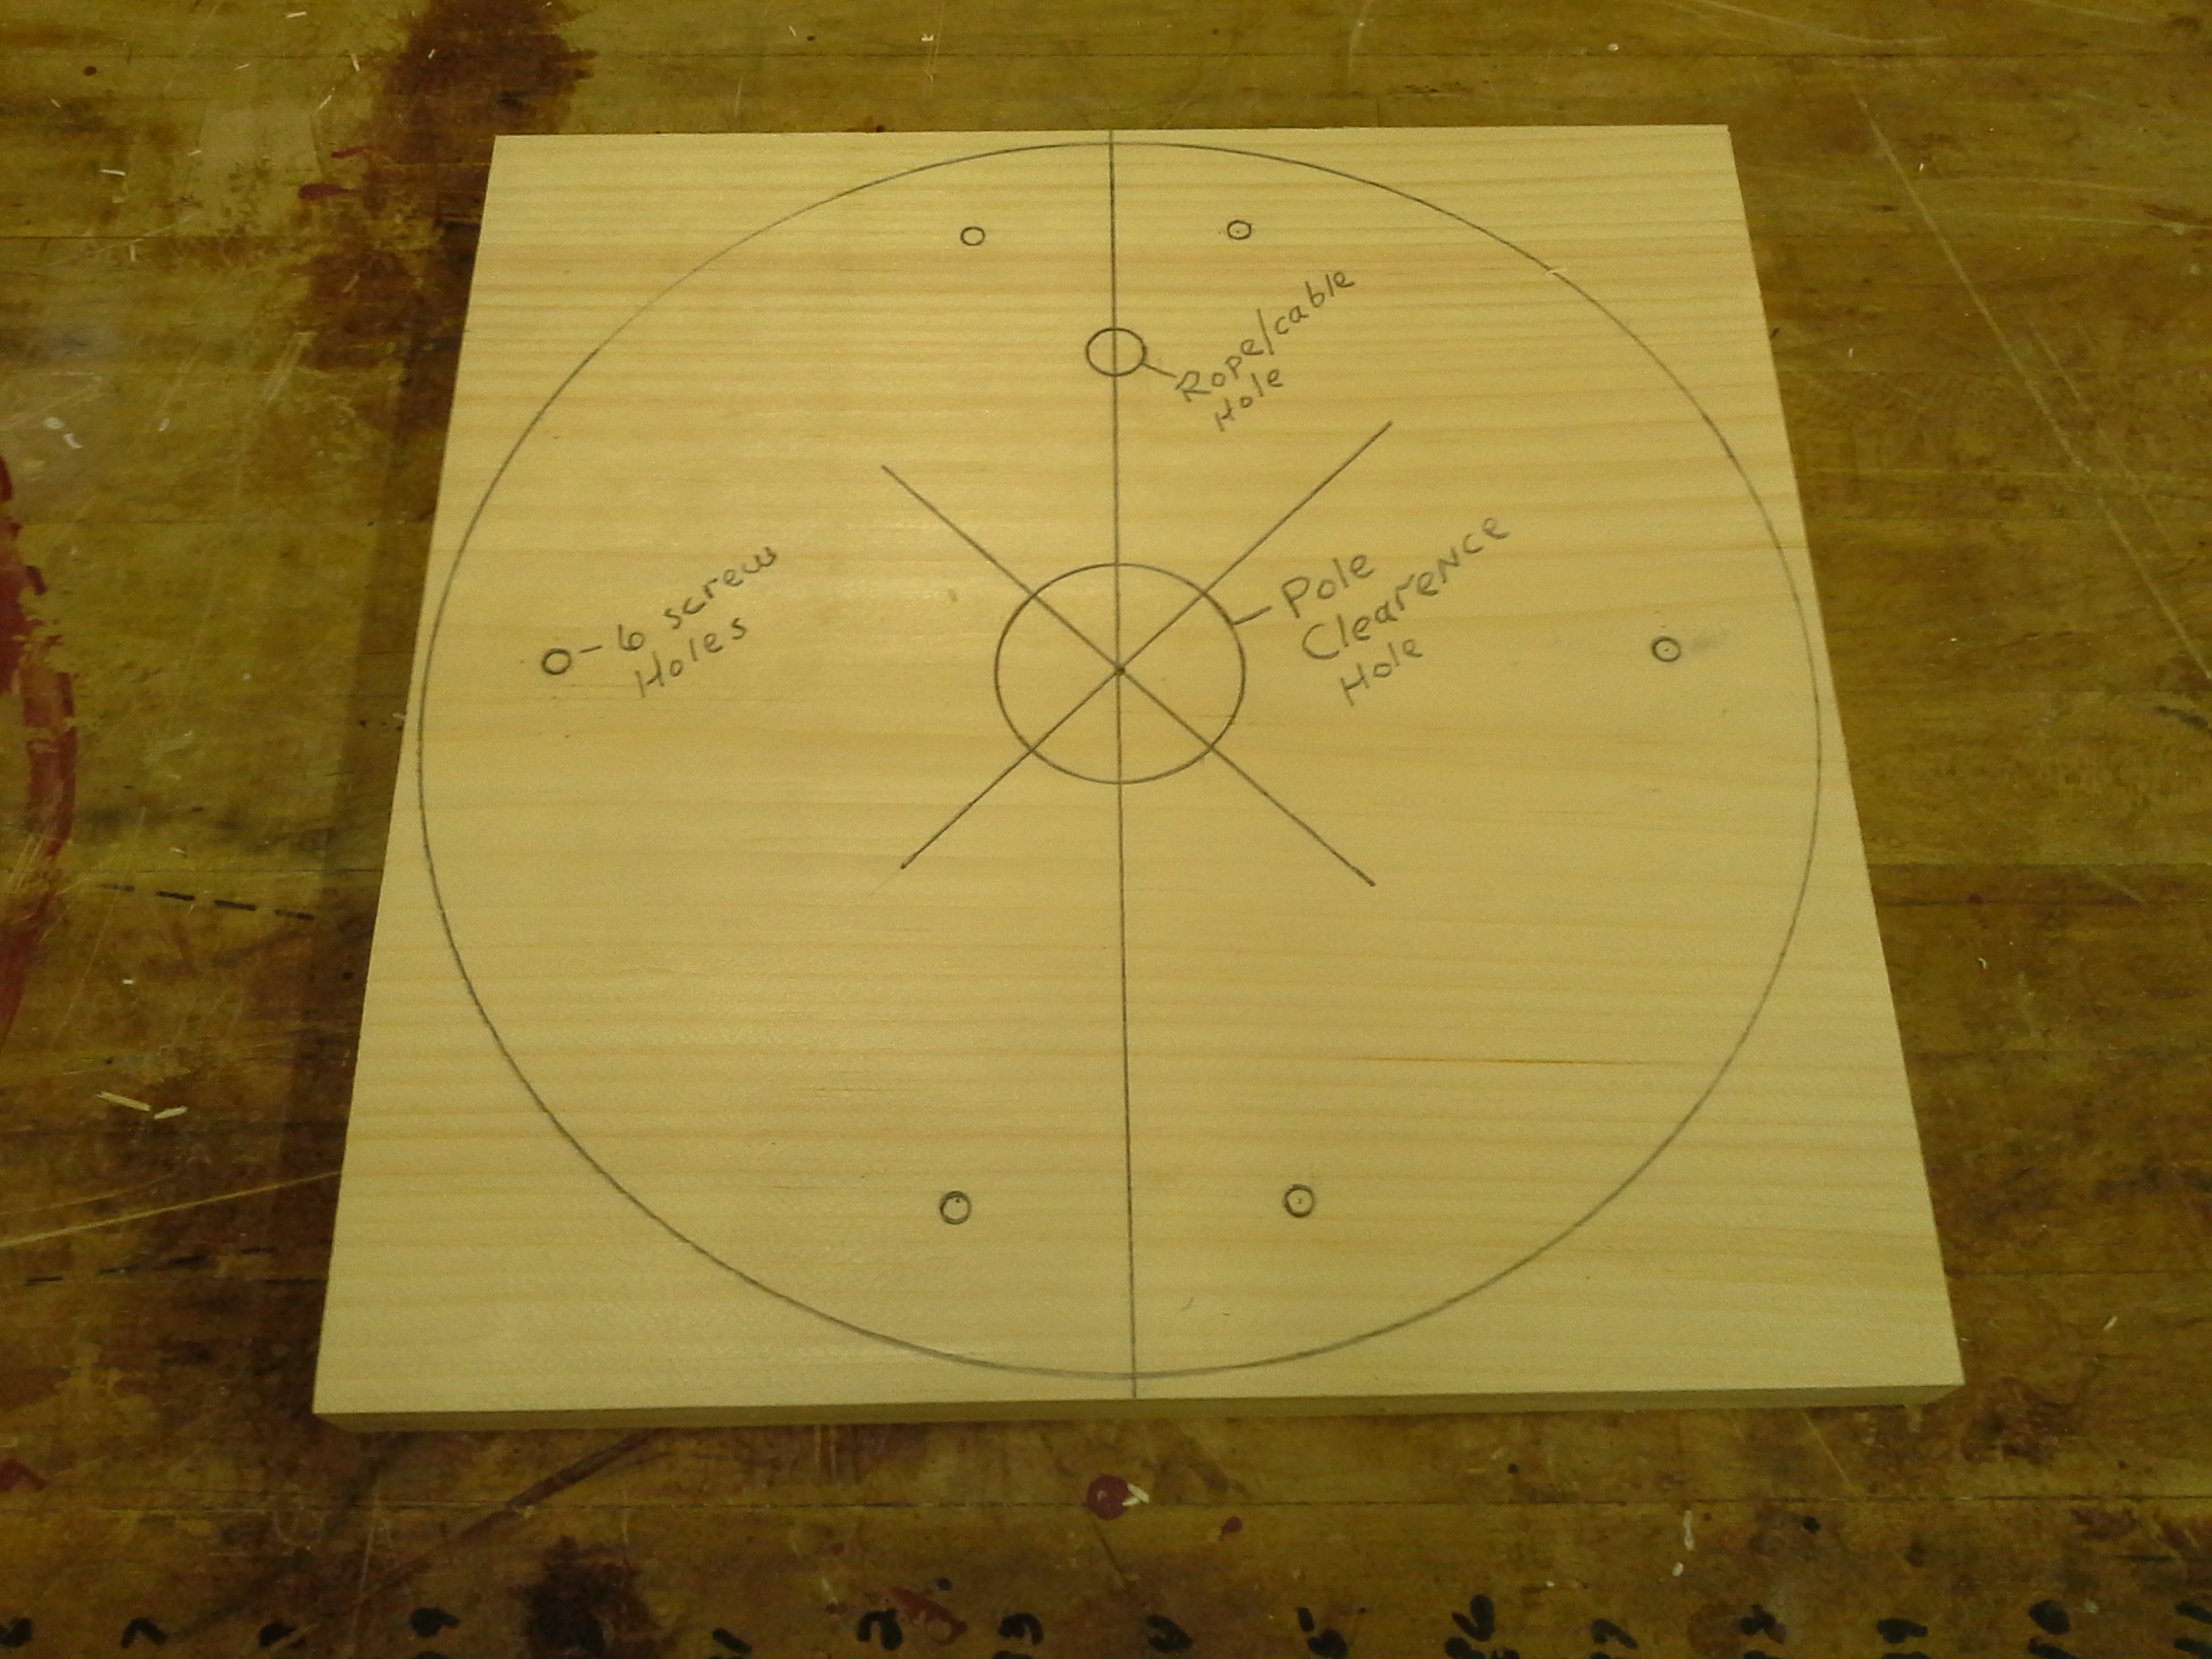
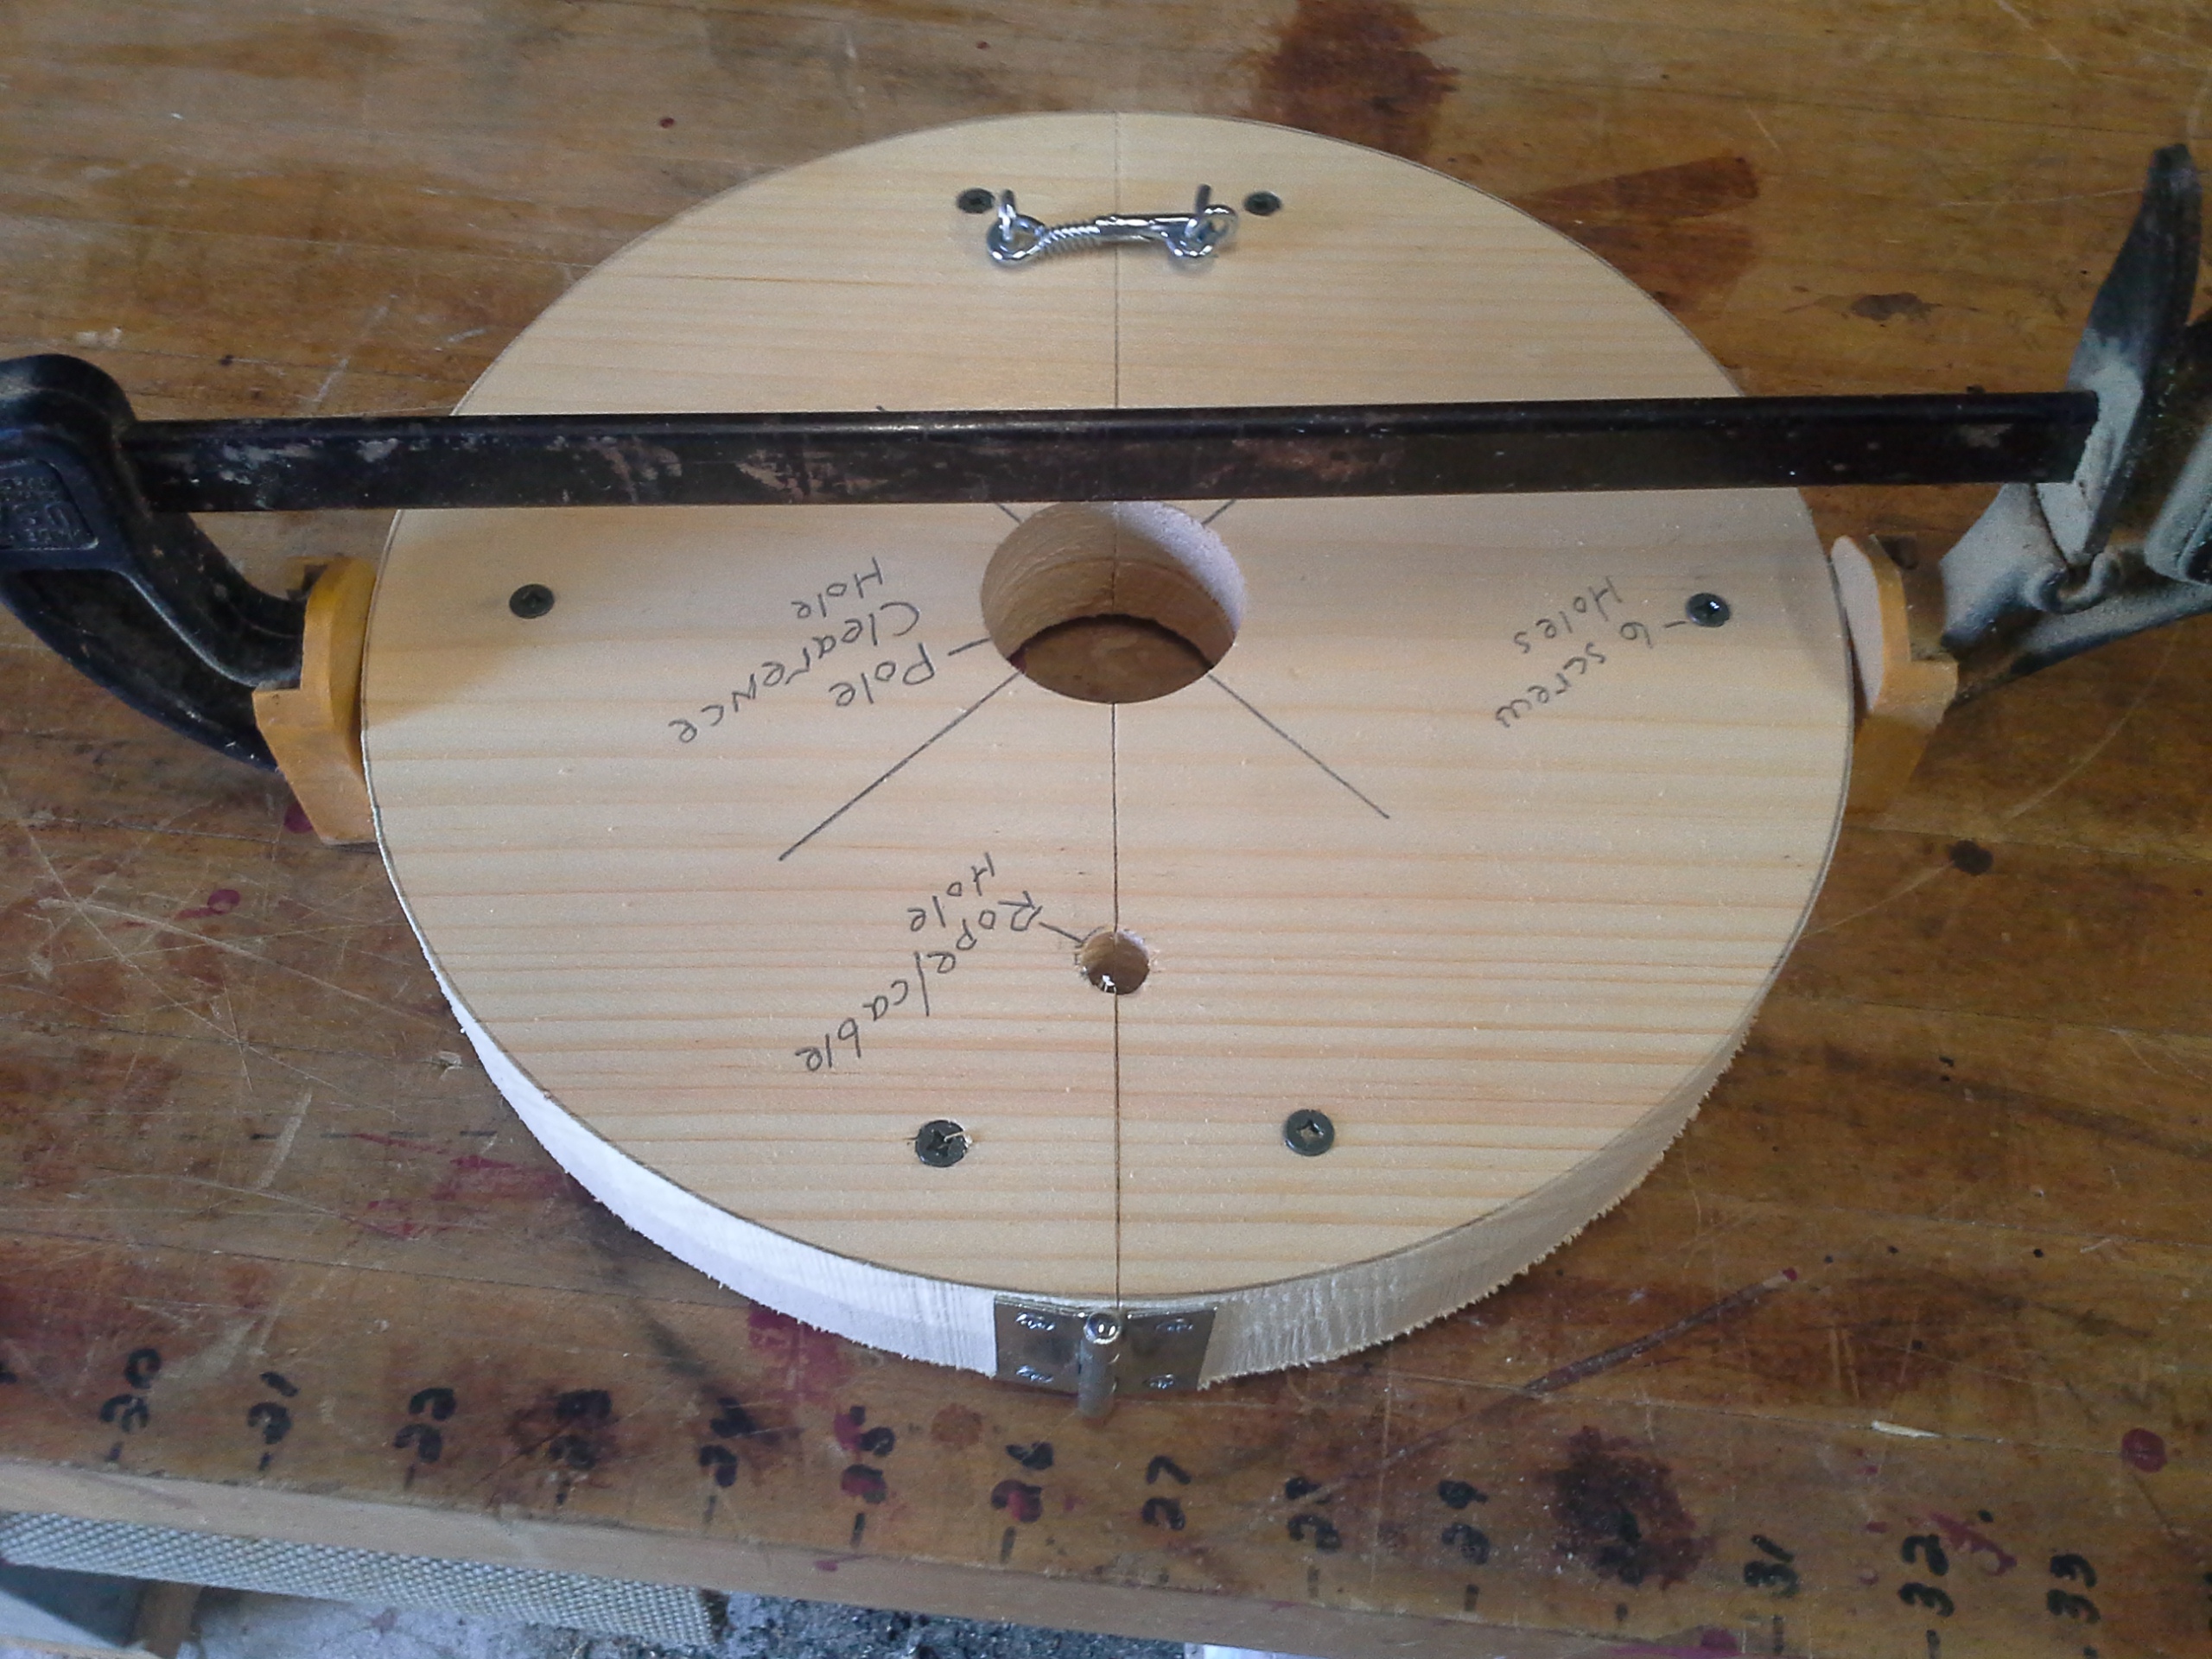
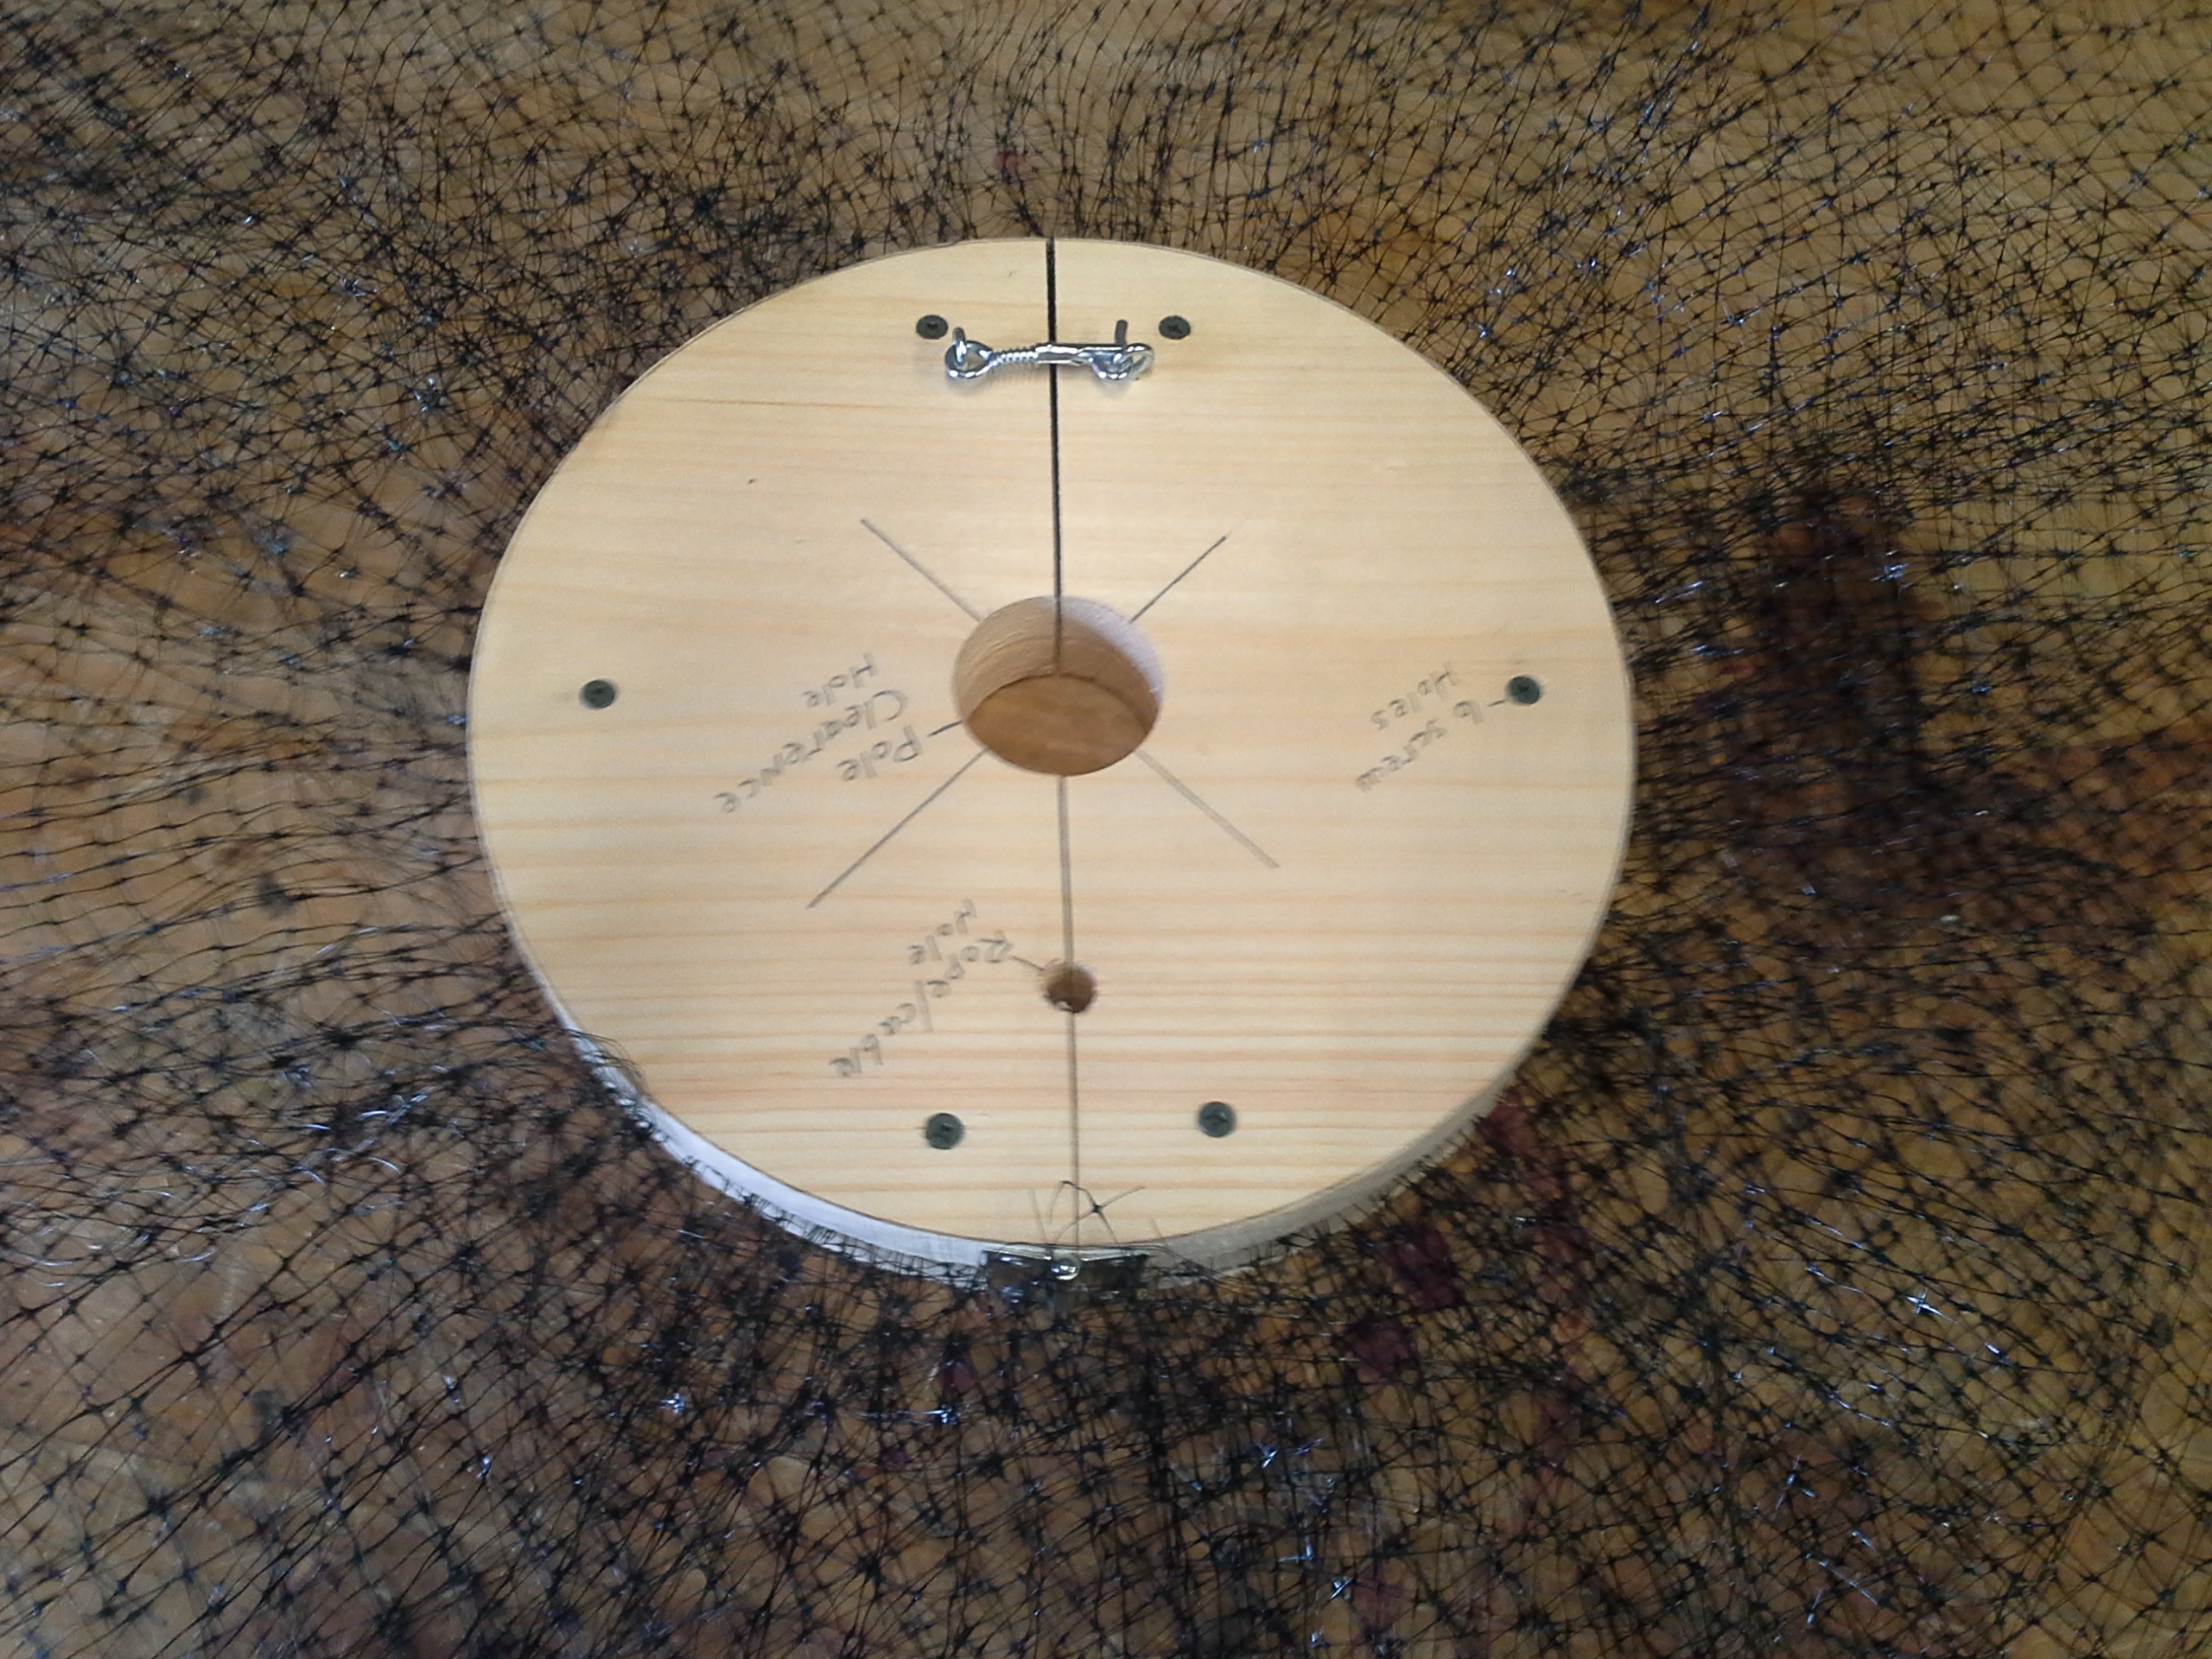
Pair them up. Then on one piece only, (let's designate it as the TOP) find the exact center. This is easily done by using a straight edge (a yard stick works great) aligned from corner to opposing corner in each direction and draw lines at the center.
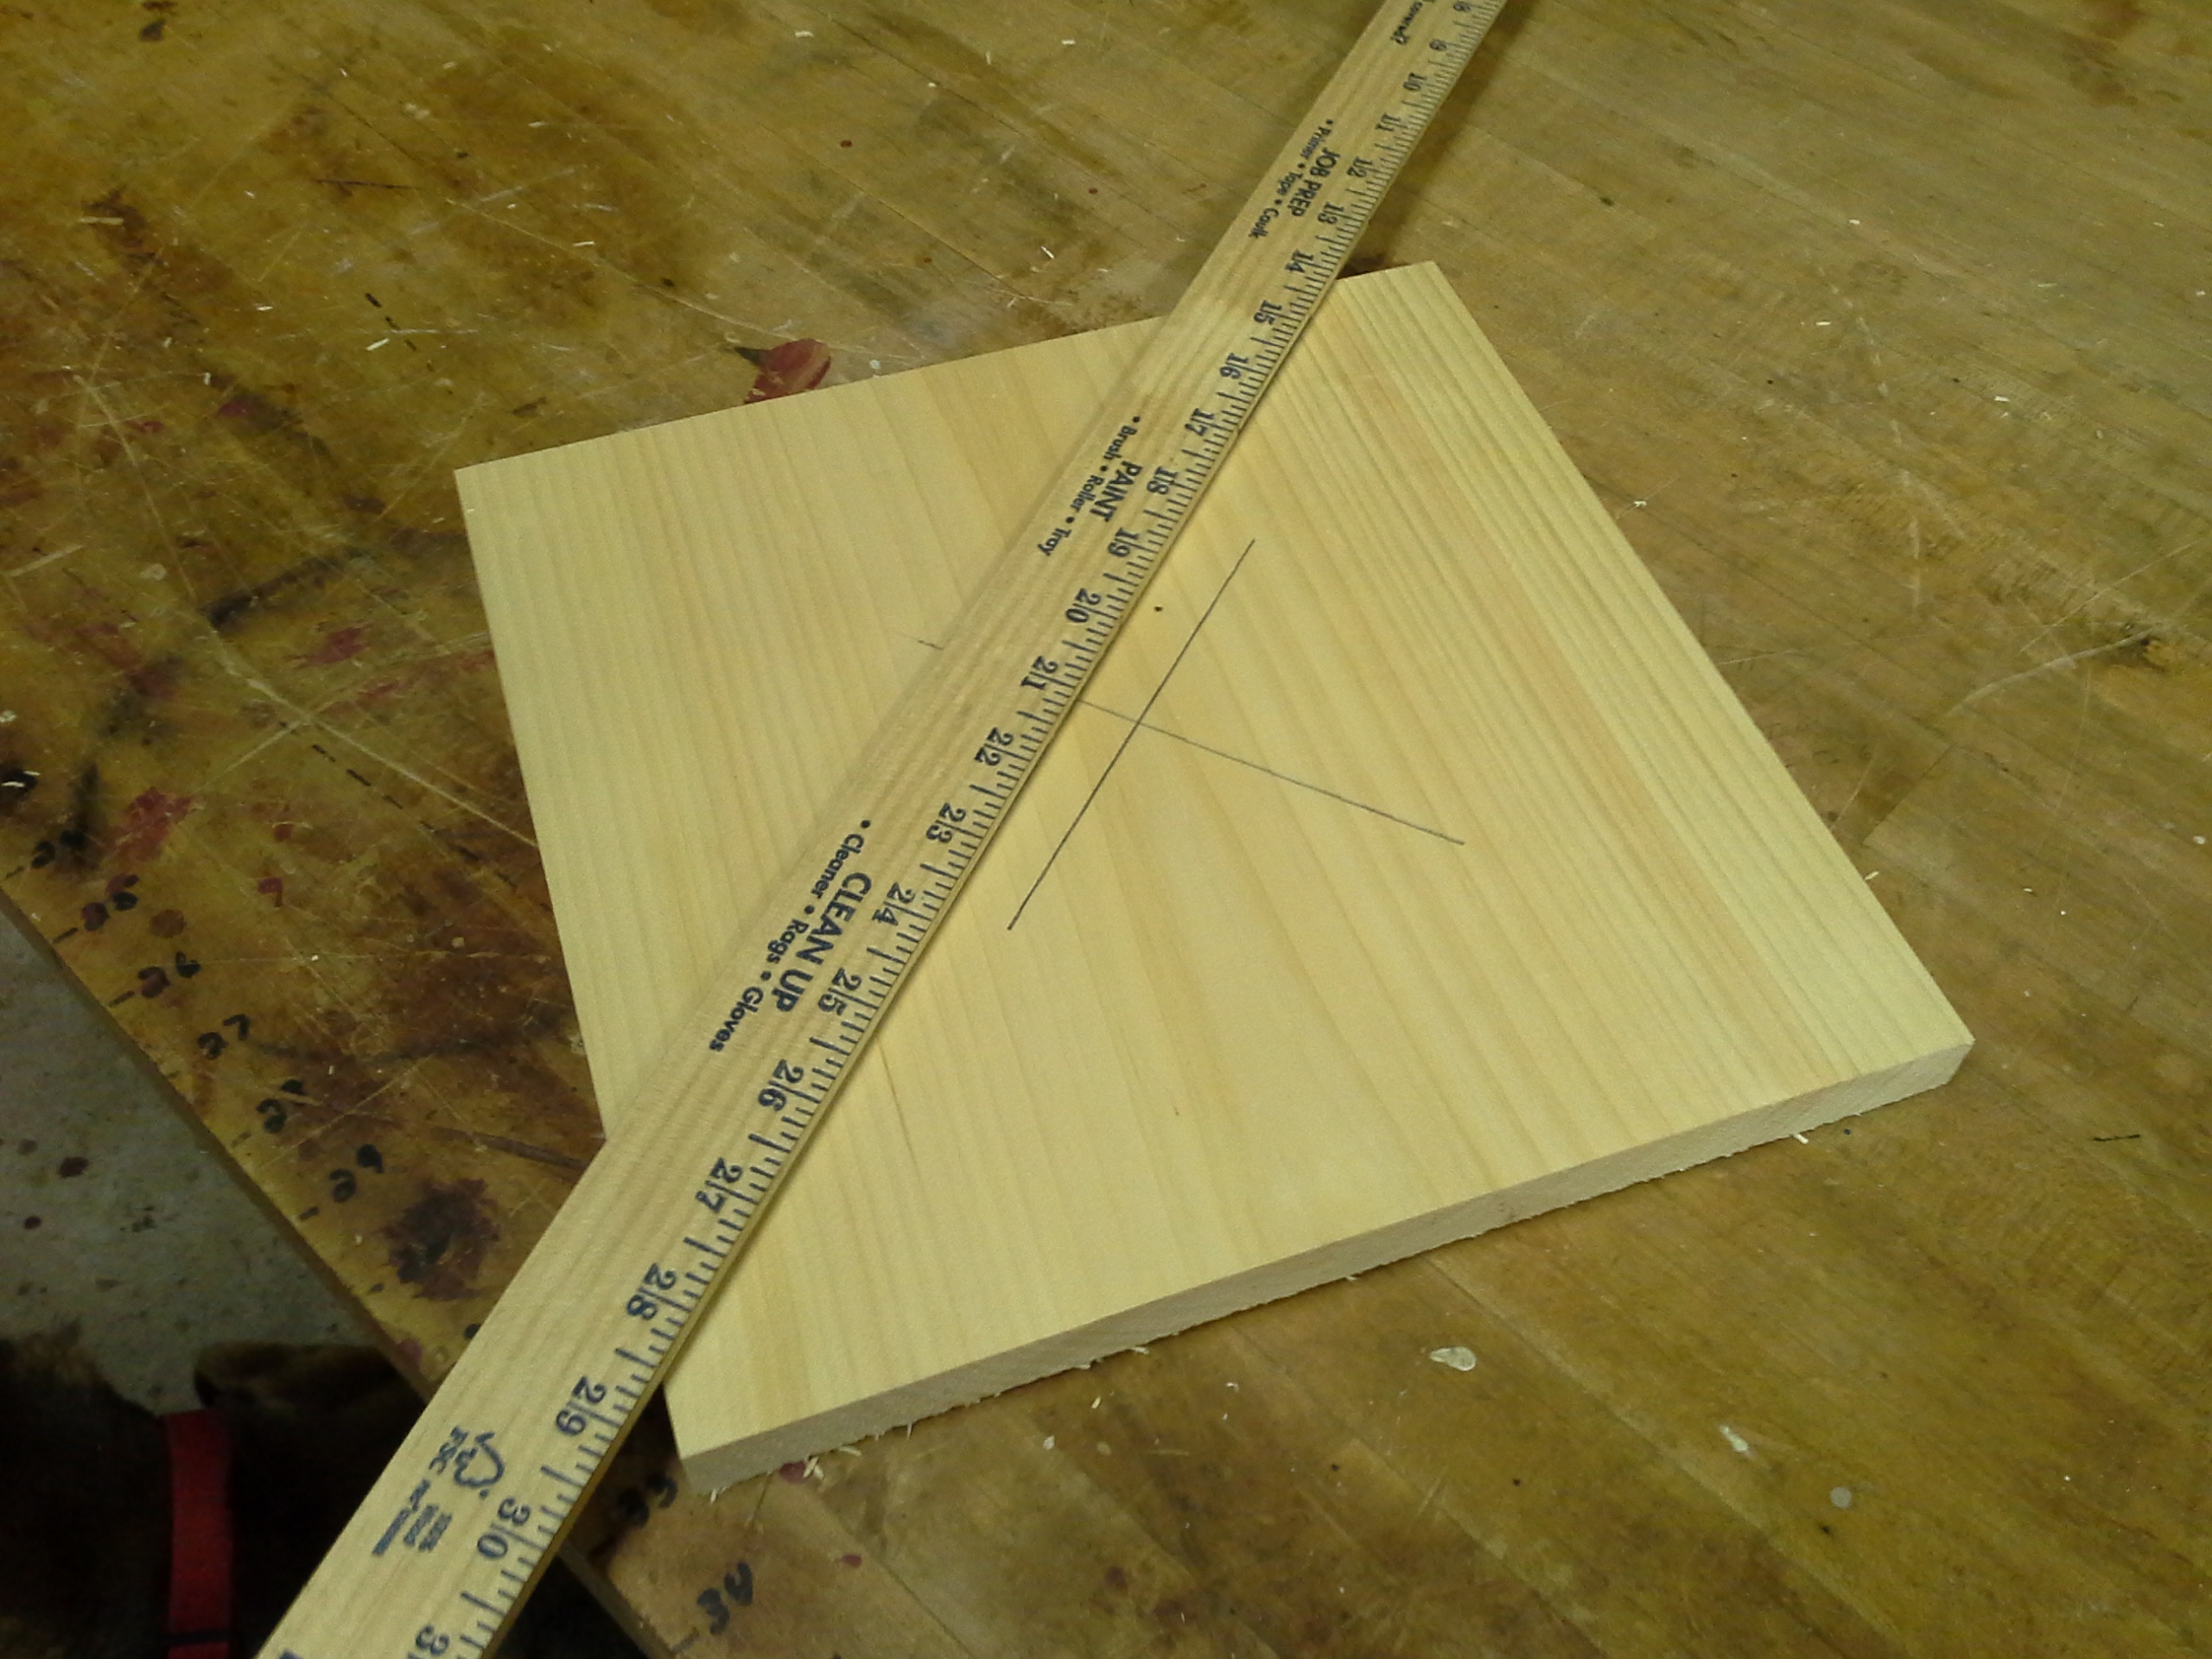
Then draw a line thru the center as shown.
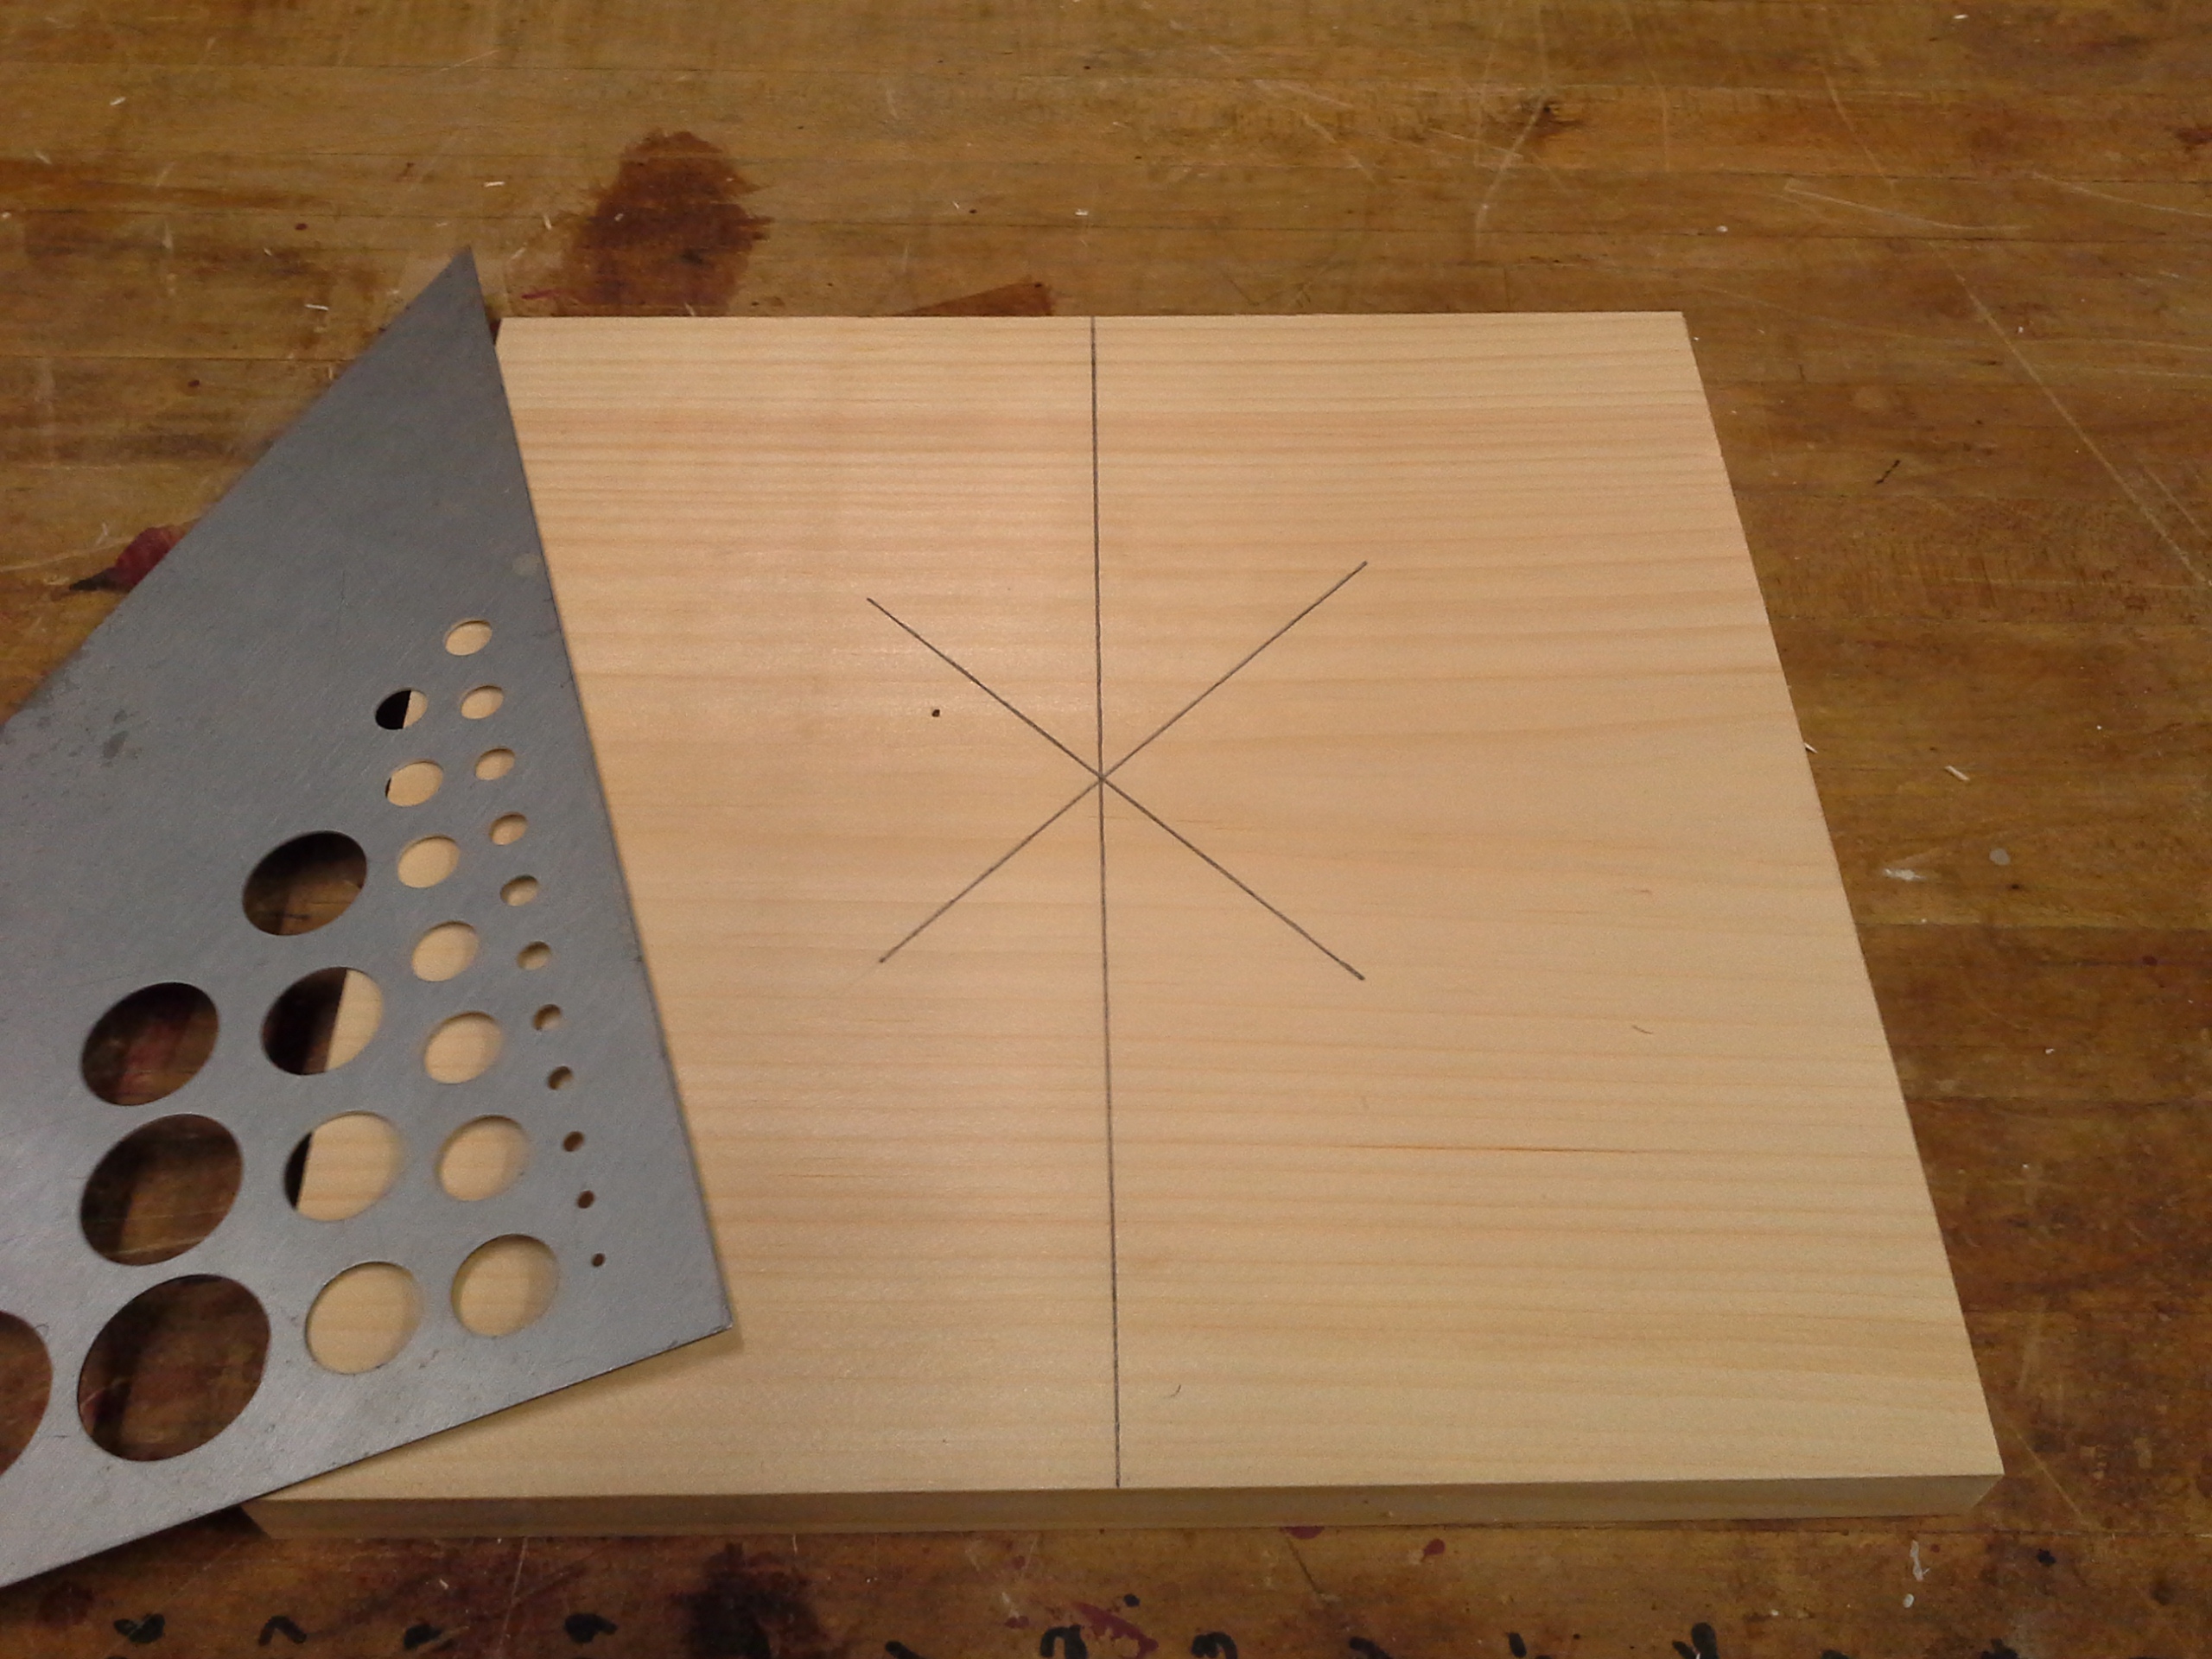
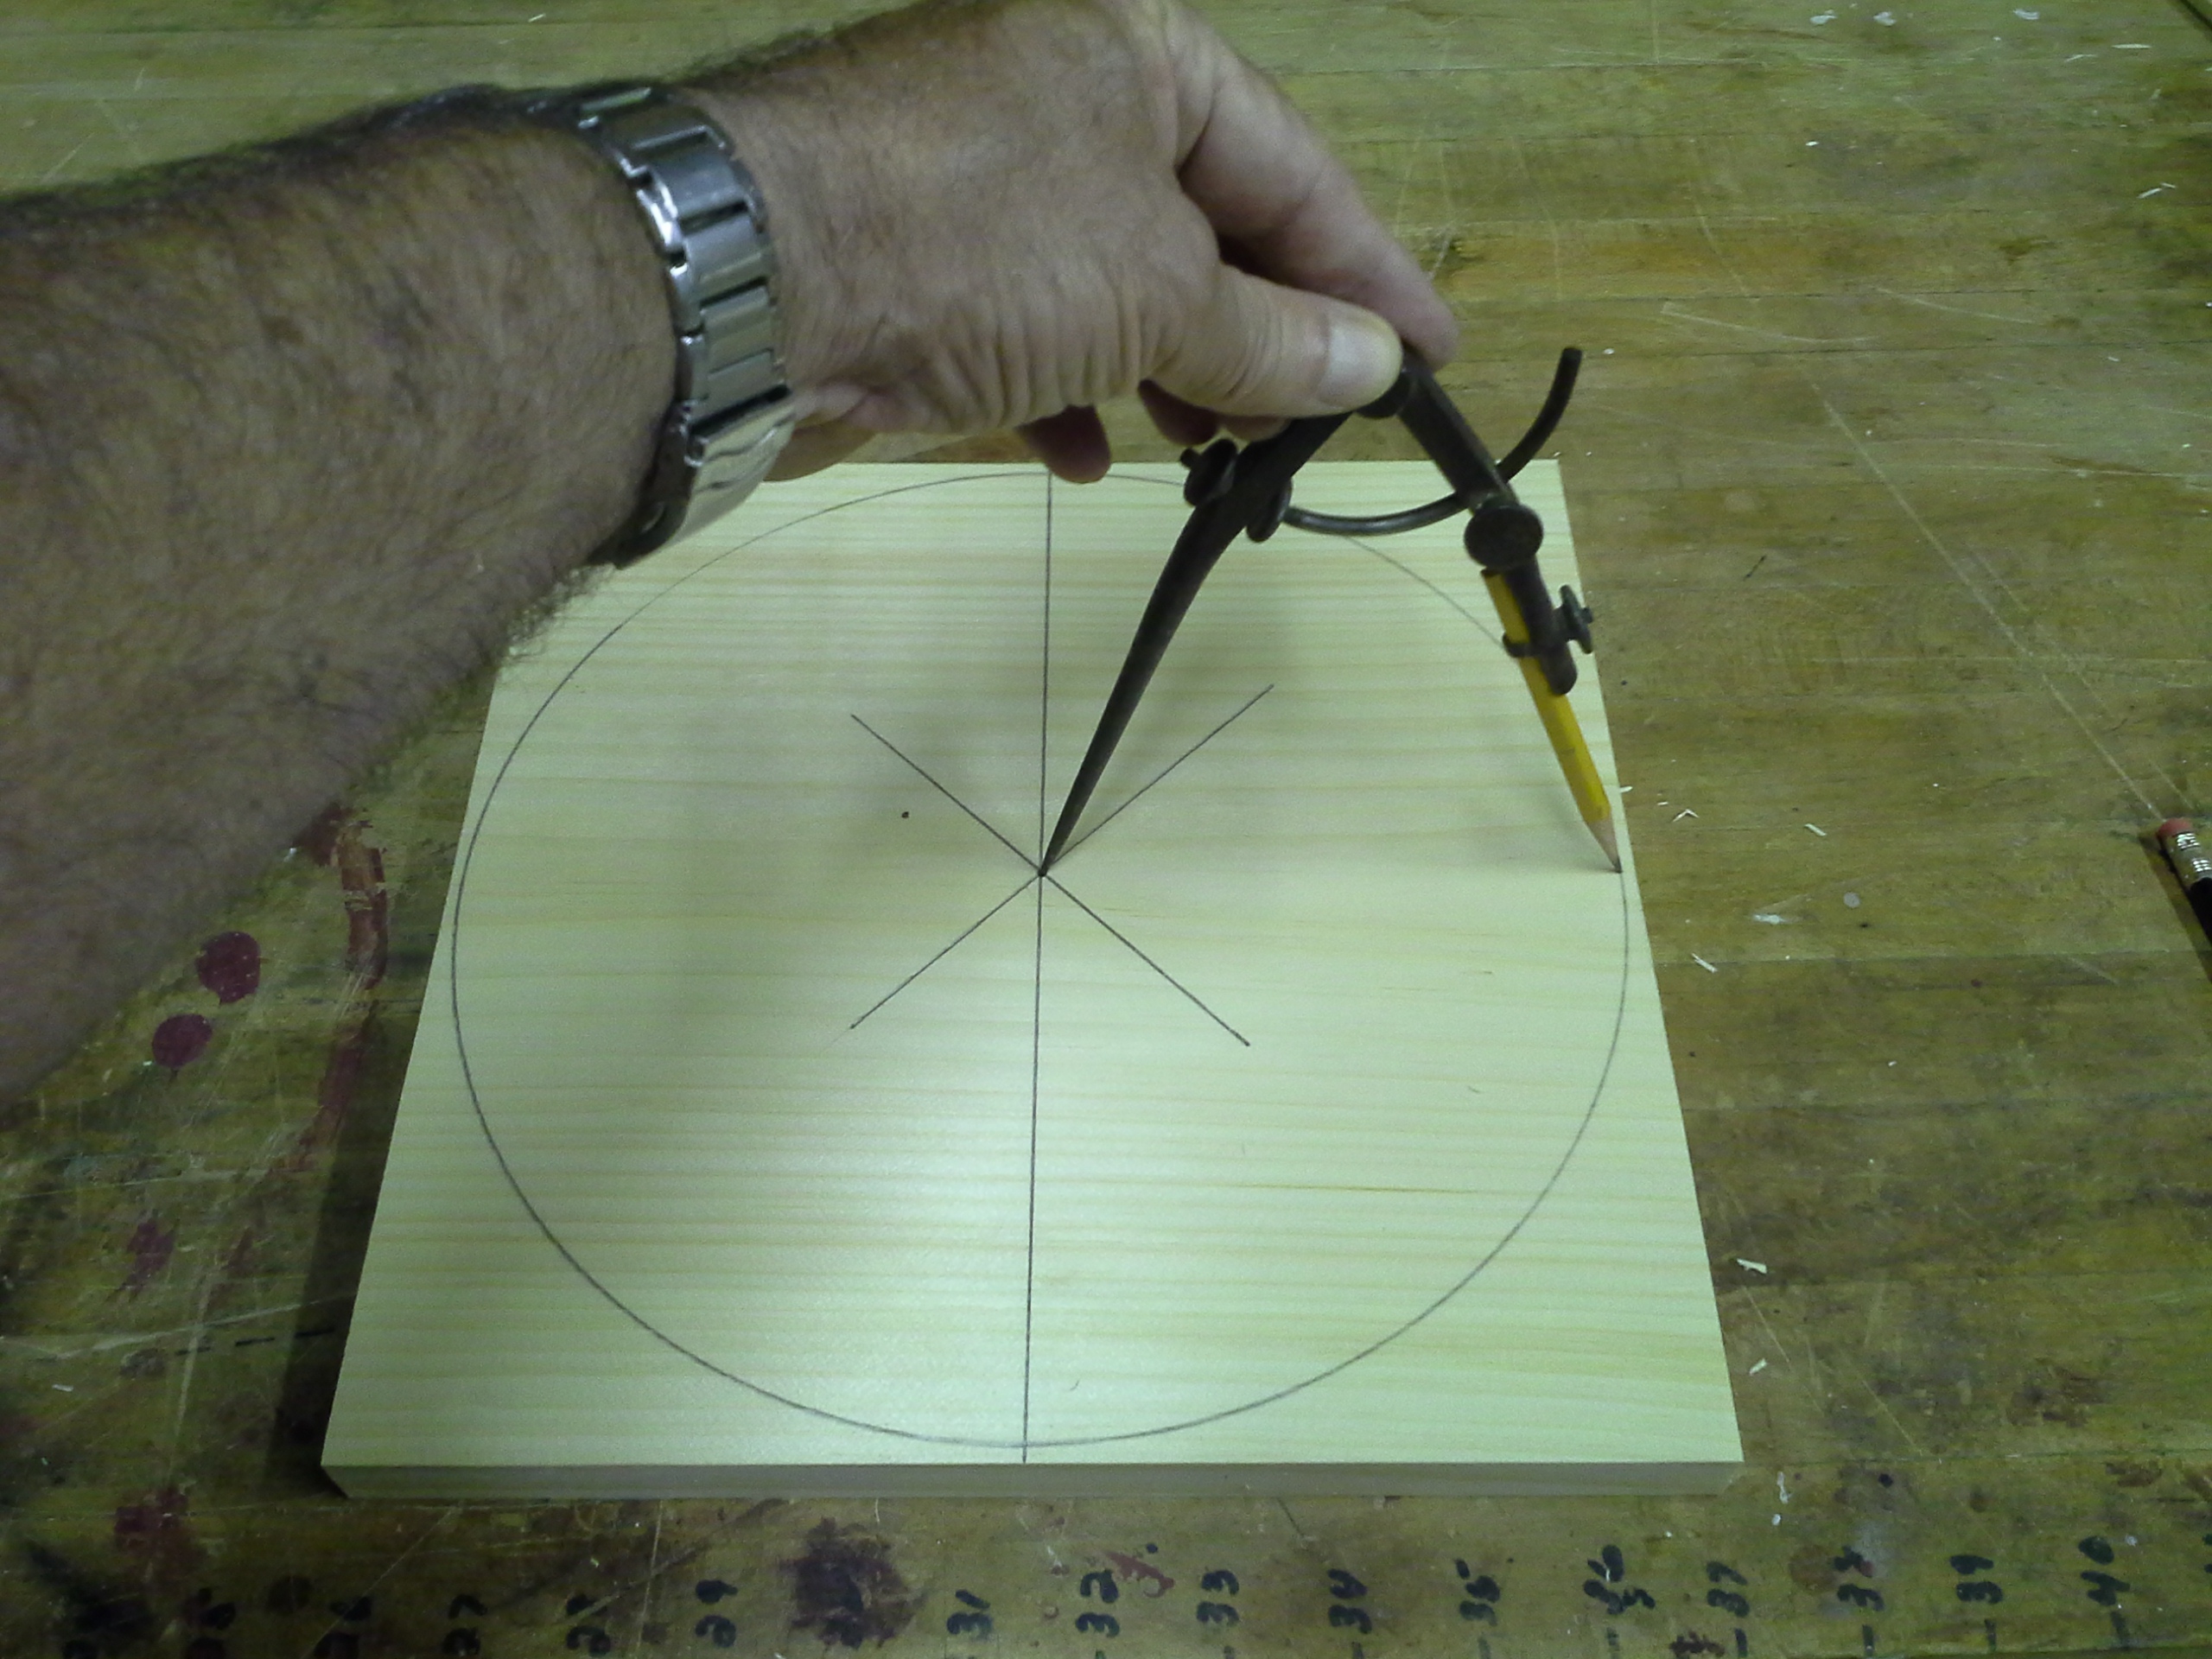
Draw the outside diameter
lines with a compass, going right up to the edge of the piece.
Next, draw the circles I have in the photo.
The 6 small circles are for screw clearance holes, located approximately where I show them.
The large hole is for the
pole and has to be centered and just a little bit bigger than the pole it's
going on.
The smaller hole off to the side of the big hole is for the cable/rope clearance.
(Obviously, if your pole doesn�t use a rope or
cable system, this hole wouldn�t be needed).
Now in just the top piece only, drill out the 6 clearance holes for the screws.

Now, turn the 2nd piece
(bottom) 90 degrees to the first (so the grains oppose each other), set the TOP
piece on the BOTTOM piece, align them, and then screw them together with the 1
1/2" screws.
Drill
the rope/cable clearance hole first.
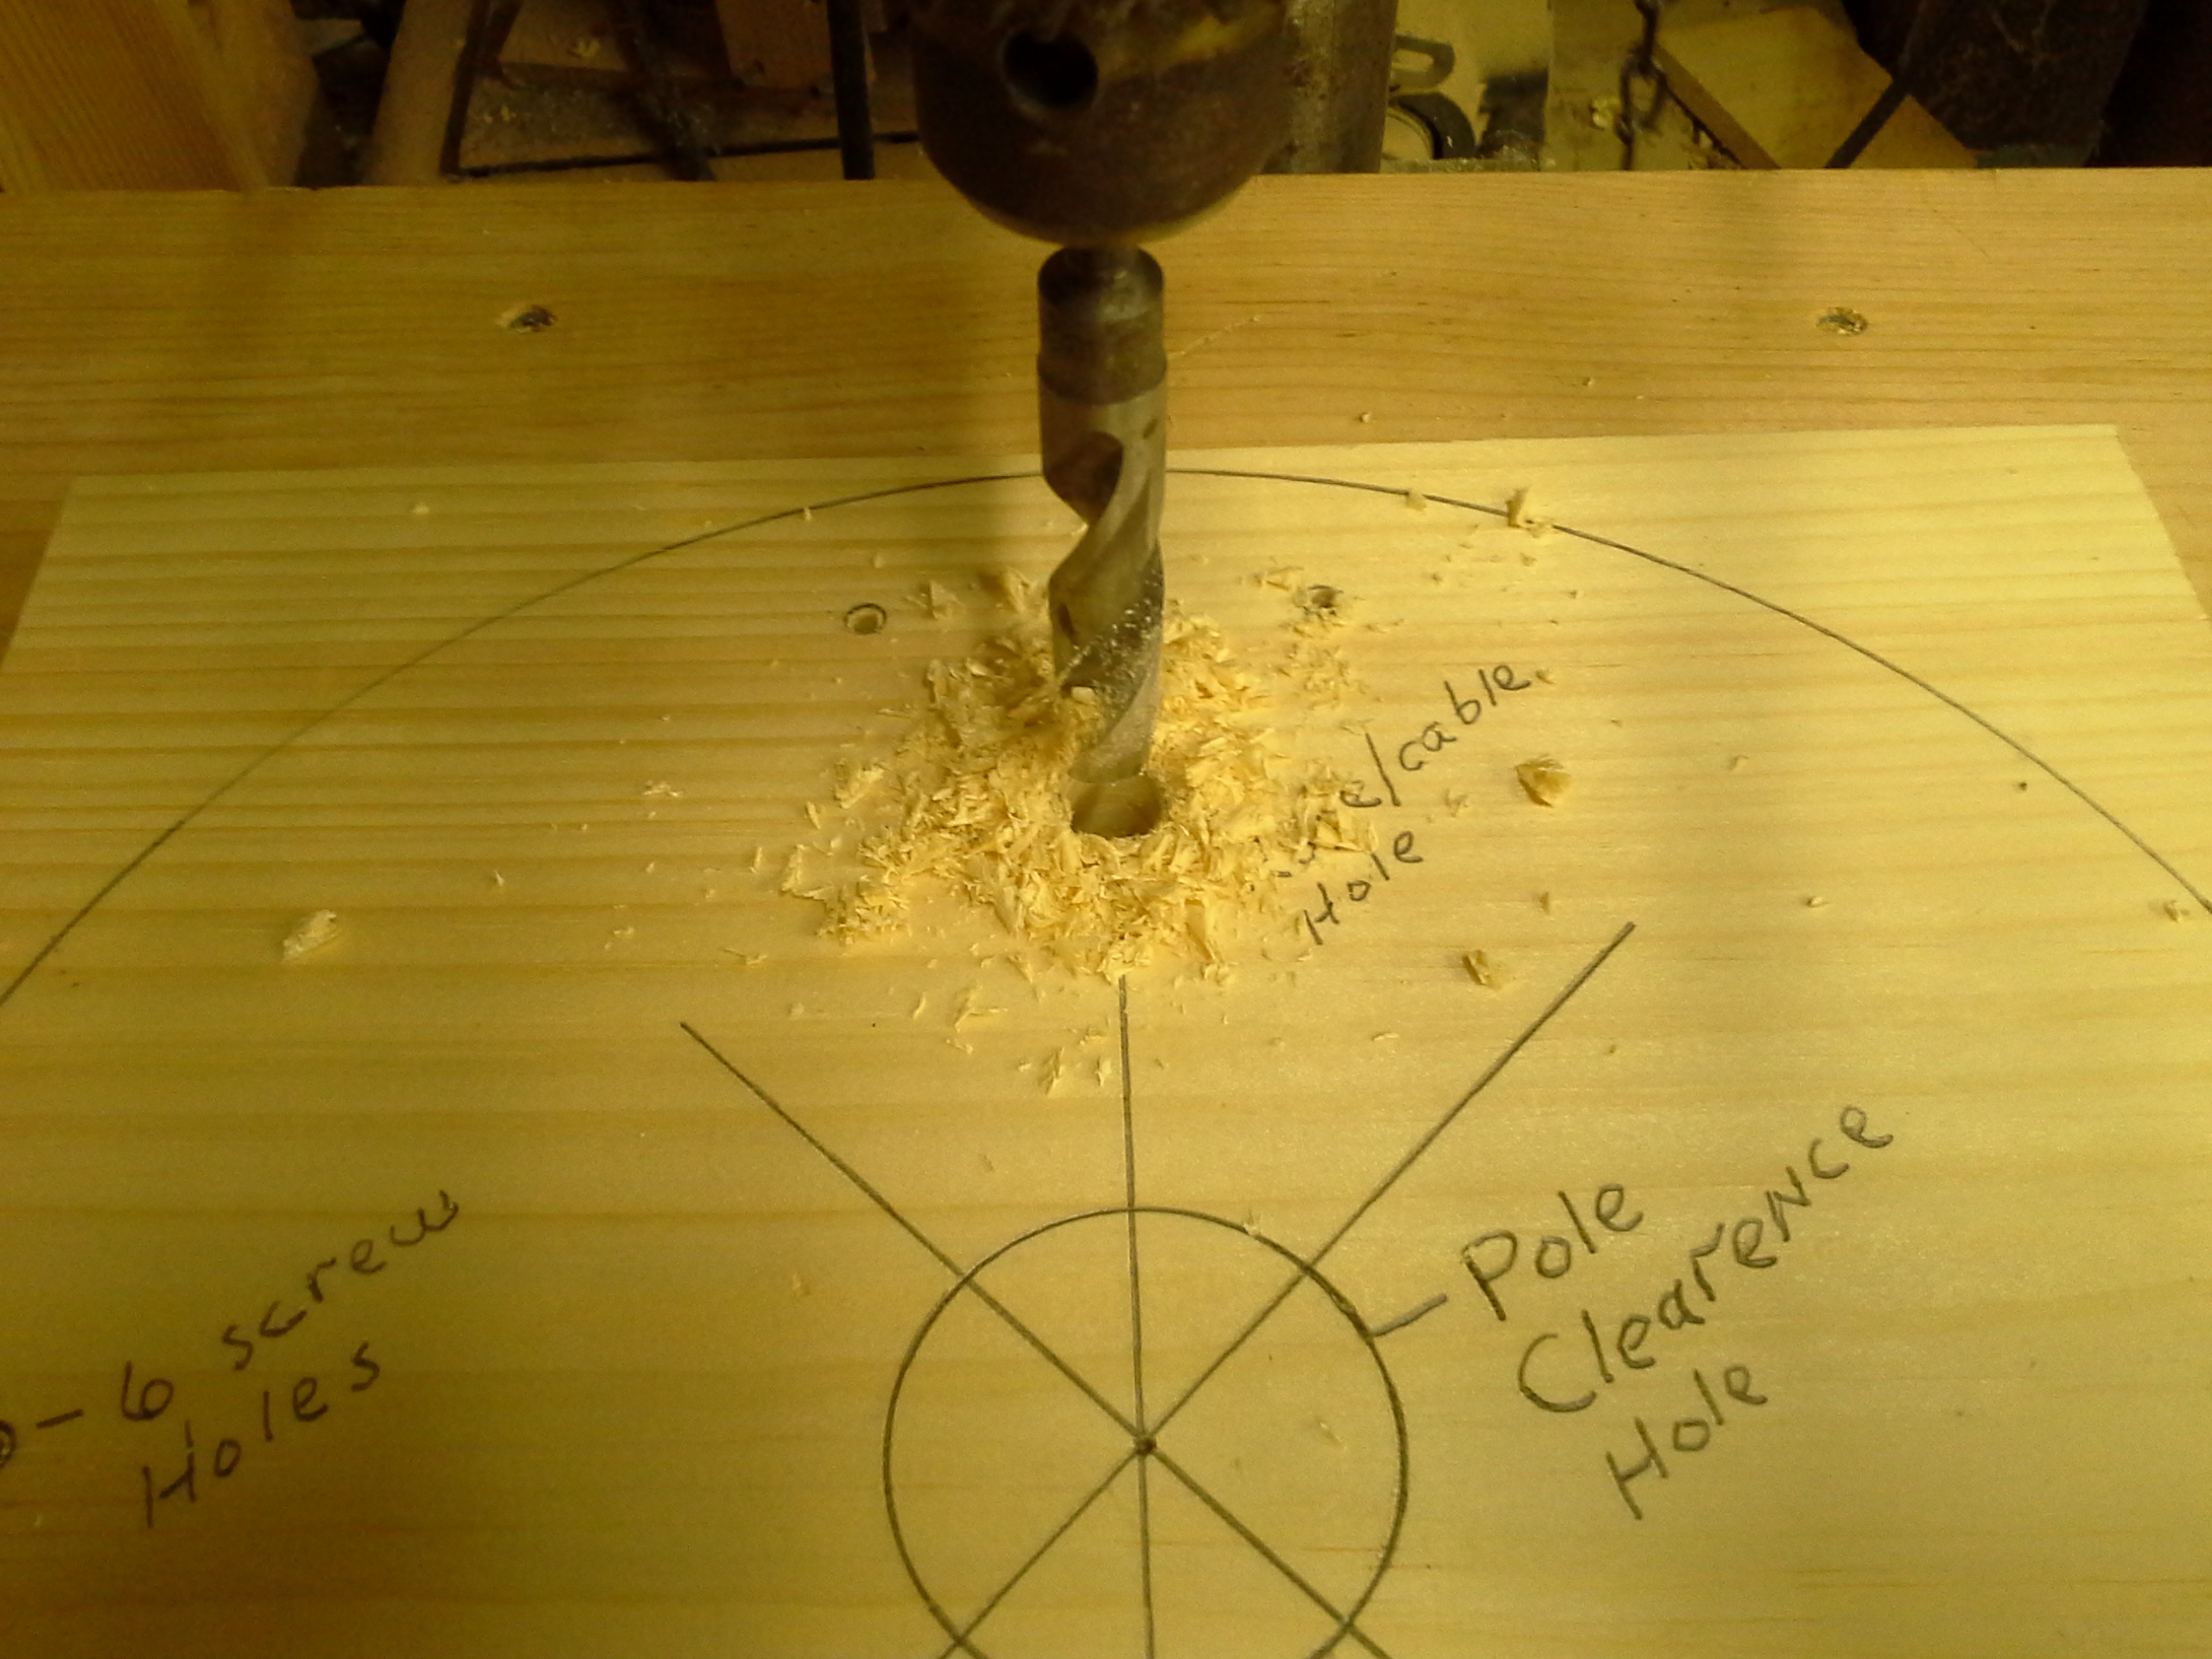
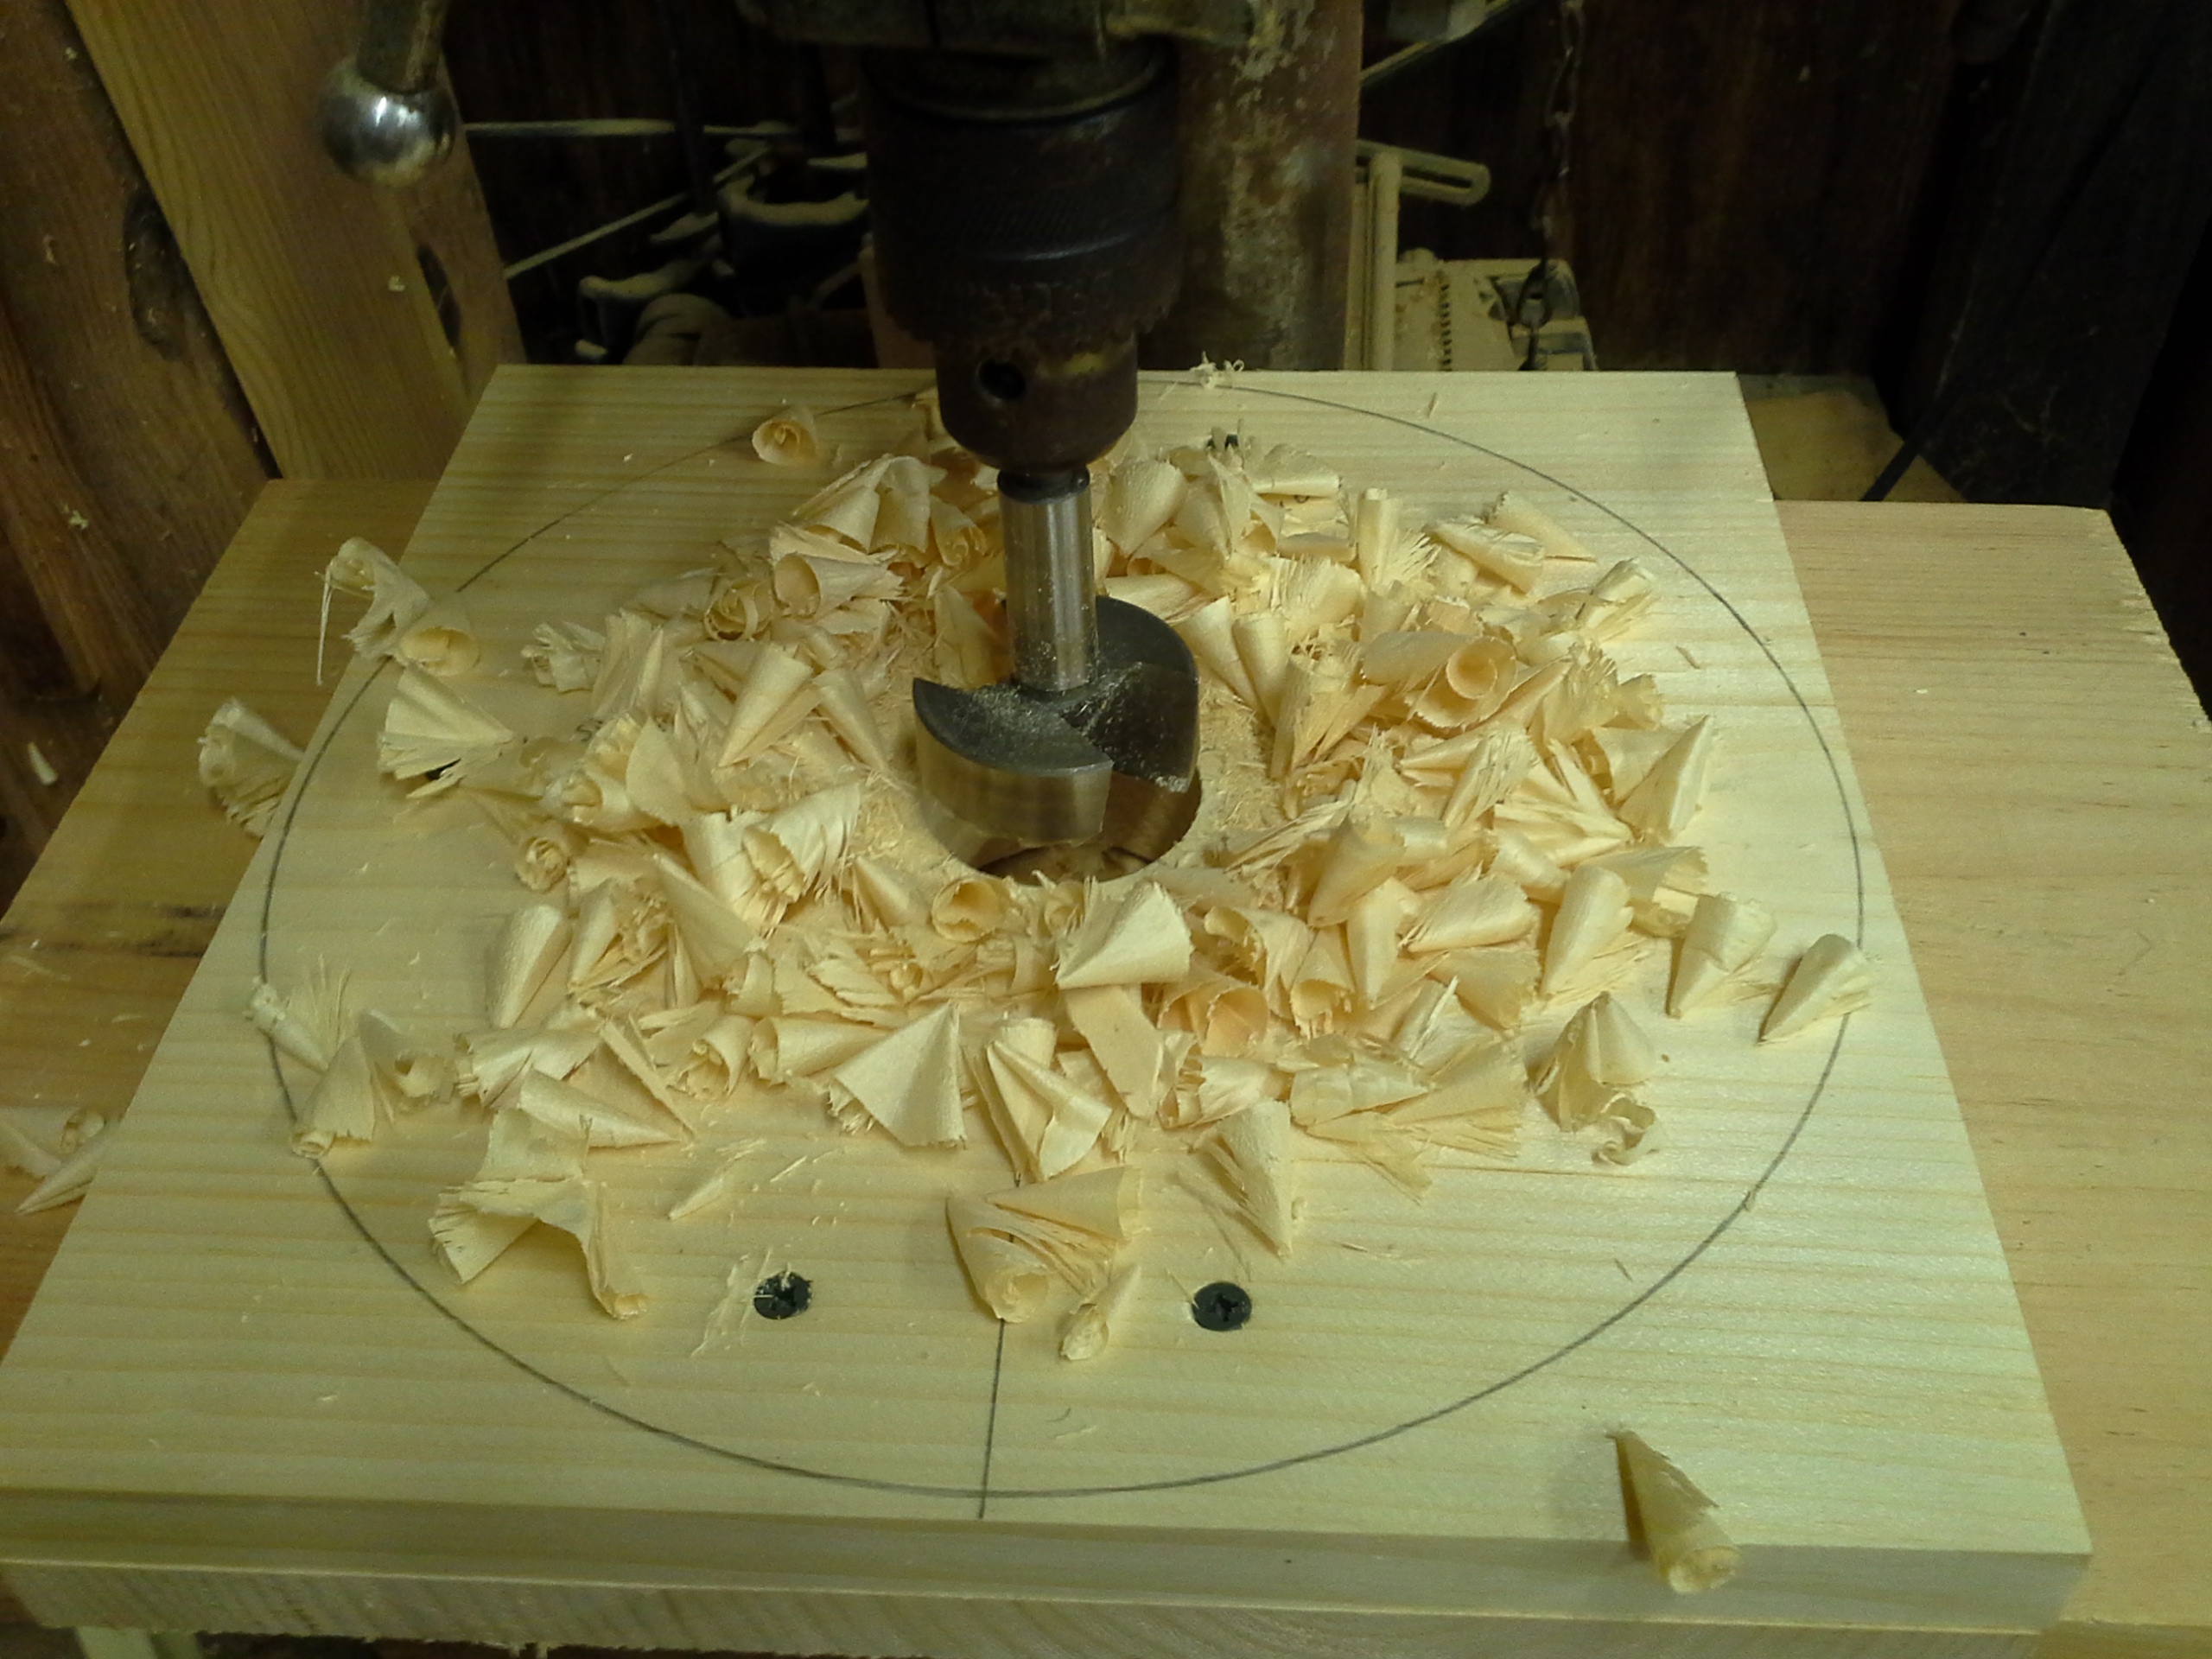
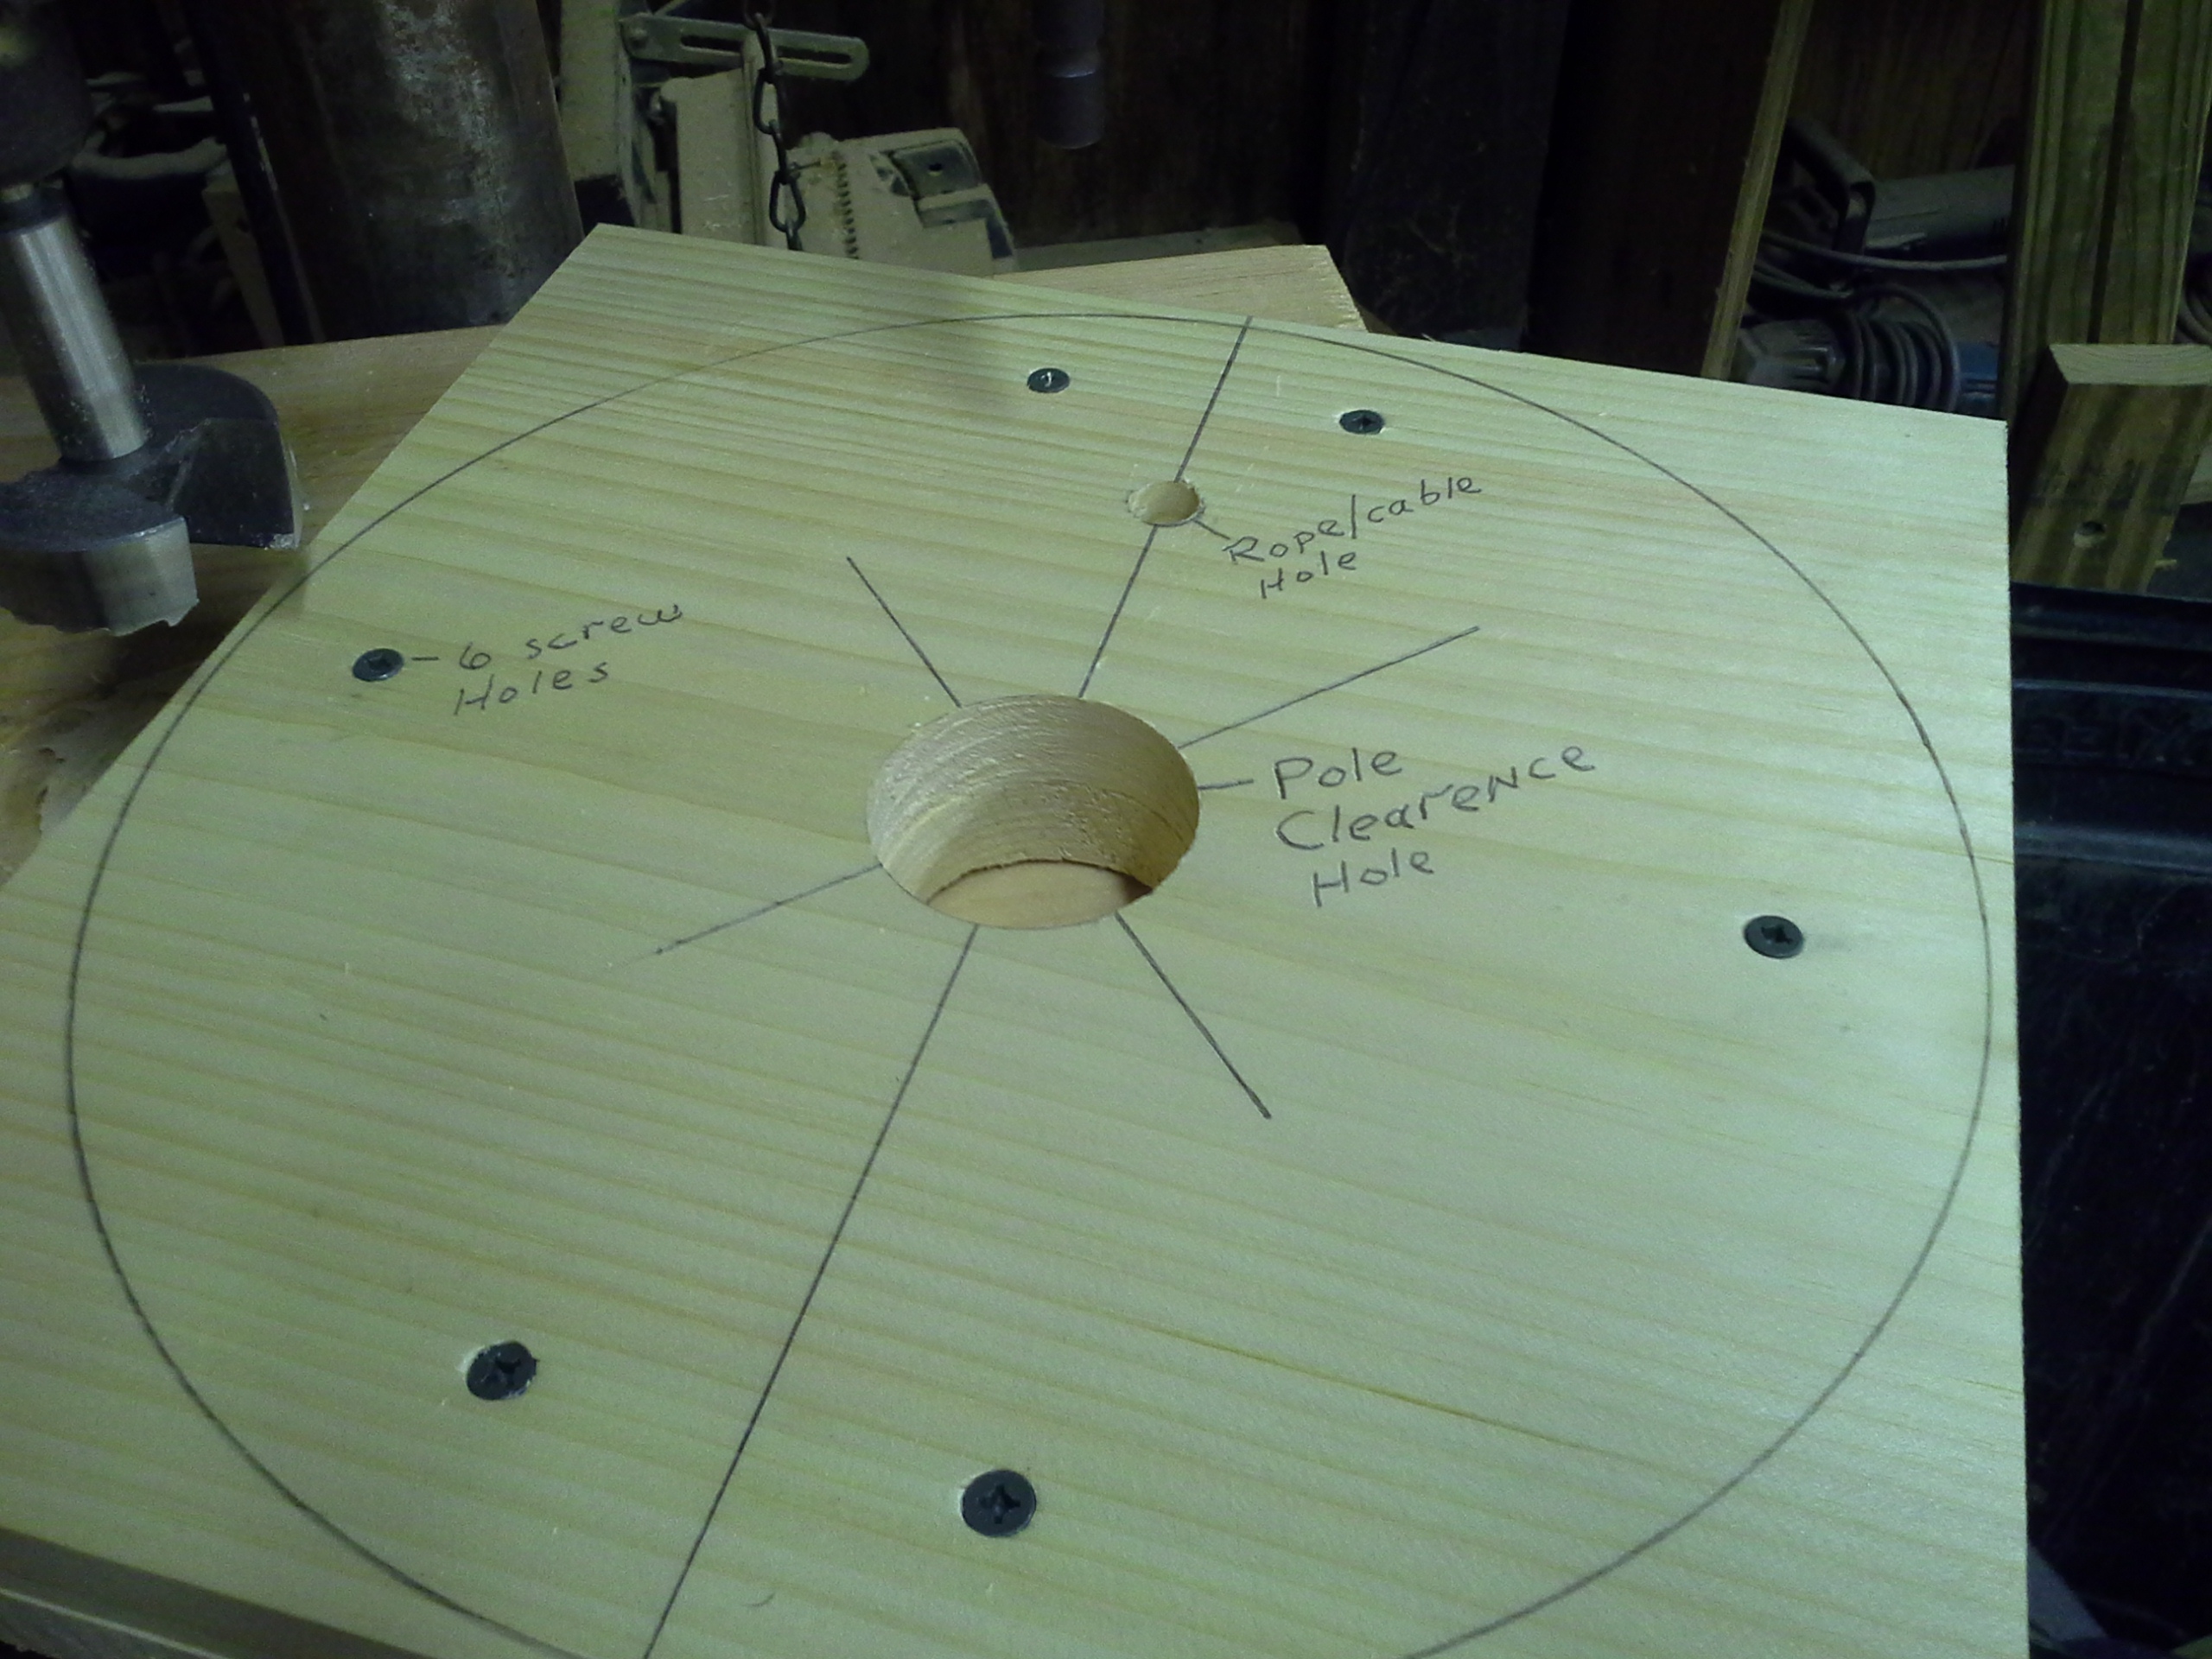
Then
drill the clearance hole for the pole. It needs to be only slightly
larger than the pole it's going on. In fact, a 'snug' fit would be even
better.
Note:
IF you do not have a drill or
hole saw to make the larger hole that matches your pole, follow the directions on the next photo first,
and then carefully cut the pole hole out with a jigsaw after the part has been
cut in half.
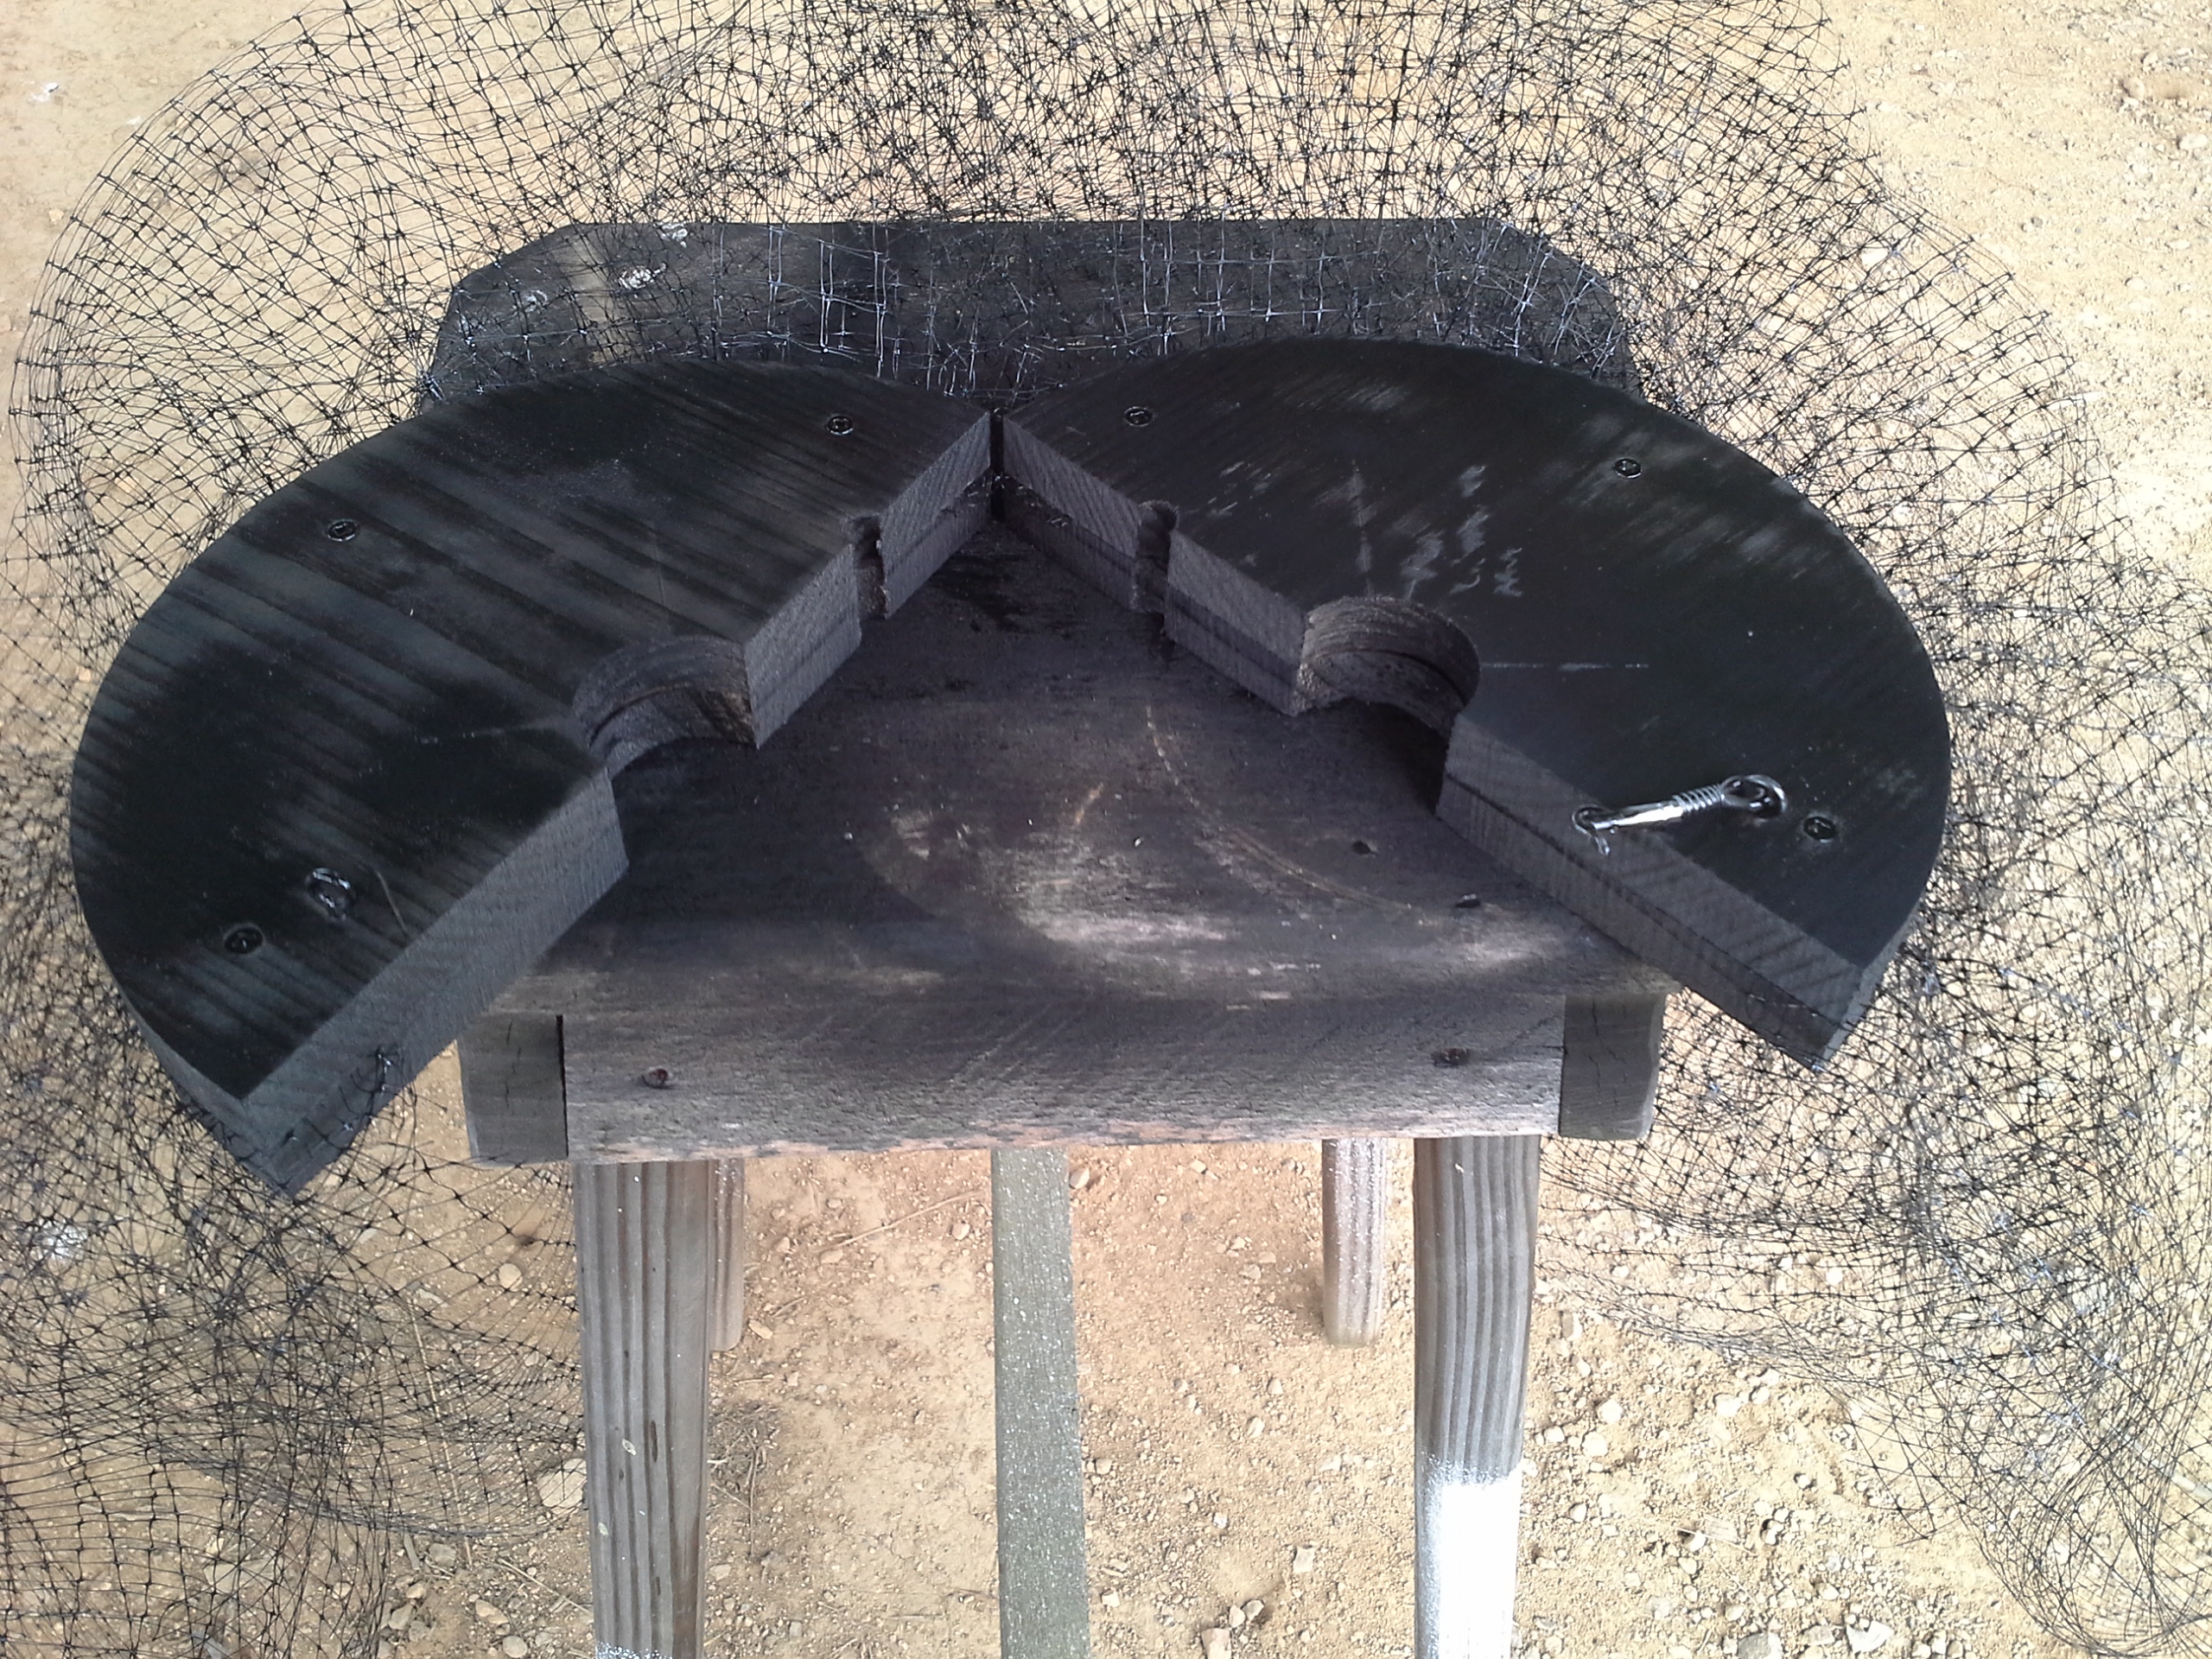
Now cut around the outside
circle and then cut the part in half, thru the rope and pole hole as shown.

Now clamp the part together and add the hinge first using
the 1" sheet rock screws.
A clamp isn't absolutely
necessary, but they do make life easier.
I use 1" sheet rock screws instead of the screws supplied with the hinge, because they are stronger and won't pull out as easily.
Then add the screen door
latch to the opposite side of the part. Make sure it's snug.
NO, it doesn't matter which side you put the hinge on (rope hole side vs non-rope hole side). I just find it easier to add to the pole when I capture the rope first and then close the guard around the pole.
If you want to go opposite as
to what I show, then so be it. It's your guard, do as you wish.
Now let�s add the screen.
Bird screen usually comes in rolls and is
usually folded onto itself to keep the roll short. Cut about a 7'
piece off the roll.
Now cut it down the center
lengthwise.
Now unscrew only the TOP 2
screws of the hinge and the 6 screws holding the guard together.
Set the TOP of the guard to
the side.
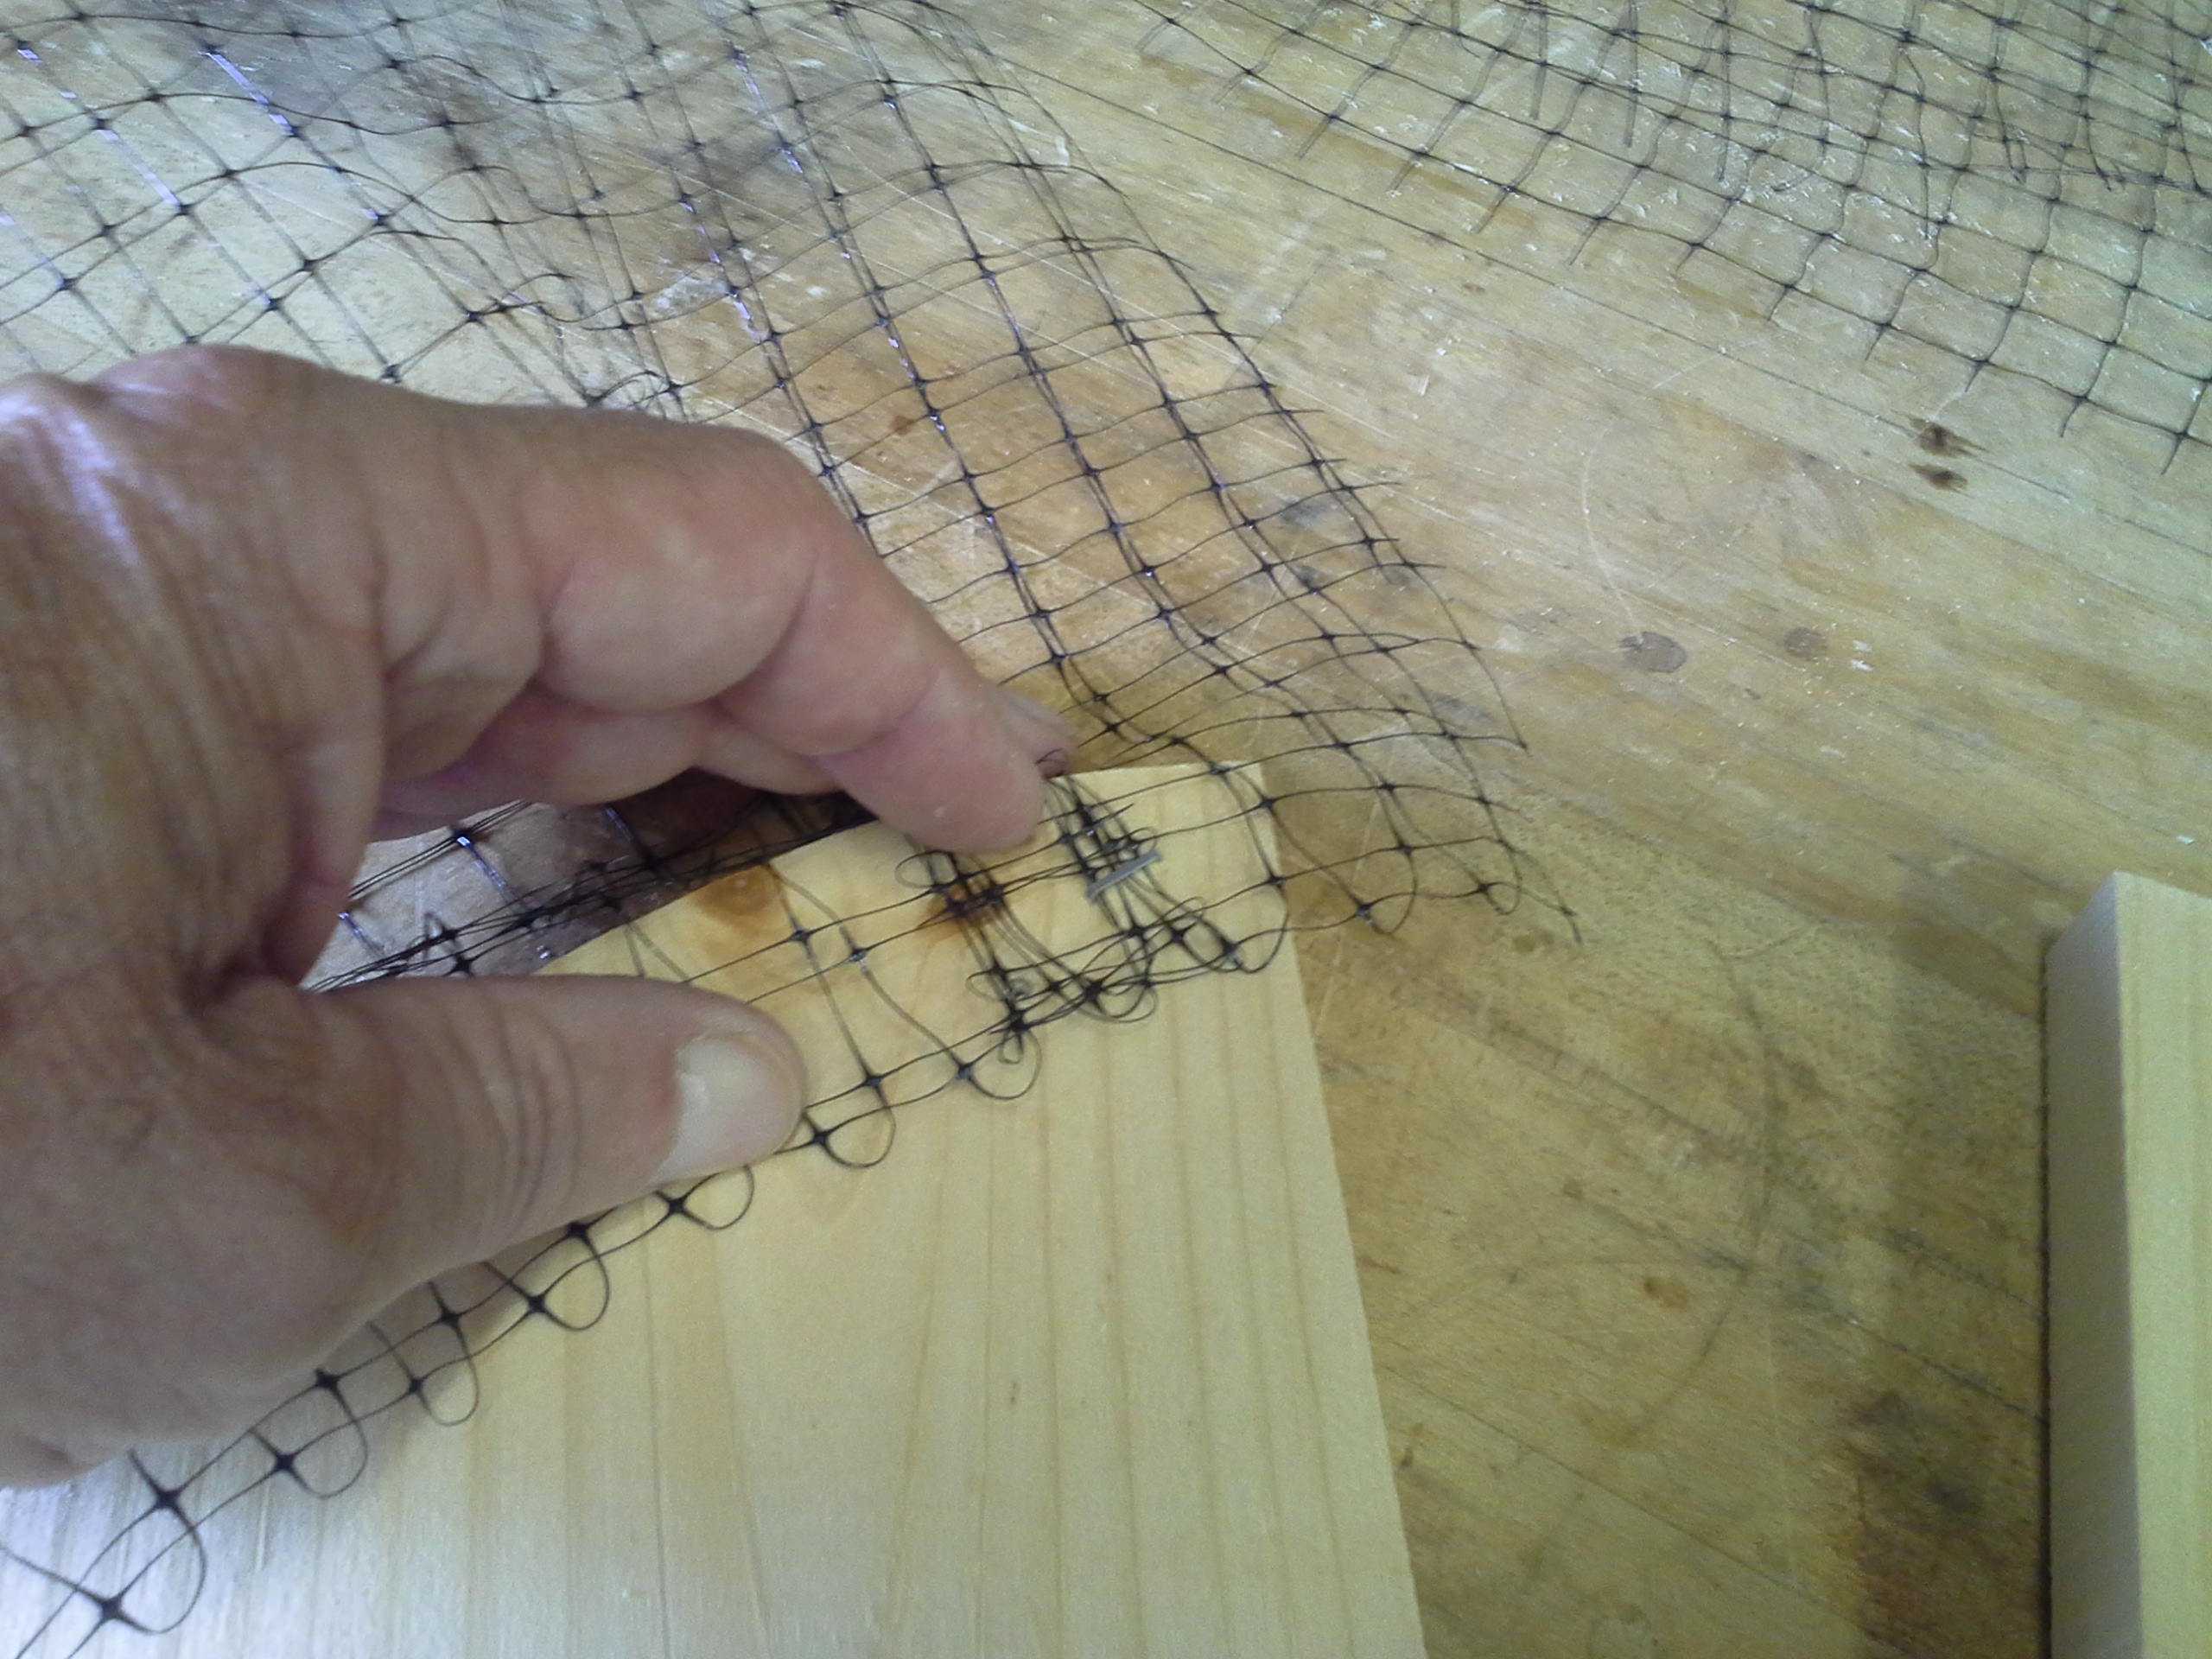
On the BOTTOM ONLY, begin adding the screening at the cut in the wood. You want the short edge of the screen hanging over the edge of the guard. Take the FOLDED edge of the screen and start by laying it on the bottom. Leave an inch or two long so that it hangs beyond the split in the disk as shown (don't want any openings for a snake to get thru).
Begin by stapling it in
place. Then fold the material back onto itself in about 2" loops along one edge, then staple
it to the guard. 1/4" or 3/8"
staples will work just fine.
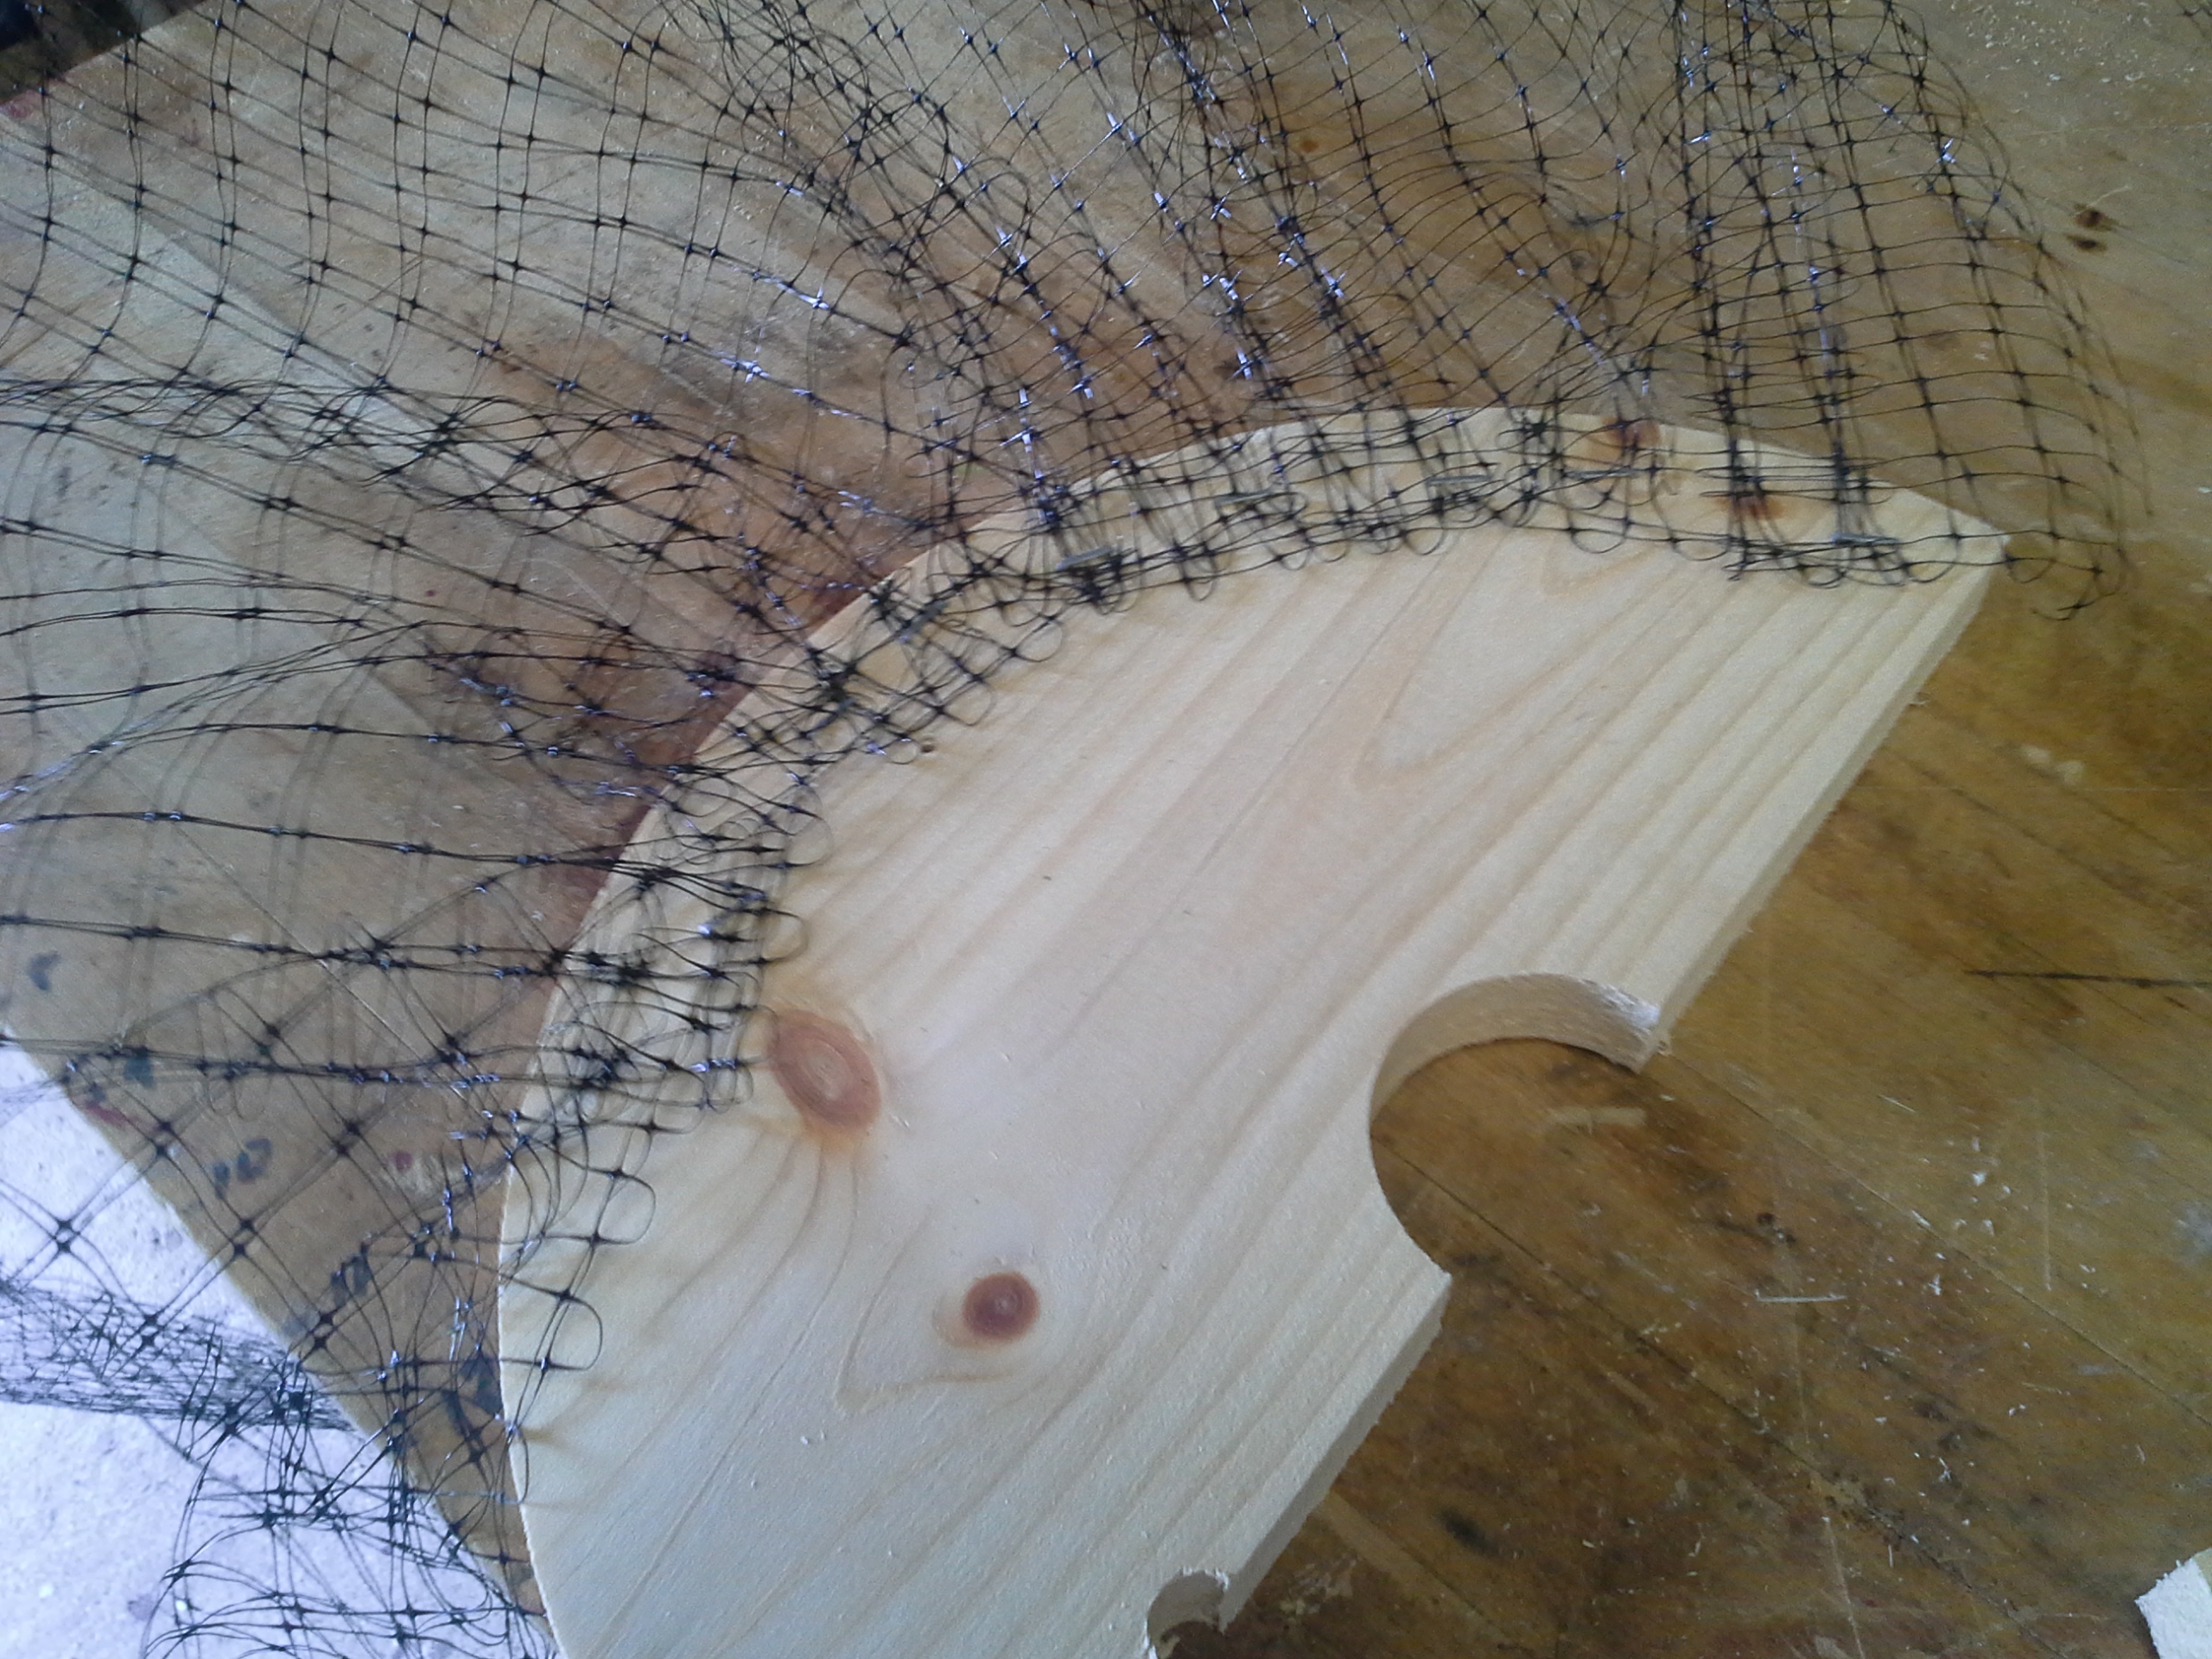
2 loops then staple, 2 more
loops, staple and so on around the guard. I think seamstresses call this
'pleating'...
Staple it closer to the edge. That way, there's a lot more material hanging down creating a much better finished product. Try to gage the material that you use so that there'll be enough to go all the way around the disk and still have a couple of extra inches to hang over the slot in the disk.
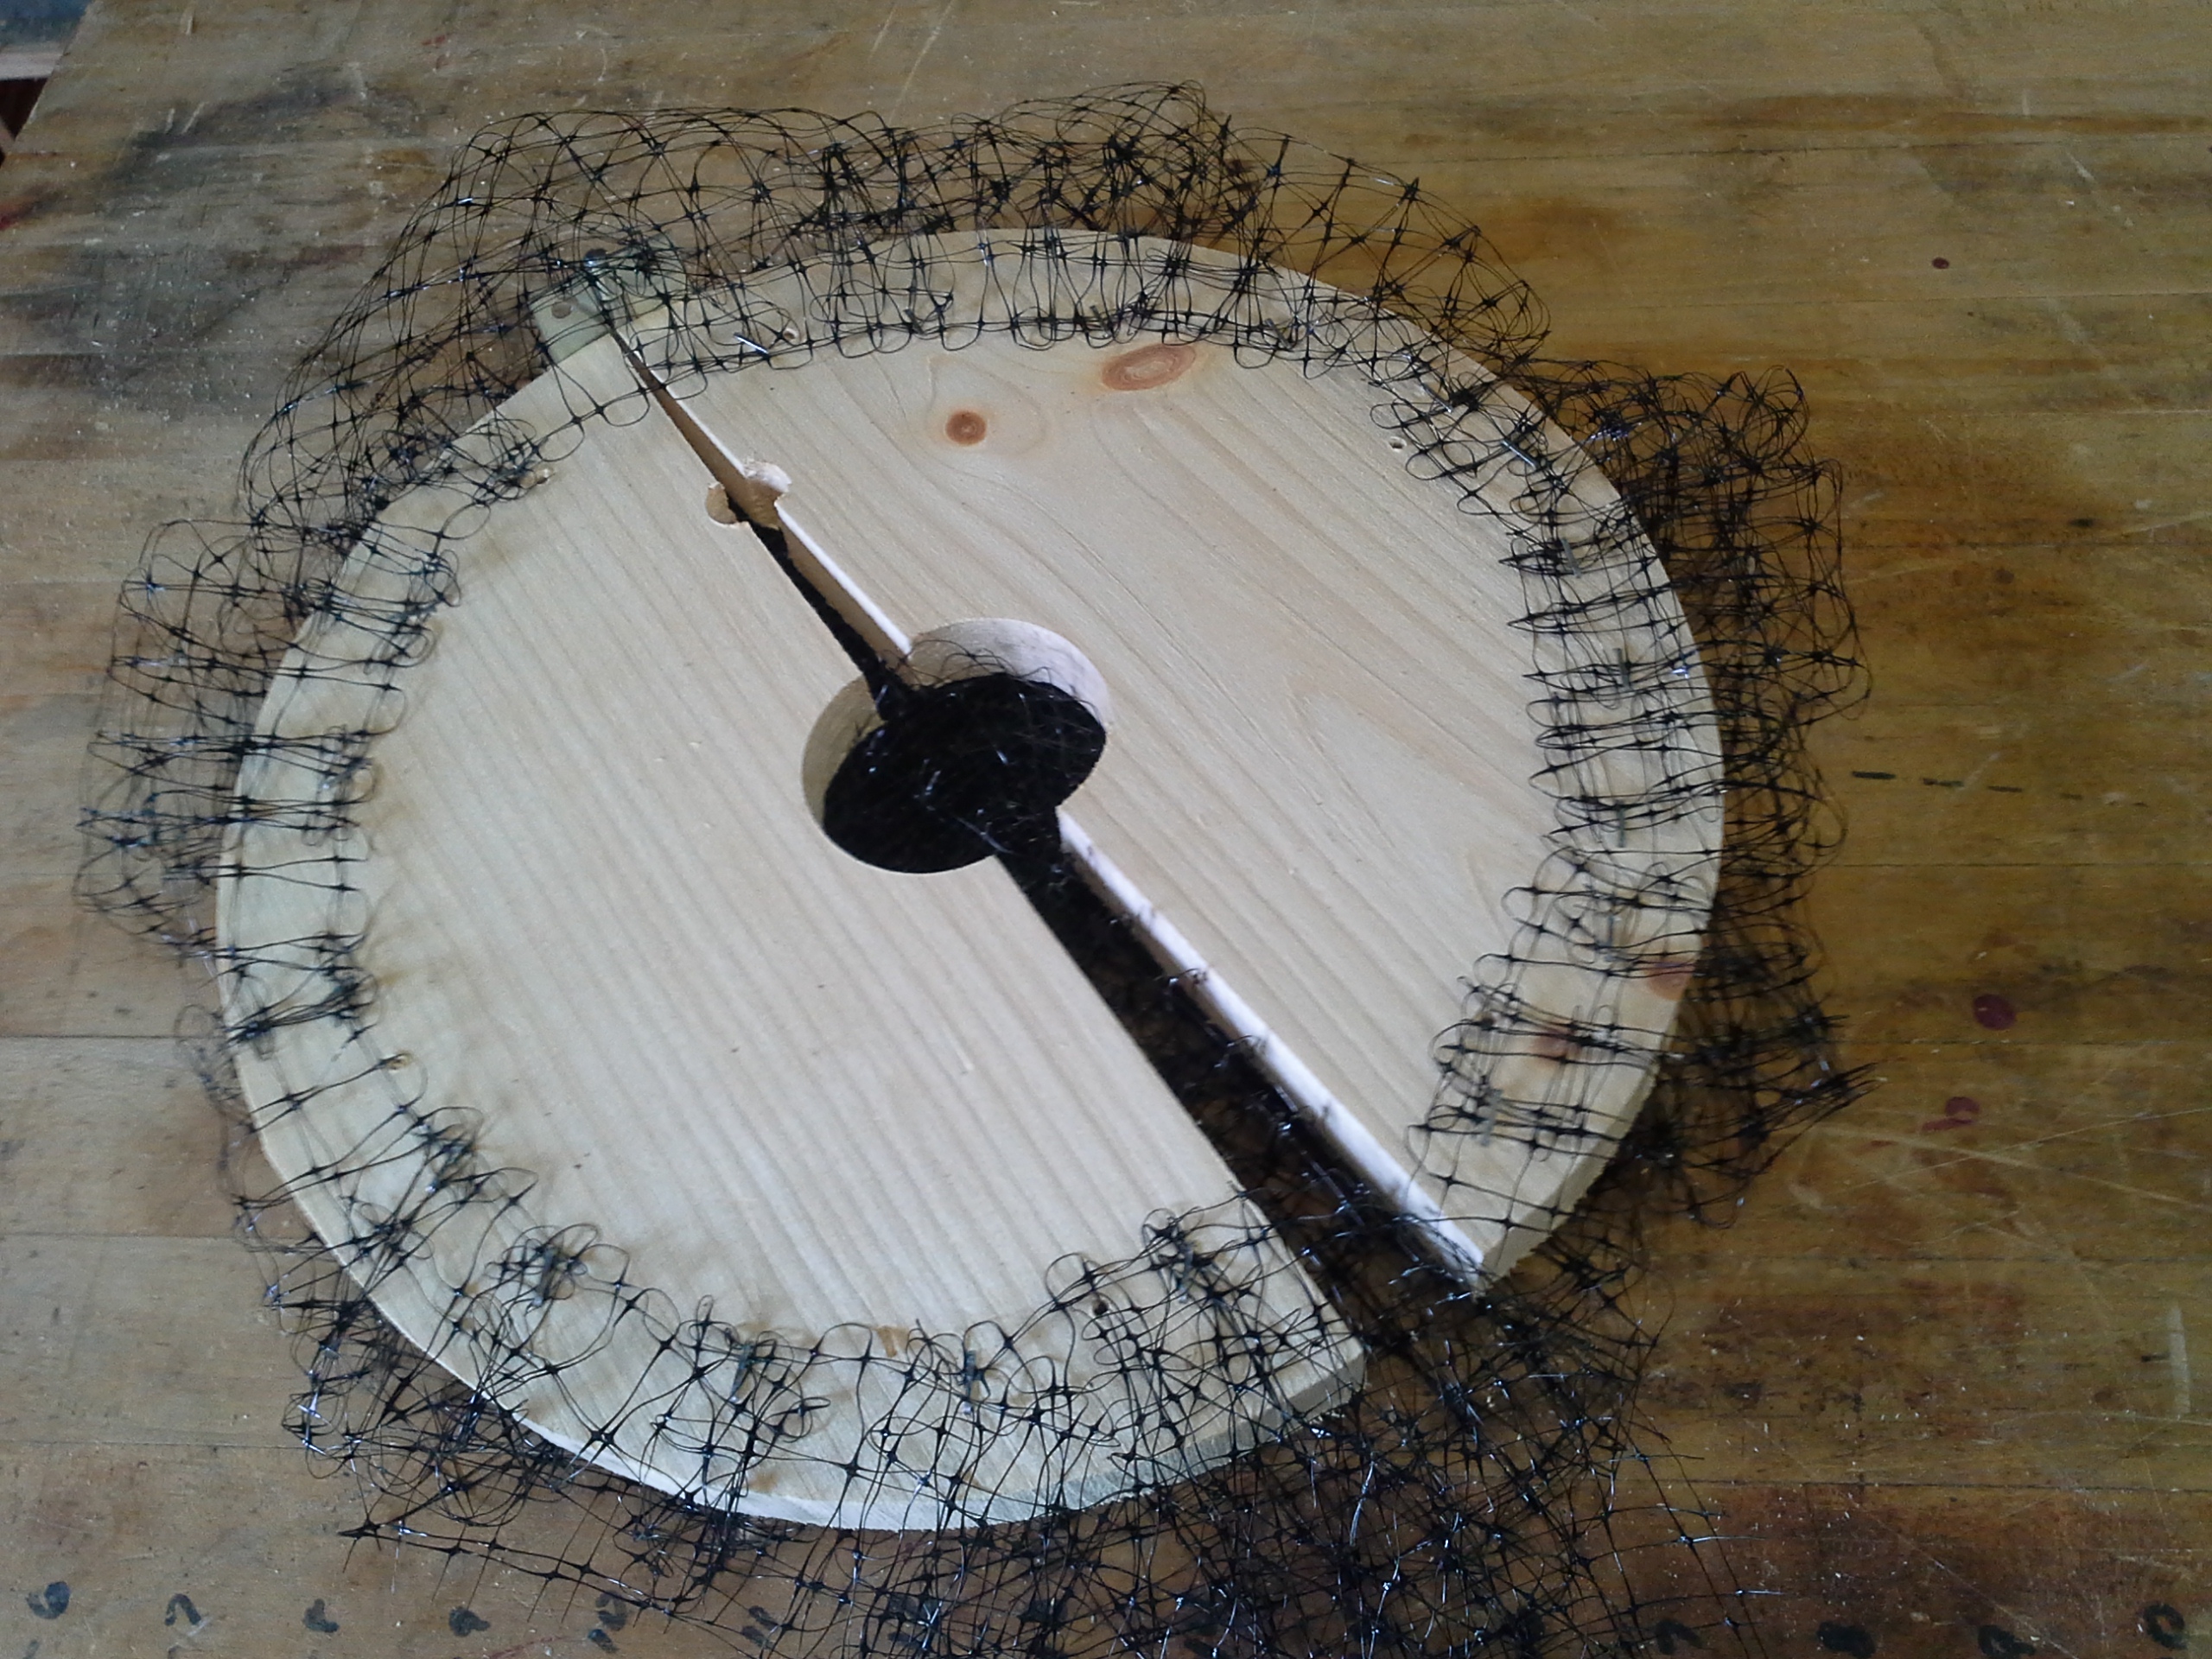
Once the first layer is applied, do the same with the second piece, but begin by adding it to the guard FROM THE OPPOSITE DIRECTION this time.
NOTE: I quickly
found out that, by folding the first layer UNDER the guard, the second layer
went on much easier. (This stuff is a mess to work with and is probably
the reason why it works so well).
After the second layer is added, replace the TOP of the guard and screw it together. You may have to cut a few strands of screening to fit over the hinge, just make sure there are no holes that a snake can get thru
.
Then replace the 2 top hinge
screws.
Now, simply snap the guard
closed, pick it up by the center hole and straighten the screening, pulling and
stretching to straighten it up. Make it real nice and FLUFFY.
Believe it or not, IT'S DONE...and ready for painting (which I suggest since it's going to be out in the elements).
Painting helps keep the weather off and obviously makes the guard last a lot longer out in the elements and the spray paint can be added right thru the netting. Spray both the top and bottom so it has good coverage.
And the guard is
done and ready to be added to the pole.
NOW...take
the hose clamp and a couple of pieces of old garden hose (or whatever hose you
have available) and slip the clamp thru the hose and then add it to the pole as
shown about 4' high. Cut the hose in short 1" pieces and add one to
each side of the pole. The guard will simply set on top of this gizmo...

And finally, simply add the
guard above the clamp/hose, clamping it in place with the screen door clasp.
Straighten out the webbing so that it's nice and fluffy and you now have a snake
guard that will not allow any snakes to get at your martins.
Now, wasn't that easy?
So... why did I make the guard 2 layers of wood? Why not simply staple the netting to the first layer?
I have a number of reasons.
First, by crossing the grains
of wood to each other, it makes it a much stronger guard.
Second, the 1 1/2" hinge
works much better with 2 layers of wood, helping keep it square.
Third, by clamping the
netting between 2 layers of wood, it's held in place much better and a snake
can't pull it from the staples while trying to get free.
And fourth, if any birds (of any kind) happen to land on the guard, they won't become entangled in the netting. Bluebirds especially use my guards to hunt from and the last thing I want to do is lose a Bluebird because it got tangled in my netting.
So there you have it. A
simple and inexpensive snake guard... PLEASE, make one or two, and PLEASE,
PLEASE, USE THEM. As I said, they are not expensive and, since you're
already making one, I suggest making an extra one and setting it aside,
just in case a snake happens along. You can use the extra one to replace
the 'damaged' one while it's being repaired.
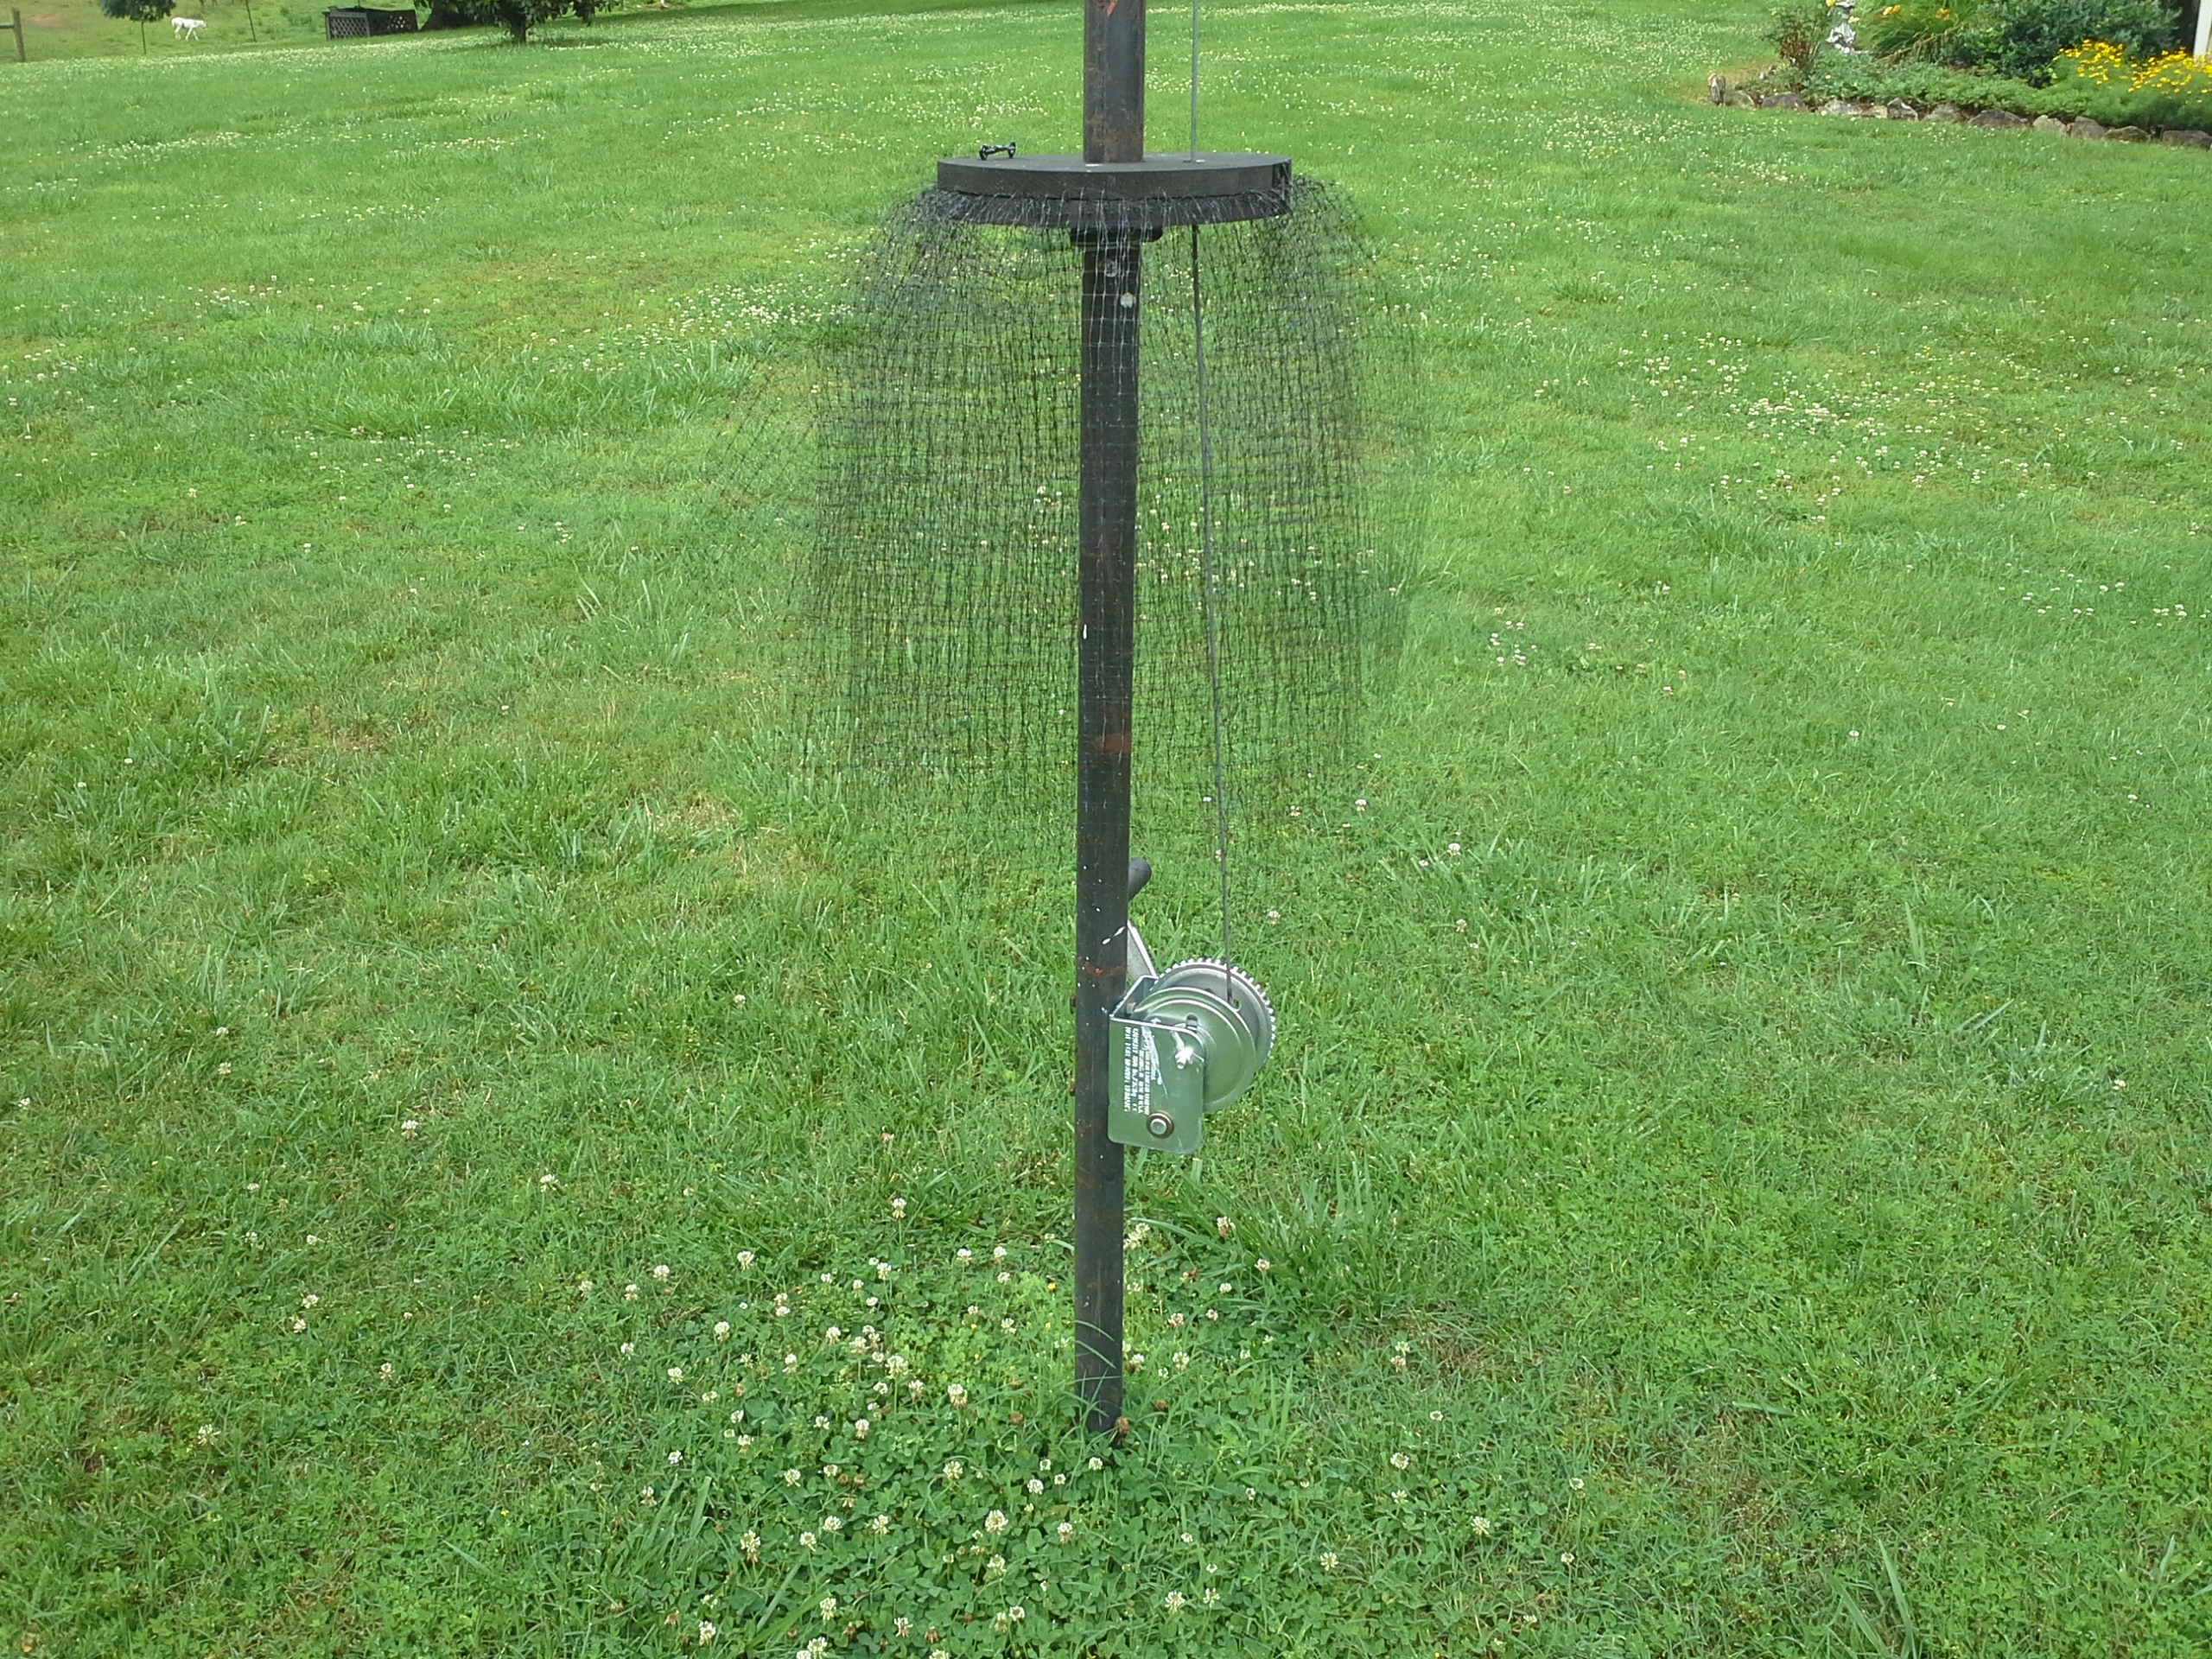
OK, now the big question. DO THEY WORK? Well, you decide...
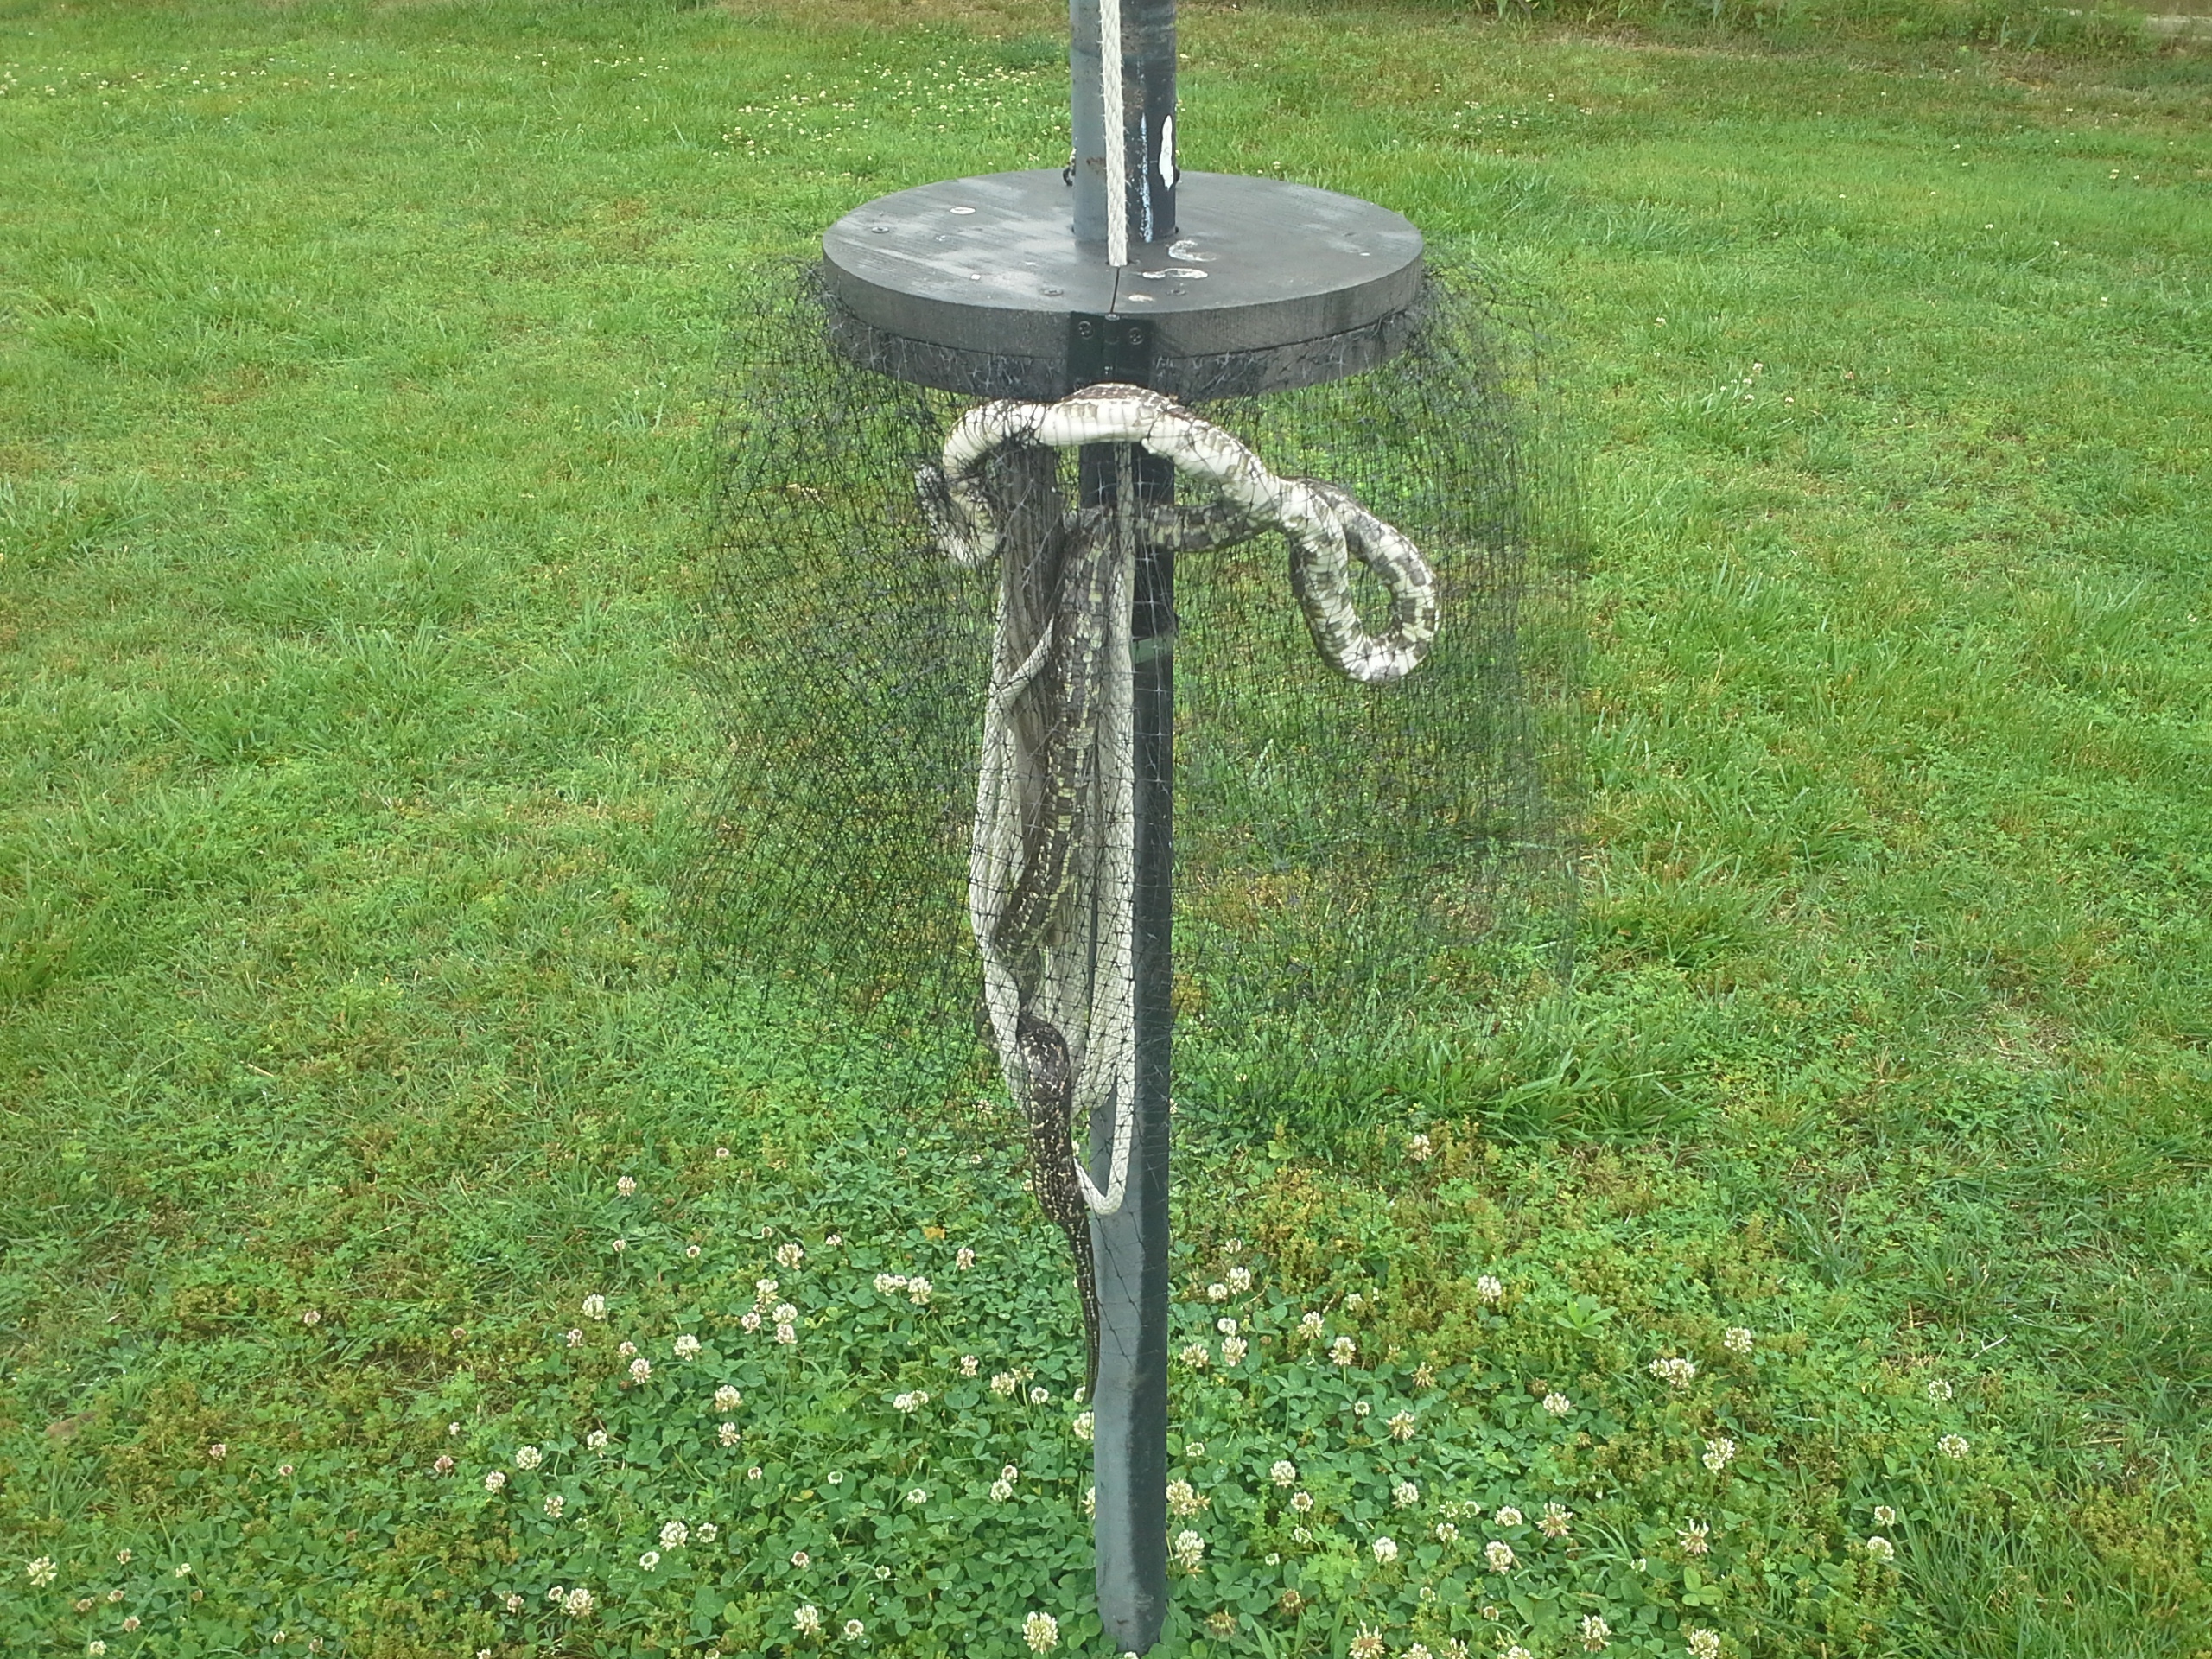
YES, this is a photo from my own colony. This fellow (Rat snake) showed up one night (yes, snakes do a lot of their dirty work at night) and decided to try and get a meal of baby martins from one of my martin racks. Unfortunately, (for him) he didn't make it. Every morning, I do walk-unders in my colony and this is what I found one morning. Yes, he was still alive, but hopelessly entangled in the webbing.
Still need more proof.
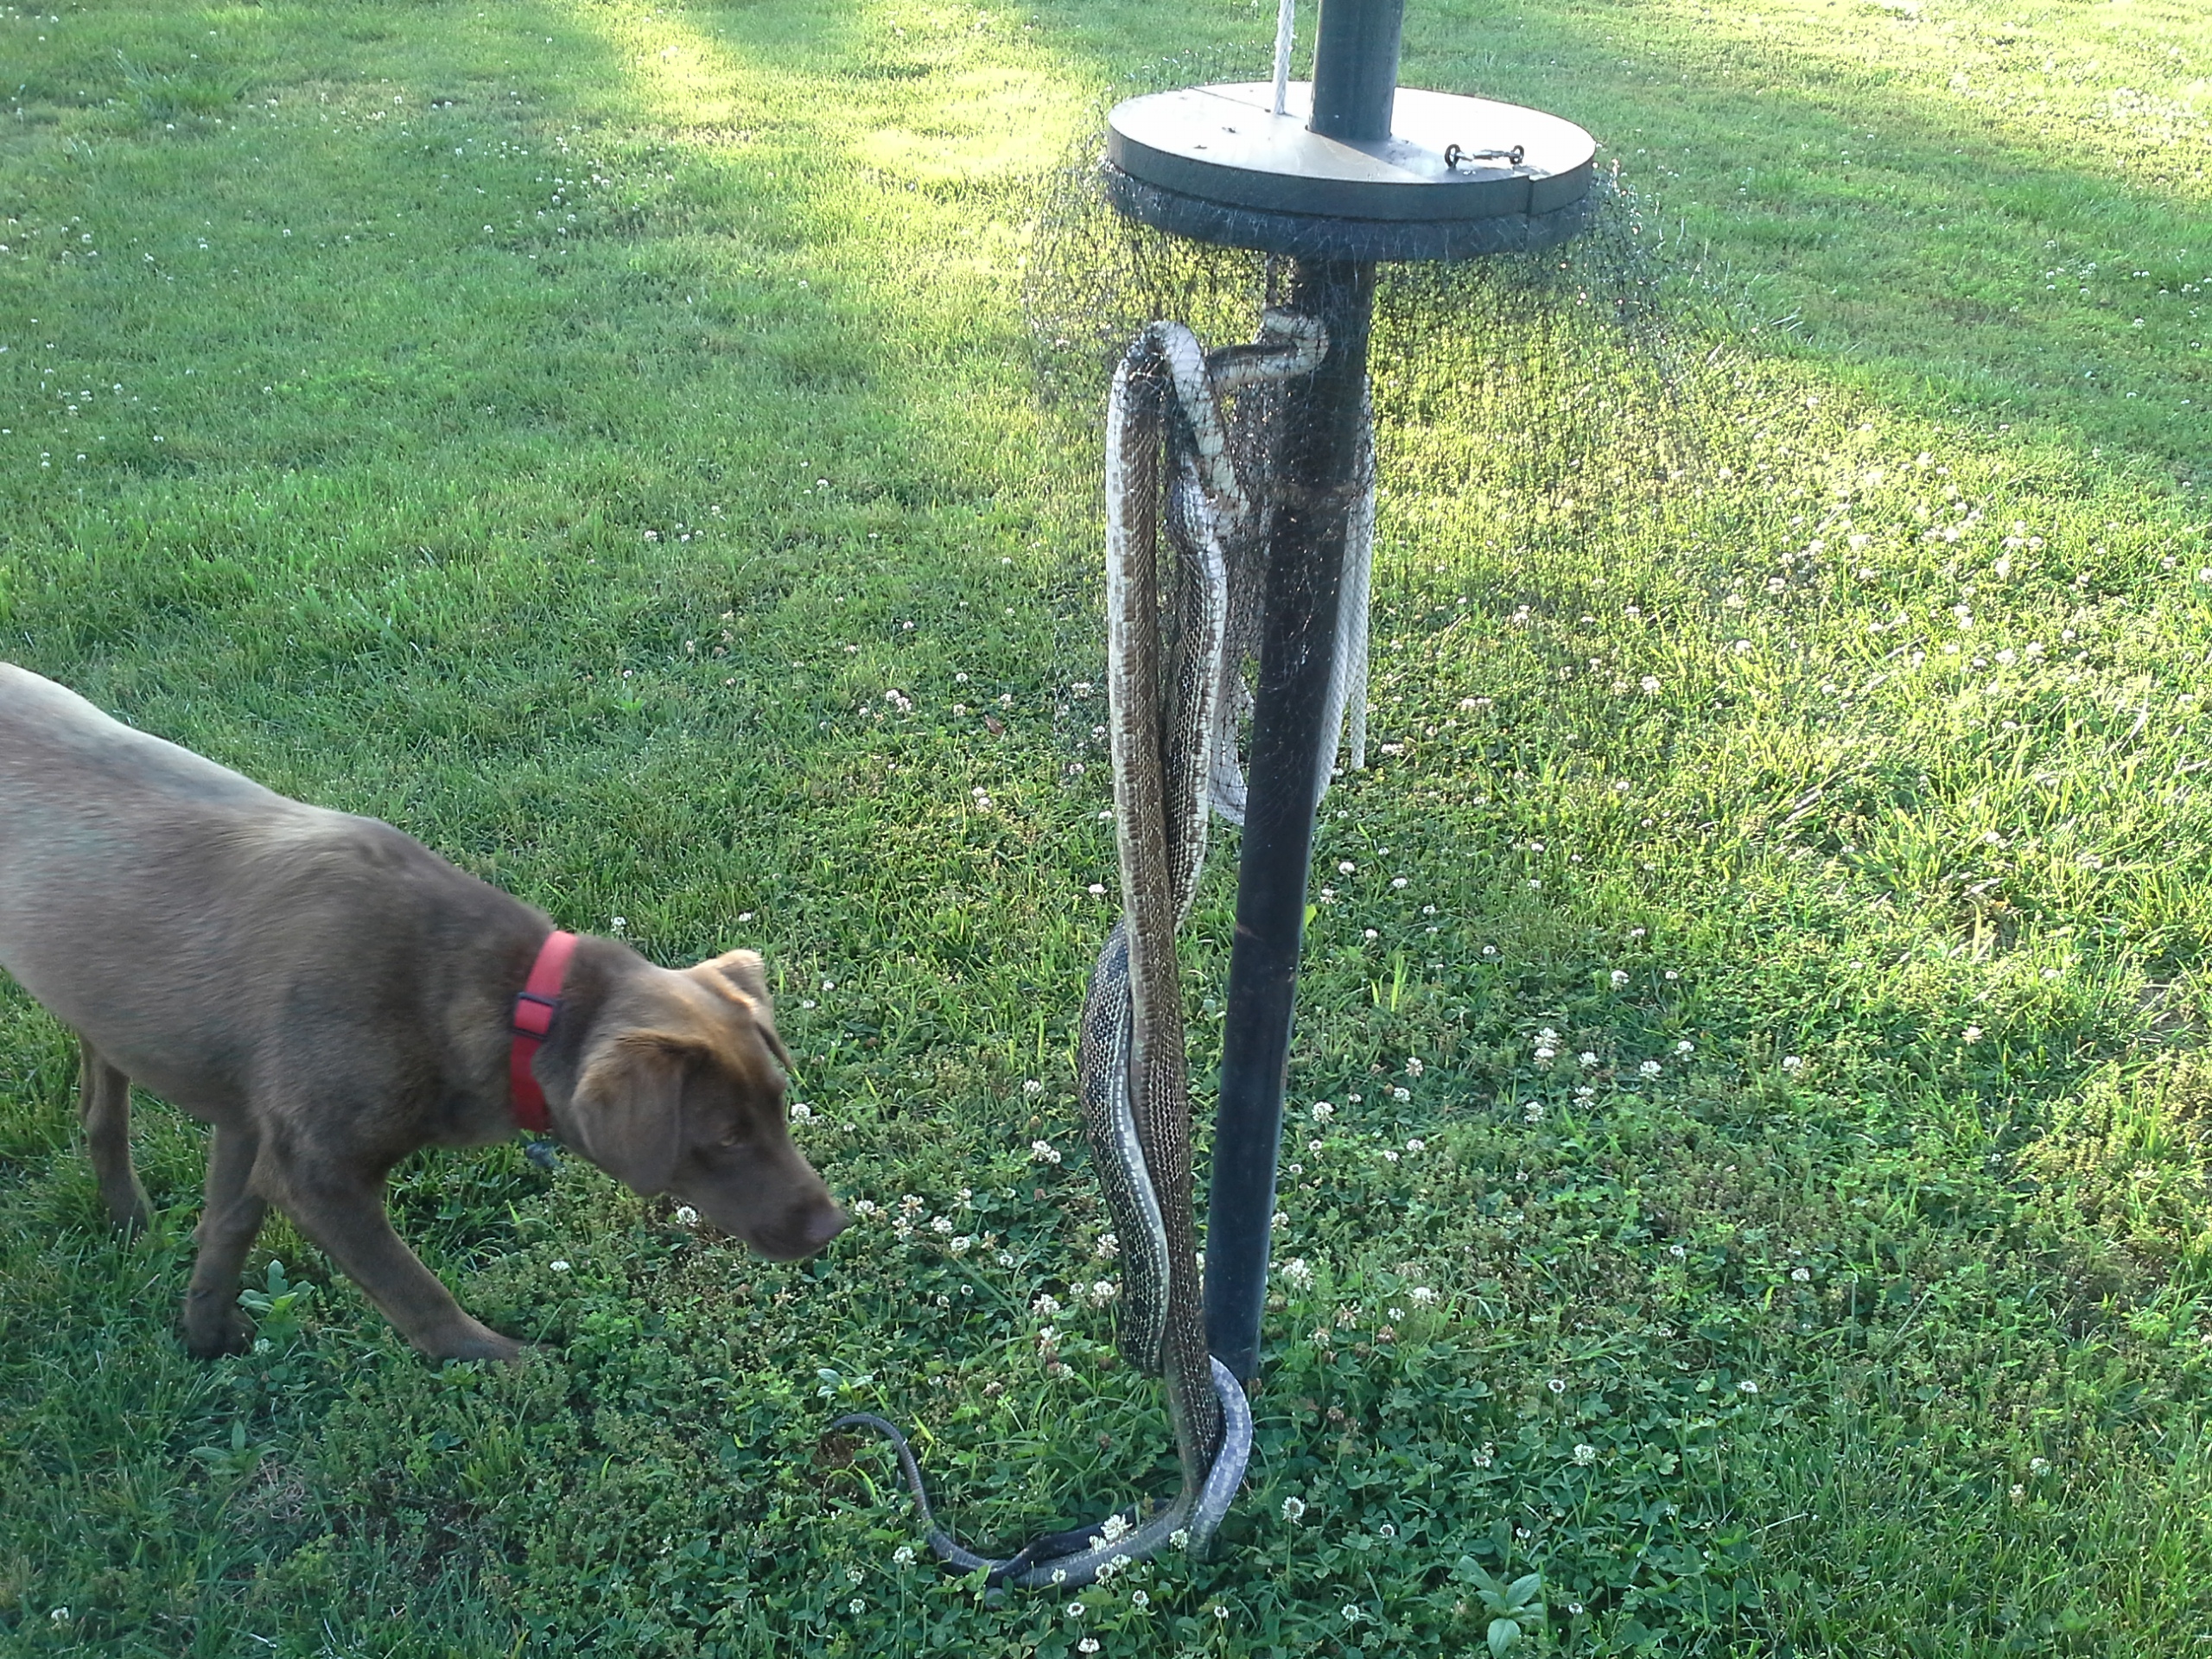
Yes, this one is a 'double', both well over 5 foot long. I found these guys after I got home from work one day. "Katie" (my Chocolate Lab) couldn't figure out what was going on. She just knew they didn't belong there.
Yes, I have more, but I think you get the point...
OK, so what happens if a
snake happens to get tangled in it?
Unfortunately, in the
majority of the situations, the snake will have to be dispatched. They
become so entangled that there's just no way of getting them out without
destroying the netting or them if they're not already dead. (The live ones
refuse
to stay still while you're working). So the easiest way is to put them out
of their miseries. (I use a .22 pistol to the head, but if that option is
not available to you, then you'll have to figure that out on your own with what
you have.) Sometimes
it's possible, but very few people will try to get the snake out alive, so I
won't go there...
IF your CAREFUL with a sharp
pair of scissors, the netting can be salvaged, carefully cutting only the threads that
hold the snake. But if the netting is not
salvageable, it's simply a matter of cutting the
netting around the guard and disposing of the snake. Then take the guard
apart, pop out the staples with a screw driver and remove the remaining netting.
Then simply
re-add new
netting. (OR...you could simply add 2 new layers right on top of the old). It takes a whole 10 minutes. This is why I use screws (and
hate nails), they make life so much simpler.
One additional point: If you've already made the tubular guard I show on my page, this is a GREAT addition to it. Simply set it right on top of the tube. It's just one more layer of protection for your martins. I cannot stress how easily these guys will get up a martin pole.
AND... these things make wonderful guards for Bluebird/Tree Swallow house posts. They work equally well for those, too.
Happy 'gardening'...
Chuck