Anybody that begins the quest of starting a Purple Martin colony quickly learns that two major problems almost immediately surface. One is the European Starling and the other is the English House Sparrow. Since the introduction of these two exotic species into this country, they have been nothing but trouble for purple martins and they have to be dealt with. Since we showed how to build a sparrow trap on another page, on this page we'll show how to build a little different version of a starling trap. I'll try to show and describe what can be done to make it. This one's a little easier to build and it works.
I've been in martins a long time and over the years, I've seen what European Starlings can do to a martin colony and because of this, I've developed a rather large disliking towards them. It's because of the nature of this bird species and what they do to our native cavity nesting species that I spend so much time developing traps to eliminate them from my colony and my immediate area and with the large numbers of starlings that are in this area, it's a never ending battle.
This is a nest box styled trap, so let me also add, nest styled traps work best before and during the nesting season, when these vermin are out looking for a place to nest. That's not to say it won't work at other times, but since its designed to act like a good cavity to nest in, then that's when it will do its thing best.
Also, this (or any other trap for that matter) should be checked daily, if not a couple of times a day. Every once in awhile, other native cavity nesting birds will get in it and they need to be released unharmed as quickly as possible. Although I designed this trap with an escape hole, one or two of them might be too big to get out. (See cage design below for more on this detail).
For clarity purposes and because I showed dimensions on some of the parts, I made thumbnails of the pictures. Simply click on the thumbnail and a full sized version of the photo will open. That way, you can see the dimensions more clearly.
One Note:
This trap is of my own design. I've worked with this particular design idea for awhile now and I make no guarantees, but I will say this. It's worked for me! I've used this same idea before in other variations that I've made with good success. For some time now, I've played with different designs and materials, not only to design a trap that's easy for the average person to build, but to also get the actuation of the 'false' floor inside the trap to trip as fast as possible. This is the reason I'm using aluminum flashing for the floor in this trap. After you get done building one, you'll also see how easy this trap "trips" with just the slightest of pressures. If any bird jumps down onto the floor, it will trip the trap and since the holes are 2" holes, any bird smaller than 2" can get in so again I say, please be diligent in watching the cage for any birds that might be in it. If they are native birds that can't escape thru the escape hole, please see to it that they are released as soon as possible without harm. However; if they are starlings...well, you know the rest...
Trap Materials:
1- sheet of 1/2" or 3/4" exterior plywood, OR...
1- 10' long x 12" wide pine shelving board will also work.
3 dozen - 1 5/8" long treated bugle head decking screws. (Don't use glue!) We will be taking it apart in the building process.
1- 12" x 10" piece of aluminum flashing.
4 ounces of fishing sinkers (shown). They can be found at just about any well stocked fishing supply shop.
1- 12" long piece of stiff wire. I used .090 diameter stainless wire, (because I had some around the shop).
12" to 15" of fine craft wire (stainless steel is best).
4 - 6 small nuts, (Used to space the floor in the center of the trap).
A small amount of black spray paint.
Down Spout Components:
1- length of either 3" or 4" thin walled PVC tubing or rain gutter down spout. (I like the PVC because it's slippery and easier to work with).
2- sq ft of welded wire hardware cloth with holes small enough that a starling can't get out. (I used 1" square wire).
About a foot of small, easily bent wire.
1- small piece of scrap plywood.
1- can of spray paint, (whatever color you want your tubing to be, or leave it original which is normally white. Your call).
Tools required:
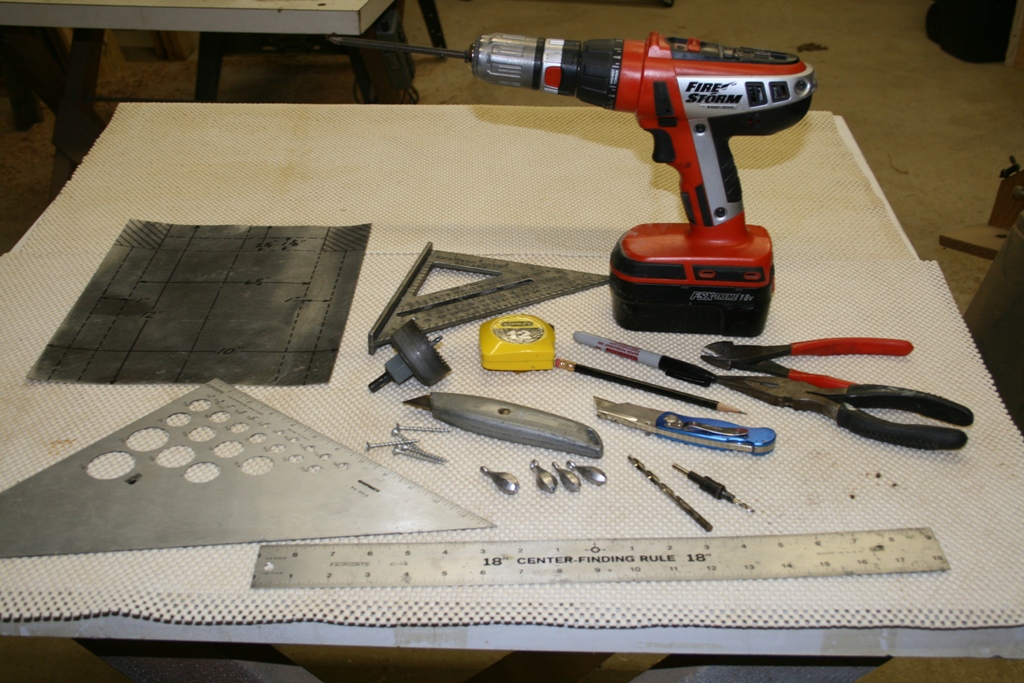
- some form of saw to accurately cut lumber. (Since the parts are all straight, a table saw works best)
- drill motor with a good selection of drill bits.
- a 2" hole saw that fits the drill.
- pair of tin snips to cut the aluminum flashing. (I used a pair of regular scissors).
- pair of wire cutting pliers to cut the pivot and cage wires.
- pair of good needle nose pliers for bending wires, etc. (They reach where fingers can't).
- screw drivers (I use a Phillips driver inserted in my drill. Much easier and faster).
- a speed square. (Makes keeping things square much easier).
- other general tools around the shop such as pencils, compass, markers, straight edges, etc.
Before we begin making your trap, we need to assume a couple of things.
One, that the maker has basic wood working tools and the knowledge of how to use them.
Two, that the maker understands a little about working with wood.
Three, that by looking at a picture, the viewer understands what is being done or shown.
And four, the maker can follow written instructions.
So, with that said, let's build a starling trap.
The Box:
First, you need to find the material you want to make it from. In the materials list I called for 1/2" OR 3/4" thick exterior plywood, either of which will work well for this project, however; white pine shelving board will also work. It's 11 1/2" wide and is cheap. Western Cedar will also work, but is a little more costly, however; it doesn't need any kind of treating such as wood preservative. Regardless of what you use, if you plan to leave it up year around and it's going to be left out in the weather, then it will need to be treated with a good coat of primer and then painted (if you want it to last a long time). It really doesn't matter what you use because I simply used some scrap 3/4" plywood that I had laying around the shop. If your materials are other than 3/4" thick, change the dimensions to fit the material you are using. And, scrap or not, in order for the trap to work properly, the dimensions do have to be accurate. I suggest pre-drilling all holes since in this case, they are so close to material edges, especially in plywood. (Good woodworking practices call for that anyway).
Remember ( ' ) stands for feet and ( " ) stands for inches.
The first thing to do is make the main box. Since I used 3/4" stock, the dimensions shown on this page will revolve around that. Again, if you're using materials other than that thickness, then compensate for the thickness of your materials.
The inside dimensions of the box are, 16" high, 10 1/4" deep and 7" wide.
Cut 2 sides to 16" long and 10 1/4" wide. This will give you the 10 1/4" depth of the trap and the height to allow the floor to activate inside the box.
Now cut the face and back, 16" long and 8 1/2" wide.
After cutting, stand the two sides up on end, place the front and back against the edges of the sides, locate the edges accurately, clamp in place, pre-drill and screw the front and back onto the sides. I used 3 screws on each side of the front and back to mount them.
IMPORTANT:
The box has to be SQUARE for the trap to function properly, so do this part carefully.
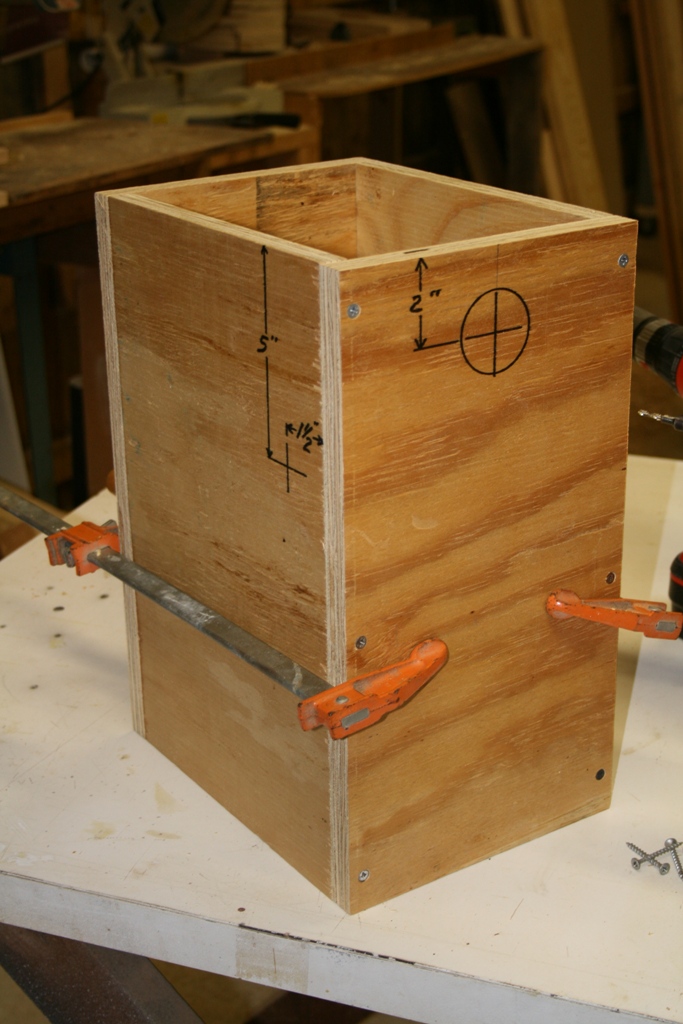
Now measure and cut a bottom to fit the box and screw it on. (11 3/4" x 8.5")
Next, cut another piece to make the roof. My dimensions are 14" x 8.5". The extra length for the roof will overhang the front of the box. Pre-drill and screw in place. I used 4 screws each (2 on either side) to mount the bottom and top.
You now have a solid sealed box.
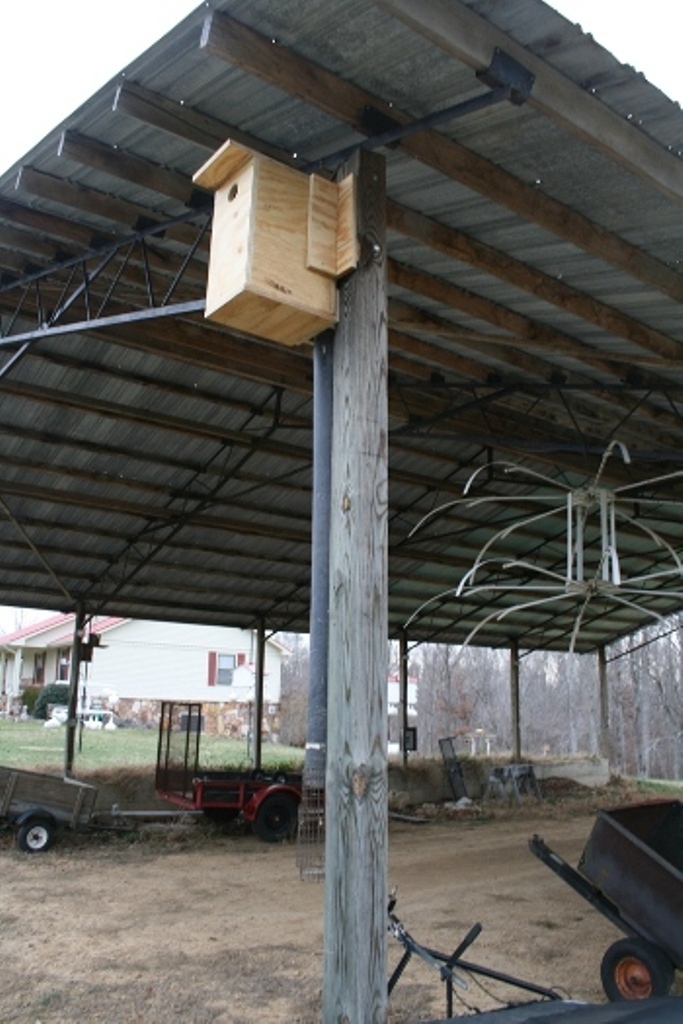
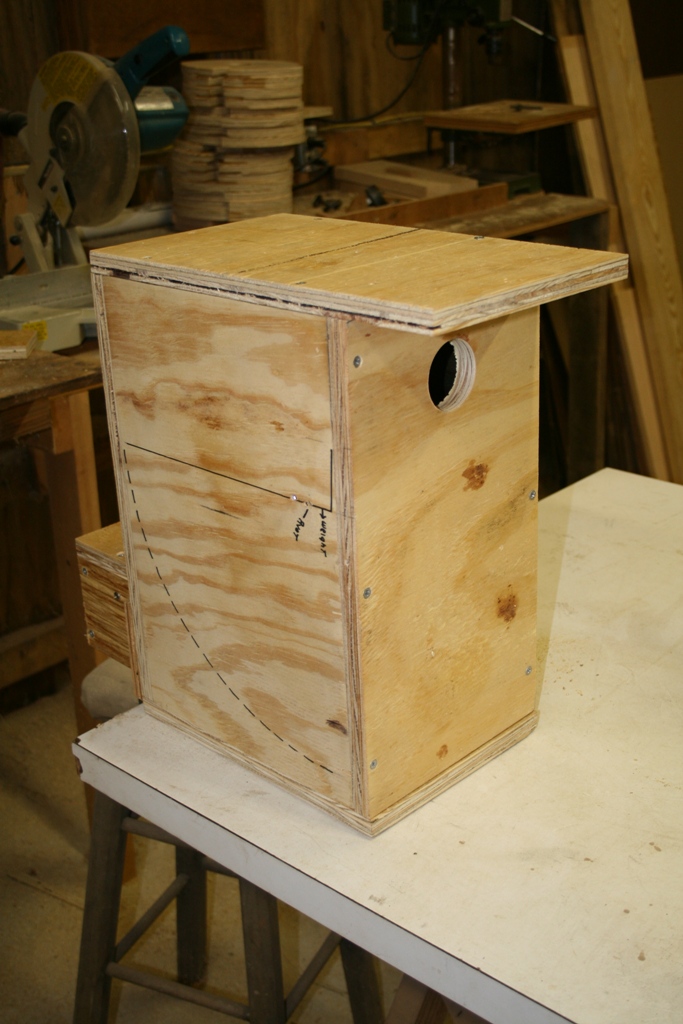
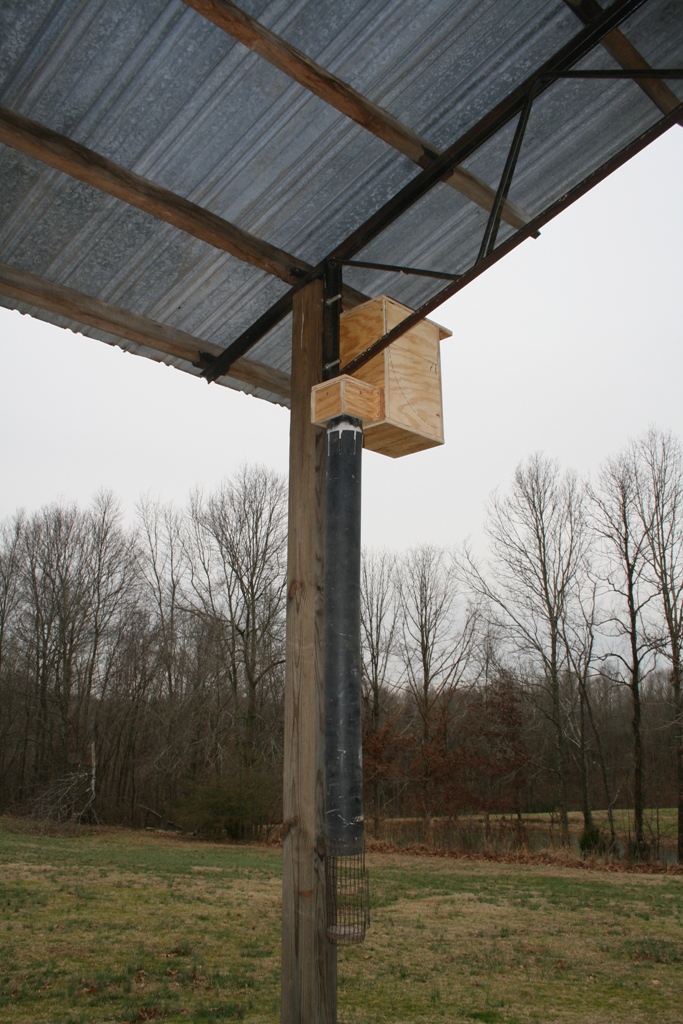
Using a 2" hole saw in your drill, cut the entrance hole. The center of the hole should be 2" down from the underside of the roof and centered left-to-right on the front face of the trap.
You should now have a box that looks like what I have here. The solid line on the box indicates where the floor will end up and the dotted line indicates the actuation line of the floor, so remember that nothing must got thru the side that will stick into this area, otherwise, the floor won't actuate properly.
Decide on how and where the trap will hang.
Before we go any further, you have to decide where and how you plan to hang the trap.
Is it going to be on the side of a building?
Will the back or one of the sides of the trap be against the building?
Is it going to be on its own stand-alone pole?
The reason for having to know this before hand is, it will determine where the down chute is going to be positioned on the trap. If the back of the trap is going to be located on a flat surface such as a building, then the down chute is going to have to be located on either of the two sides of the trap. If one side of the trap is going to be mounted to a flat surface, then the chute will be positioned off the back. This is something you will have to decide before cutting the exit hole.
Once the decision is made, you can cut the exit hole. The horizontal location for the center of the exit hole will be 4" from the surface the trap is to be mounted on, and up 2" from the inside surface of the bottom floor of the trap. You'll see the reasons for these two dimensions further down this page.
If you still don't know how the trap will be mounted, then the cutting of the exit hole can wait for a bit more.
For the remainder of the build, we'll need to get into the box, so remove the roof and the front face and set them aside.
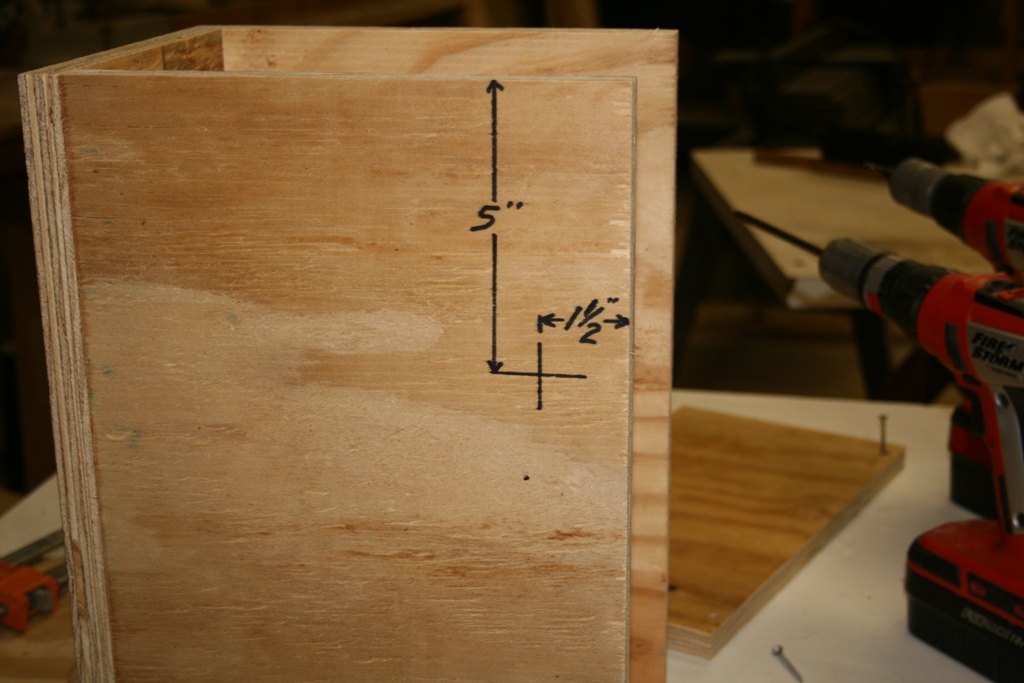
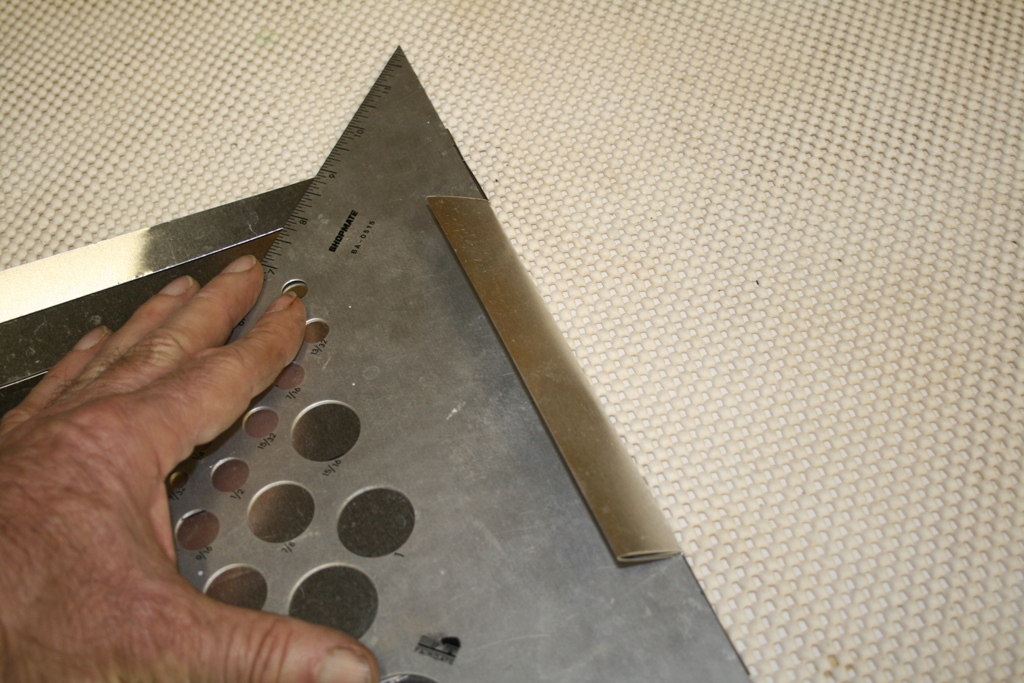
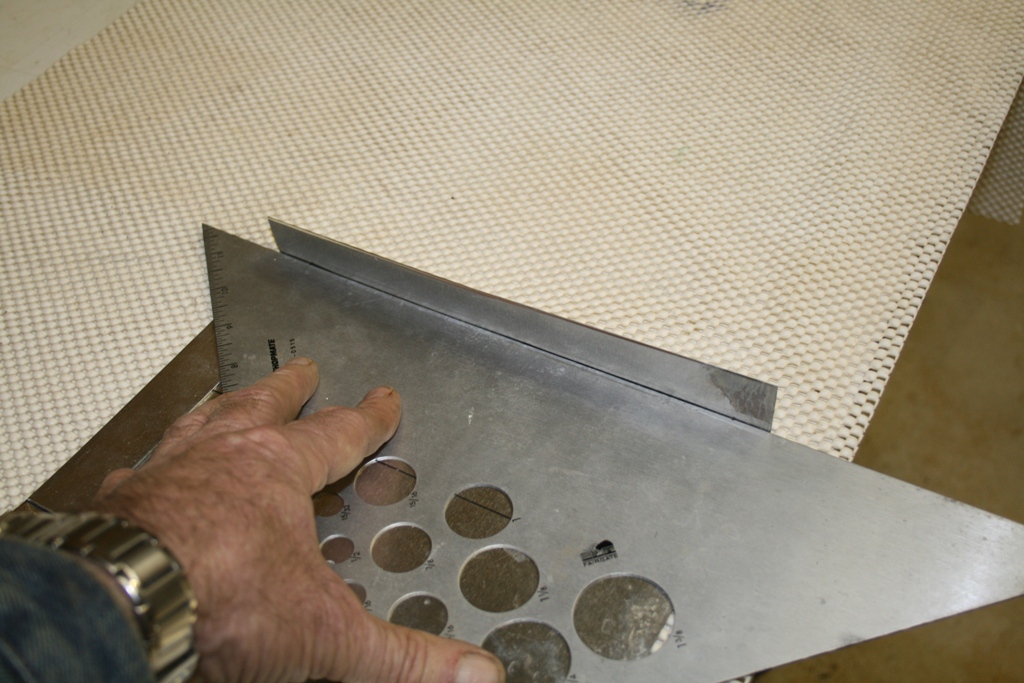
We need to drill two small holes, one on either side of the box for the pivot wire to stick thru. These holes are 1 1/2" from the front and 5" down from the top. (Since the roof and front face are removed, this is easier to measure and do). Measure and drill carefully. They have to be directly across from each other. The holes only need to be slightly larger than the wire used for the floor pivot.
There are more pieces that will be added to the box, but that will come later. The main box is now done.
Cutting the 'False' Floor
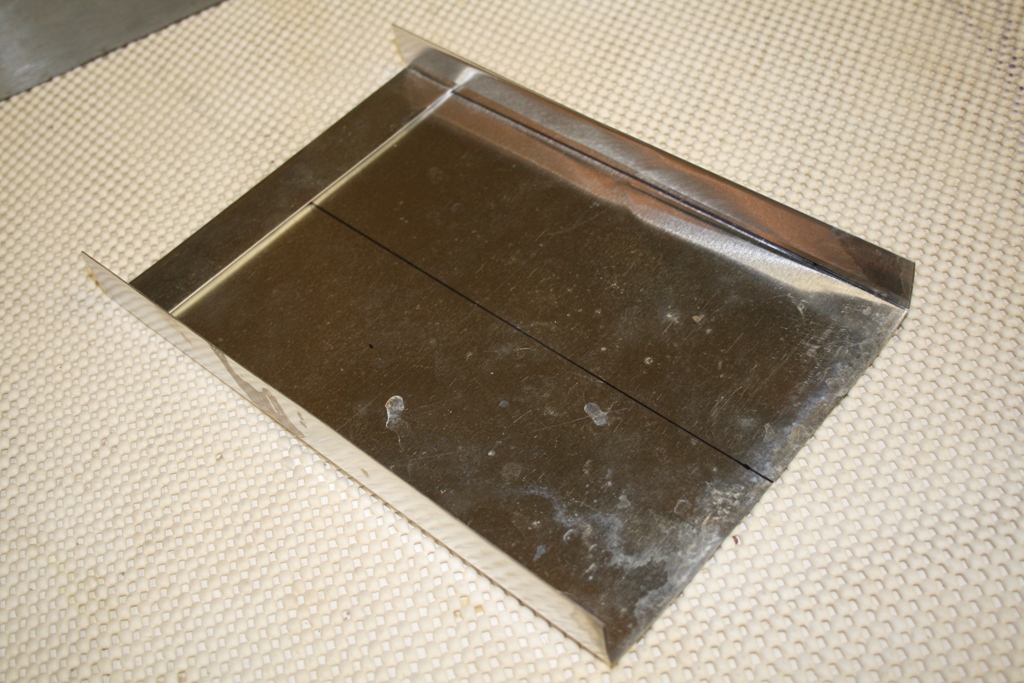
The secret to catching starlings is the quick actuation of the floor. This is accomplished by the lightness of the materials used to make the floor, therefore; I used 12" wide aluminum flashing. Yes, structurally it is weak and flimsy in general, but we'll make a few bends in it that will make it surprisingly stronger and yet, still keep it light. And besides, the floor doesn't have to be strong. It only has to appear that way. When the starling jumps down on it, you want it to fall away as quickly as possible under the weight of the starling.
First, I apologize for the picture. (This stuff is impossible to photograph). I had to lay it in the grass to get a clear shot without flash reflection.
Cut a 12" long x 10" wide piece of flashing keeping it as square as possible. If it came off of a roll and is curly, carefully over bend it backwards to make it flat. This can be done by gently rolling it backwards over a round coffee can or something of that nature. Keep at it till it's nice and flat.
And Be Careful: This stuff is sharp and will cut you, so work carefully and slowly
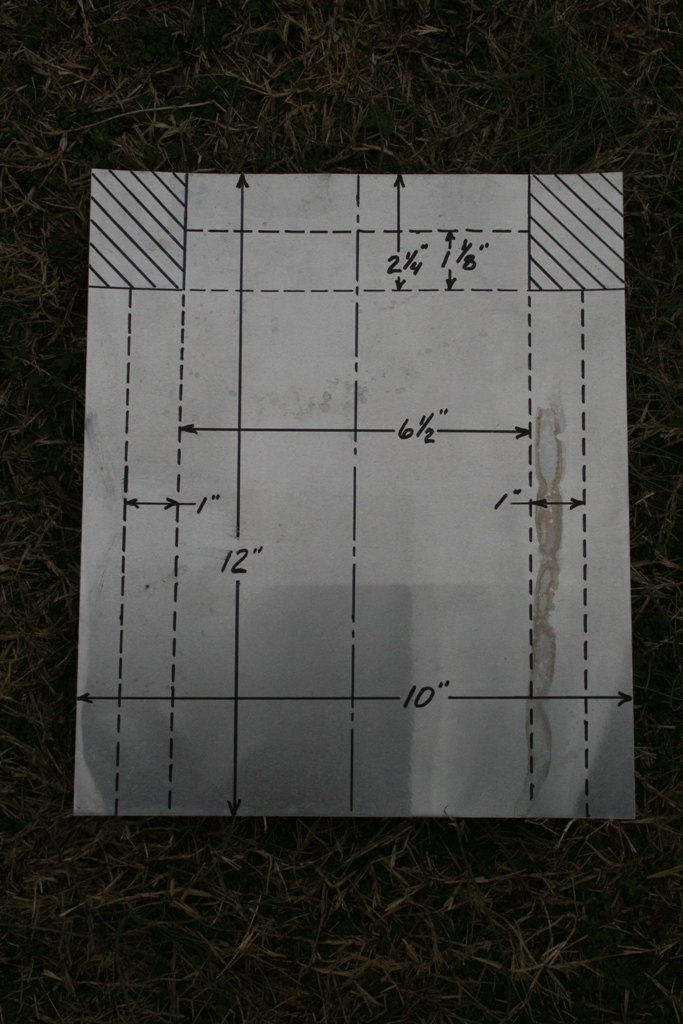
Next, using a black magic marker, mark the flashing as shown in the photo. Use a 'fine' Sharpie if possible. That way the lines will be sharper and more accurate. (Mine show up thick for photo and illustration purposes). Follow the dimensions on the photo.
Since all dimensions are centered on the sheet, first accurately draw a CenterLine down the middle of the sheet. Then work out from this line.
The solid lines indicate where material is to be cut and the crosshatched lines indicate material to be removed.
The dotted lines are where bending will take place.
Shop Tool Note:
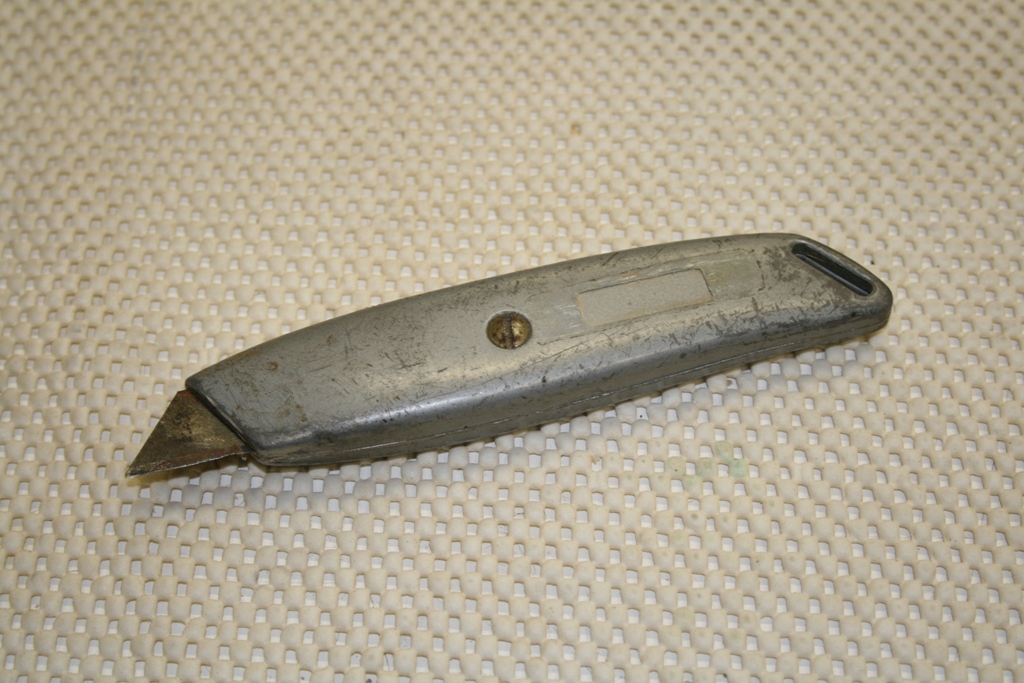
I have an old utility knife that has a very dull blade in it that I keep around the shop just for purposes like this. If you've thrown away all your dull utility knife blades and need one, a couple of swipes across a concrete floor or sidewalk with the blade will fix that. Then, stick it somewhere safe and you'll have a dull blade should you ever need it again for another project.
Cut out and discard the cross hatched areas. (Since this stuff is so thin, I used scissors). Now bending can begin.
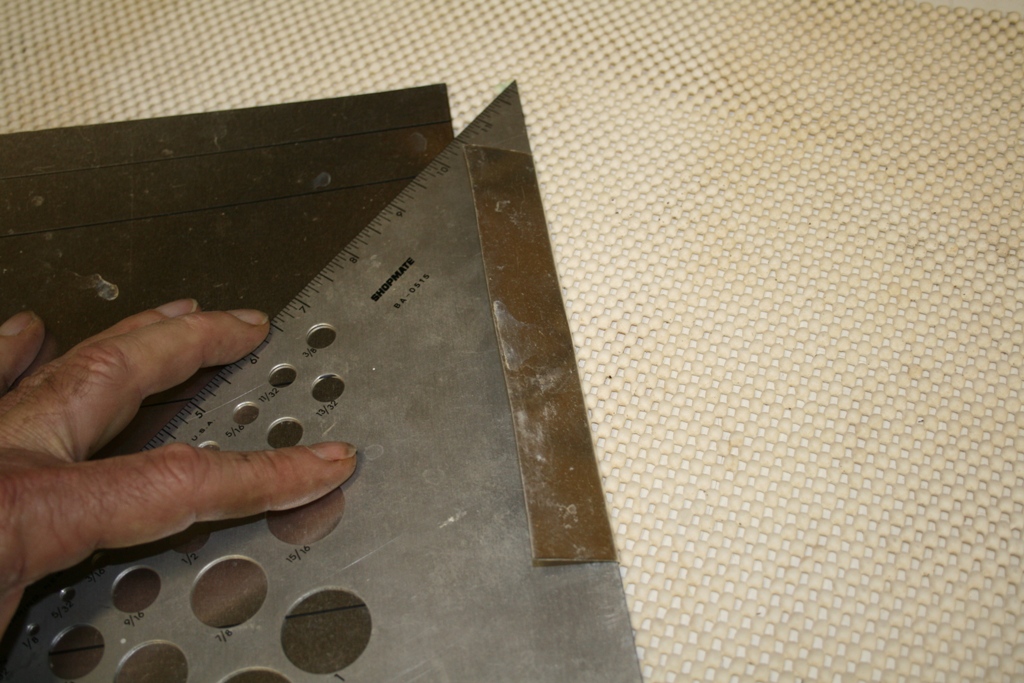
Bending can easily be done by gently 'scoring' the bend lines with the 'dull' knife or something of that nature. DO NOT CUT THRU the material. The scoring helps to keep the bends straight and they easily follow the score lines.
The first thing that needs to be done is to score the dotted lines. Line up your straight edge on a dotted line and then, using your dull blade, drag it across the flashing. Use enough pressure so that a very slight bend in the flashing results. Do this to all the dotted lines while the sheet is still in the flat state.
Now, by using a stout straight edge laid on the
scored line, the material can easily be bent as shown with nice straight bend lines.
Take your time and be accurate. Squareness is important.
Start with the front (where you cut out the material) of the floor and make your first bend. Set your straight edge and bend it completely over. Once it's bent over, remove the straight edge and, using a very stiff board, place it on top of the bend and press down firmly. This will flatten the bend giving you a double layer of material. (I used my straight edge and ran my thumb along the entire length of the bend).
Repeat this process for the second bend line on the front. Again, lay the board on the bent material and push it down. That should give you a nice flat, bent surface, making the door stronger in that direction.
Again, repeat this process for the outside bends of each side. Bend the outside bend and then flatten it...
And then bend the opposite side and flatten it.
However, on the second (inside) bend lines for the sides, only bring it up to 90 degrees. DO NOT over bend or flatten all the way. The vertical side flanges add strength to the length of the floor.
Now repeat this for the other side.
When finished, you should end up with a floor that looks like the one shown here.
Now that flimsy piece of flashing has a little more structure to it and yet, it still weighs exactly the same...light...
Next we have to drill a couple of holes in it.
First, drill 8 holes, 4 on each side of the floor, 1/4" in from the front edge as shown below. Small holes will do just fine. They only need to accept the craft wire.

And now for the pivot rod holes. Be very careful with these. The 1 1/4" is critical and they have to be exactly across from each other. The hole has to be just slightly bigger than the wire you are using for a pivot rod.
On the sides of the floor, right down next to the inside surface, drill a hole on either side as shown below.
Quick tip: If you lay a board against the inside of the wall, it will help support the wall while you're drilling the holes. A center punch to locate the center of the holes also works wonders.

Once the holes are drilled, we need to add the counter balance to make the door operate correctly.
Hop down to your local fishing tackle shop and pick up some sinkers like the ones shown below. They come in a number of different sizes with the weight (in ounces) molded right on the side of the sinker.
If you can't find the exact same sinkers shown here, there are others that will work. Barrel sinkers look like little watermelons and have a hole thru the middle of them. They also work, just get enough of them. You will need 4 ounces minimum, so you might want to pick up a couple of extra smaller ones 'just in case'...
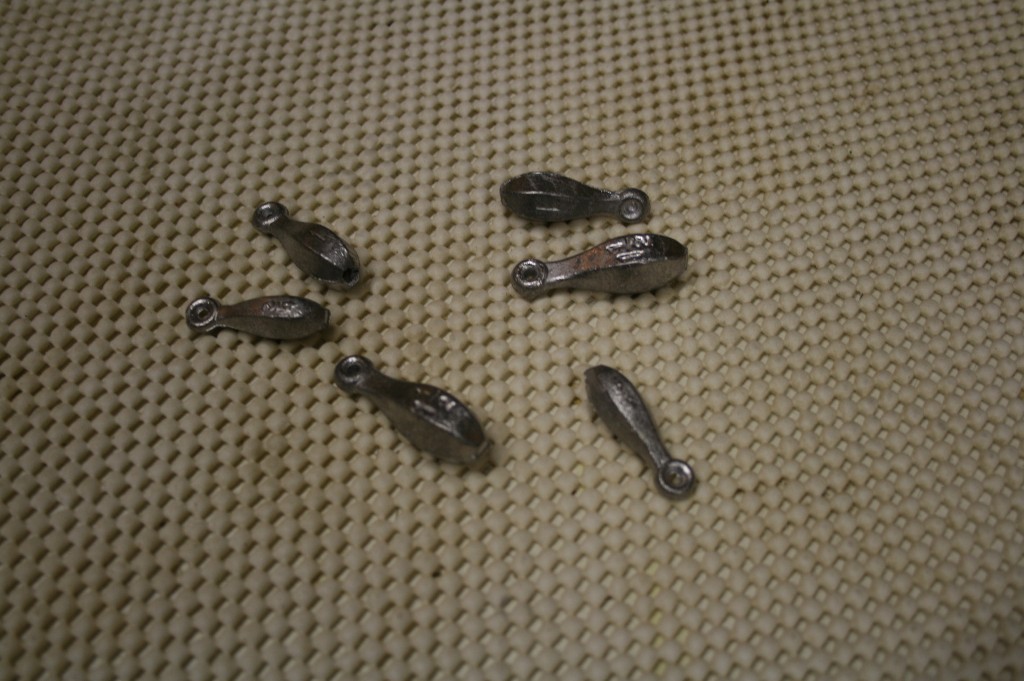
Using some fine stainless steel craft wire (or whatever fine wire you have available), add 4 ounces of sinkers to the floor as shown. (I used two - 2 ounce sinkers to start with here, but other combinations can be used to make the minimum 4 ounces). Start with the outside holes that are near the edges (for structural purposes). Make sure they are loose and can swing freely.
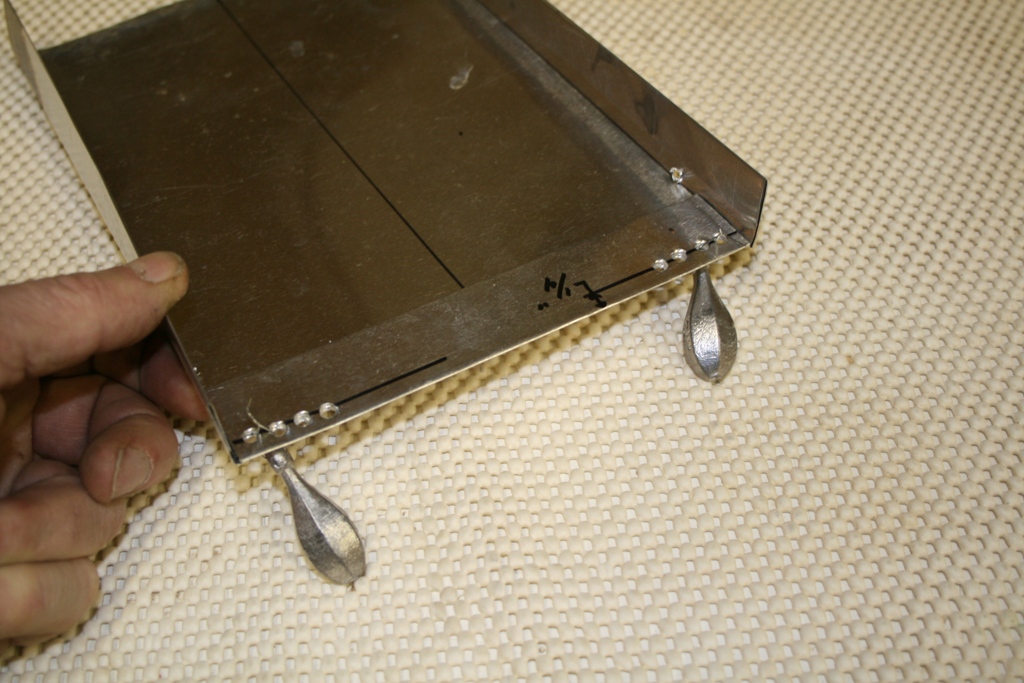
Note: Yes, there are other ways to mount the sinkers to the floor. Using small screws with nuts and washers thru the hole in the head of the sinker will also work, or hot glue will also do the trick. Your option! However, they have to be mounted as far forward as possible so that the weight will remain in the front of the floor, thus returning it to horizontal.
Adding the floor to the box
Now we can add our floor to the box.
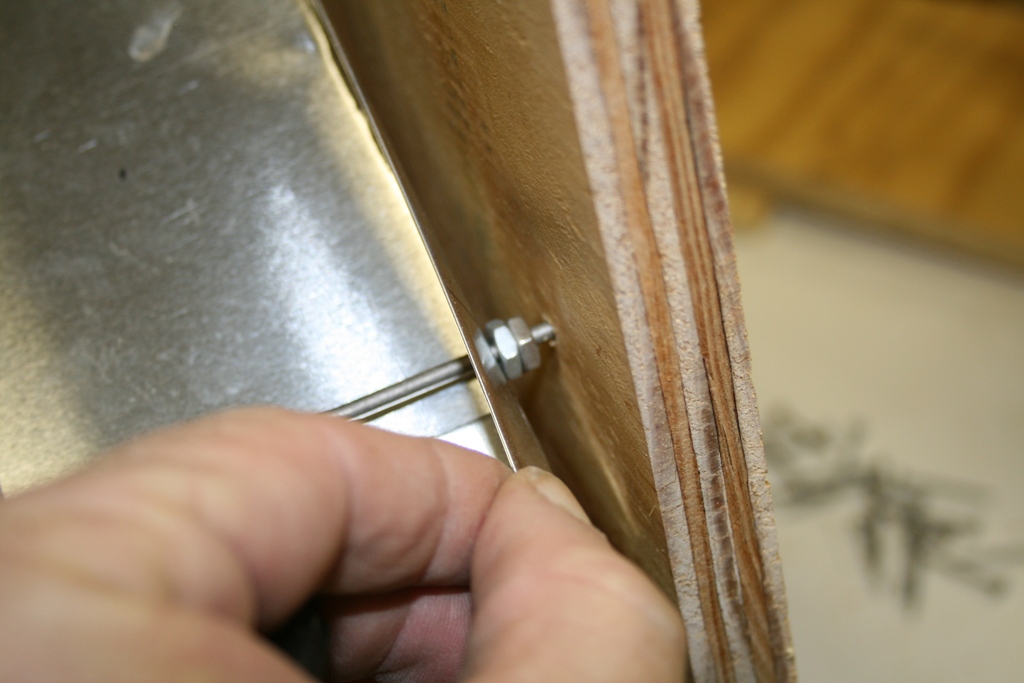
Next, cut the rod to length. The length should be equal to the same width as the outside of the box. (Which should be 8 1/2" if you use 3/4" stock).
You will need 4 small nuts, 2 on either side, outside the floor between the side of the box and the floor. These are used to center the floor in the trap and keep the floor from touching the sides of the trap.
Begin by feeding the rod thru the left hole in the box, add 2 nuts on the rod, lift floor into place and feed the rod thru both holes in the sides of the floor, then 2 more nuts (might need needle nose pliers here) and finally, into the hole on the opposite side of the trap. If your trap and floor are square, then your floor should swing freely inside the trap. If not, tweak it so that it does.
Your floor should set tilted with the front (sinker end) lower than the back end. It doesn't have to be a lot, just enough so that it tilts forward. It should tilt at 'approximately' 45 degrees or somewhere close to there. If it isn't, then add another small sinker (or two) to the front of the floor so that it will. Don't over do it. The more weight slows down the trip speed.

Since the pivot wire is just sitting in the holes, we have to stop it from coming out of the box. To do this, simply add two small, thin pieces of wood to the outside of the box over the pivot rod holes as I've shown here thus, keeping the rod in place. My pieces are 1 1/2" long and 1" wide. Tack them in place near the top with two small brads. That way, they can be pivoted out of the way should you ever need to access the pivot rod for any reason.
Now we have to add a couple more things to the box.
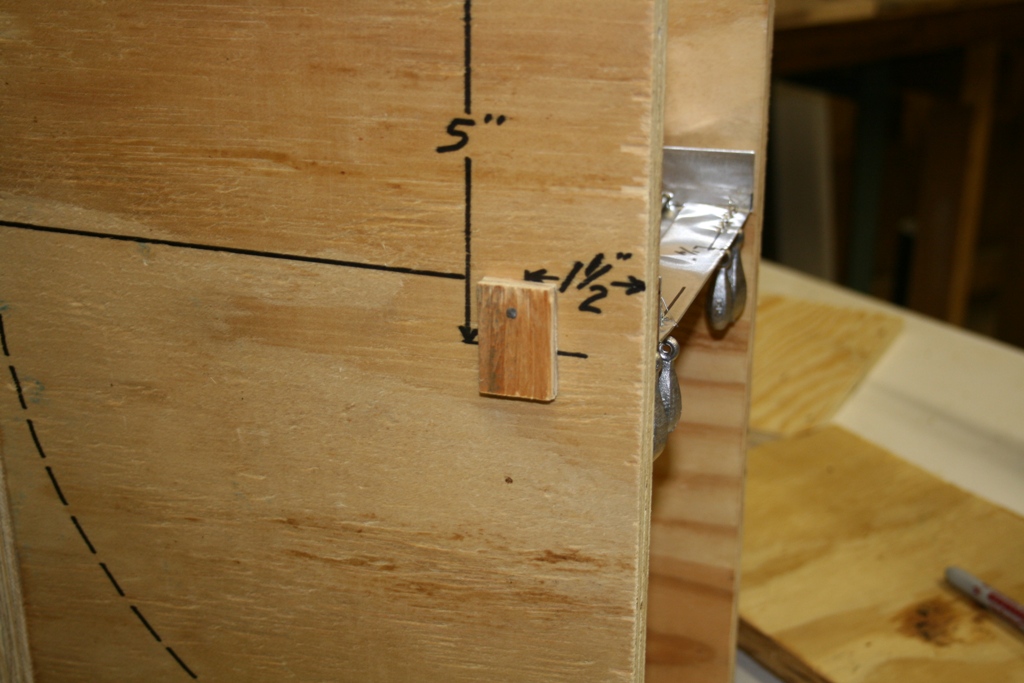
Look at the picture below. Notice in the back of the box there are two small strips of wood that the floor sets up under and sets level. To make these, hold your floor level and then measure from the top of the flange on the false floor up to the top of the box. Now cut two 1 1/4" wide pieces the length of what you measured and then using a single screw, screw them right in the corners of the box. Make sure your floor is pivoted under them before screwing them in place. Now your floor will bump up under them and sit level.
Next we need a floor 'stop'. Cut two small 1 1/4" wide pieces. The vertical piece is 5" long and the short horizontal piece is 3 1/2" long. Pre-drill and screw the long one onto the end of the short one. Then, drill a single hole in the center of the short one. Angle it in some so your drill will fit under the floor when you screw it in place.
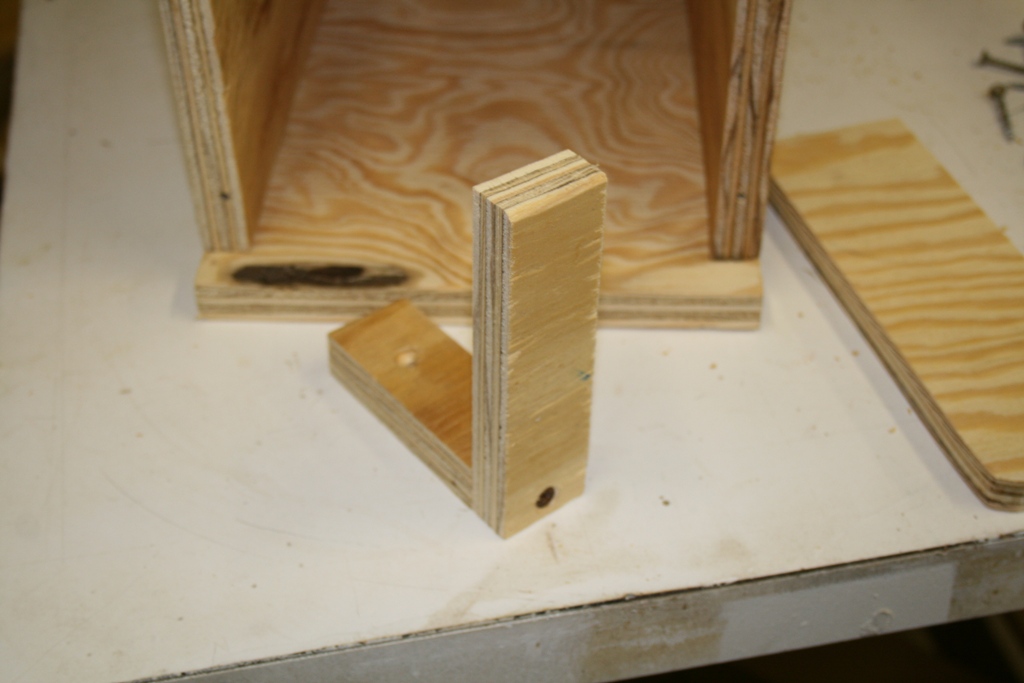
Place this piece on the floor in the center of the trap as shown, short side down on the floor.
Place a temporary strip of wood across the front of the trap. Then, slide the end of the stop against the back of the strip and screw it in place. This insures the front face board won't hit the stop when it goes back on.
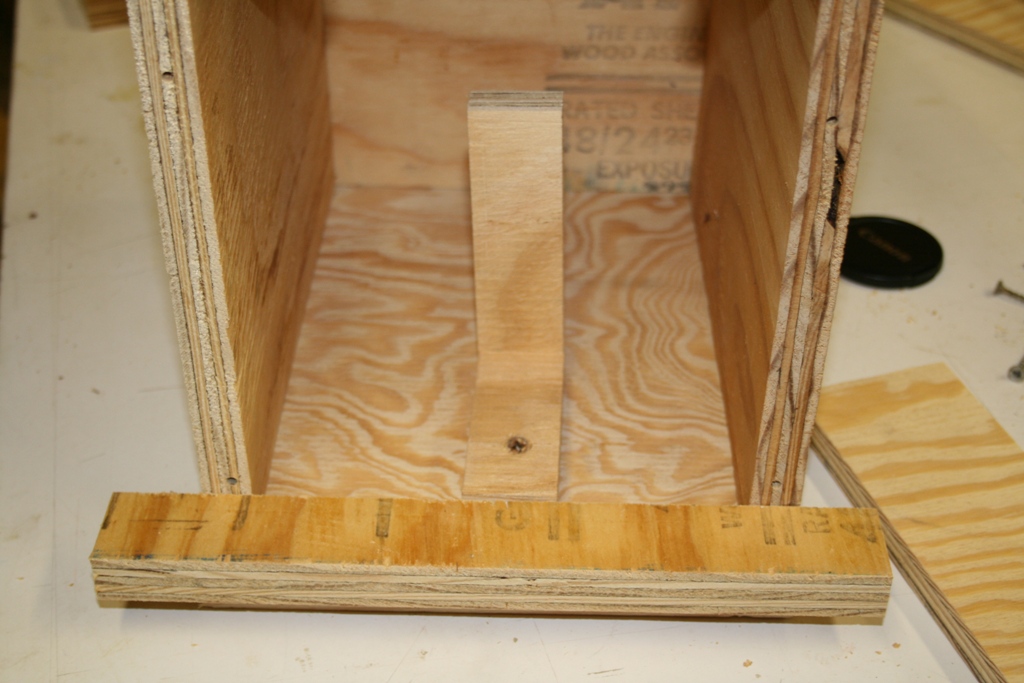
The reason for this piece! It will stop the floor from 'over pivoting'. The floor will hit this piece and as soon as the starling's weight slips off the end of the floor, it will return to " 0 " or level.
Now, test the trap. Take the 'plug' from the entrance hole and toss it onto the floor. The floor should activate and then return as soon as the plug slides off the end of the floor. This is exactly what will happen when a starling jumps into the trap. It will then be trapped in the bottom of the box with no exit except out the 2" hole and that leads down to the catch cage at the bottom of the down chute. It's as simple as that...
A normal starling's weight is equivalent to about 15 quarters, (the plywood plug is approximately equivalent to 3 quarters). With the trap working at a lighter weight than the average starling, it will trip faster and thus, catch any starling that enters.
However, as I stated, it will also trip under any other bird that jumps down onto it, so again I say, keep tabs on the trap daily.
The Down Chute Frame Assembly:
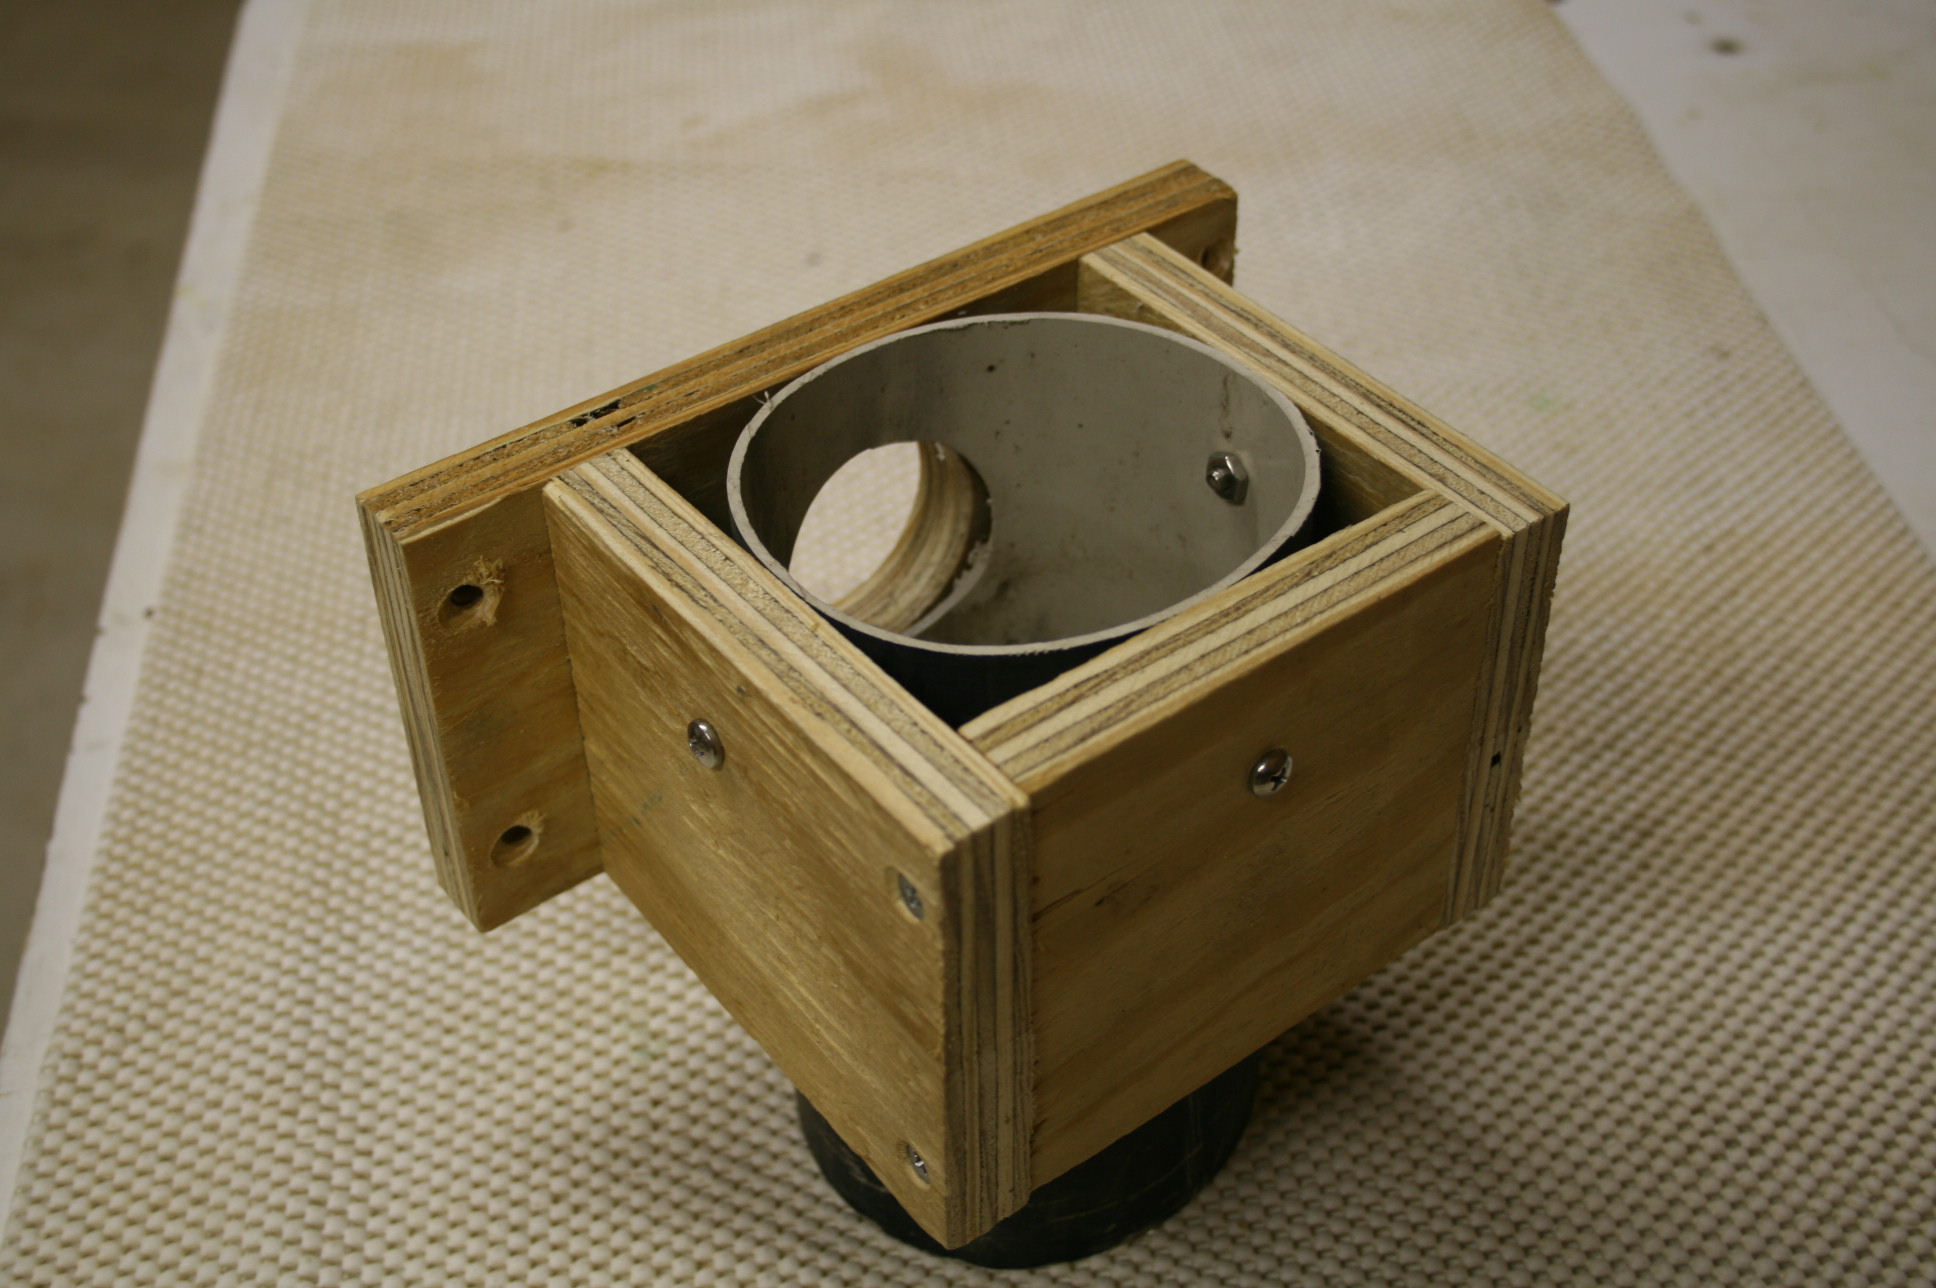
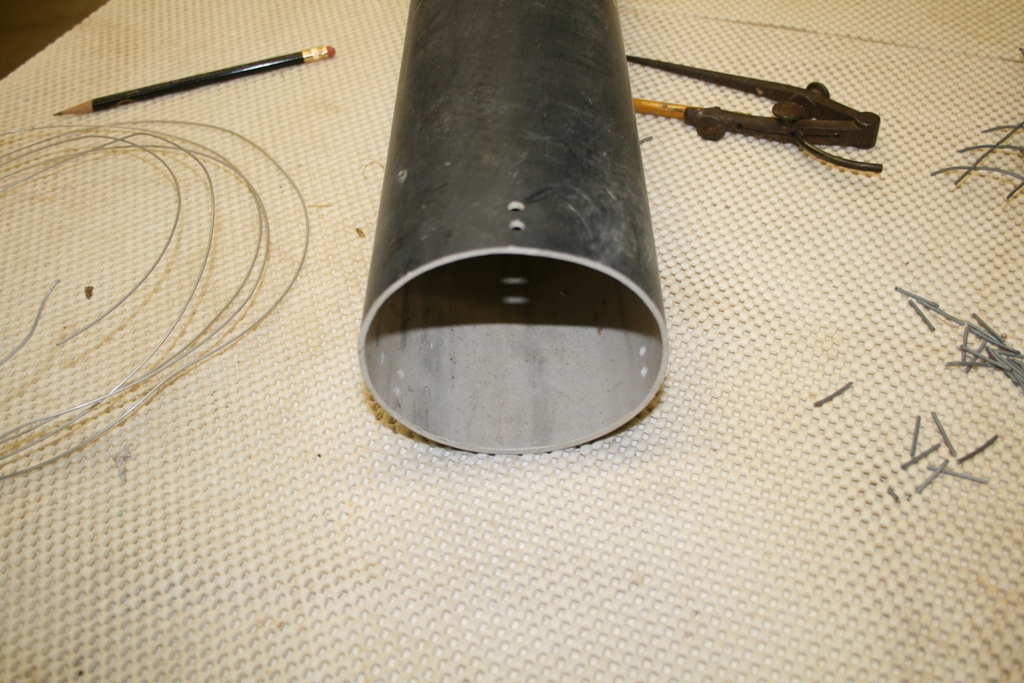
Next, you have to make a down chute to funnel the trapped starling down to the catch cage when he exits the trap. This is done by adding the tubing to the trap. I used 4" thin walled PVC tubing on this trap. It can be purchased just about anywhere and usually comes in 10' lengths. (It's also very slippery). 3" tubing will also work, simply adjust the dimensions accordingly.
The outside dimension to 4" diameter PVC tubing is 4 1/4", therefore, you need to make a square frame that has a 4 1/4" inside dimension.
Start out by making the frame. I used 3/4' stock for the frame, so the actual dimensions for the boards used here are:
1 (the back) @ 4 1/4"
2 (the sides) @ 5"
1 (the main with the hole in it) @ 8" long.
All of them are 4" wide.

In the long piece, drill a 2" hole in the dead center of the piece. (4" in from the end and 2" up from an edge). There should be 1" of material on each side of the hole. This hole will match the exit hole in the trap.
To screw it together, I centered and clamped the short piece to the back of the main board and used it to align and drill for the two side pieces. Then, after the two sides were in place, I simply moved it to the rear and screwed it in place.
Finally, you'll need a cap for this assembly. It can be of thinner material if you have some available. Measure your frame and cut it to that size. Don't put it on yet, just set it aside for now.
When you purchase your tubing, take note that one end is larger (flanged) than the other. That will be the top of the tube.
From the bottom of the tube, cut off a short 8" or 10" piece of the tubing.
Now, slide the short piece into the frame, pushing it all the way to the bench. Now, turn it over and, looking at the picture below. Match drill 3 mounting holes, one in the back piece and one on each side of the frame thru the tubing. Using 3 - 1 1/4" long, # 10, machine screws with nuts, screw the tube into the frame as shown.
Now that the tube is secured in the frame, take your 2" hole saw in the drill and match drill the 2" hole into the tubing thru the hole in the main frame board.
Finally, add frame mounting holes. On each end of the main frame board, drill two clearance holes for the screws that will be used to mount it. (4 total). Drill these holes at an inward angle of about 15 degrees. The reason for this angle! 1 5/8" long screws will go all the way thru 2 thickness' of material if drilled straight. But if angle at about 15 degrees, they won't penetrate the side wall of the trap, thus not hindering the operation of the floor.
Now, do a test fit to make sure the top (flange) of the tube will fit over the short piece in the assembly.
The reason for building it this way, it allows you to put the trap up without the long tube attached to the trap. Once the trap is in place, you simply stick the long tube up, (flange end up) slide it over the short piece and then secure it at the bottom while you're standing on the ground. No need to climb a ladder again.
Remember that 4" and 2" dimensions we spoke about for drilling the 2" exit hole. This is where those dimensions come into play. The frame attachment board is 8" long, so half that is 4". This way, none of the frame attachment board is outside the dimensions of the main trap box.
The frame boards are 4" wide, thus 2" is half of that. If you drill your exit hole 2" up from the inside floor, the bottom of the frame will be level with the inside floor.
If you haven't drilled your exit hole yet, then it's at this point that you will have to decide where and how the trap is to be placed thus, the general location of the exit hole has to be known. Once you know which side of the trap the down chute is going to be located on, fit the frame assembly up to the trap. Slide the frame sideways till the end of the main frame board and the edge of the trap line up. (The edge of the frame that will be against the flat mounting surface). Likewise, line up the bottom of the frame board with the top of the inside floor of the box. Now, using a short pencil, reach thru the tube and trace the exit hole onto the trap. It should measure 2" up from the box floor.
Now you can drill out the 2" exit hole.
Now screw the frame assembly to the trap making sure the exit holes all line up.
Once this is done and it all looks good, the cap piece can then be added to the top of the frame. This cap prevents the starling from 'going up' when he comes out of the trap. A couple of screws, one on each side should do the trick.
One note:
I have used screen for this purpose. It allows the light to come in the exit hole and the starling, not being able to get back up on the false floor, heads for the light. If you want to do it this way, use a piece of your welded wire from your cage wire and staple it in place. Or cut some thin strips of wood and sandwich the screen in place using them and some screws. It also works just fine.
One more thing I did. I know that starlings like dark compartments, and although not necessary, I hit the inside of the false floor compartment area with a little bit of black spray paint. Not a lot, just enough to darken the insides and shiny floor. Once the roof and front are put on, the compartment should be nice and dark.
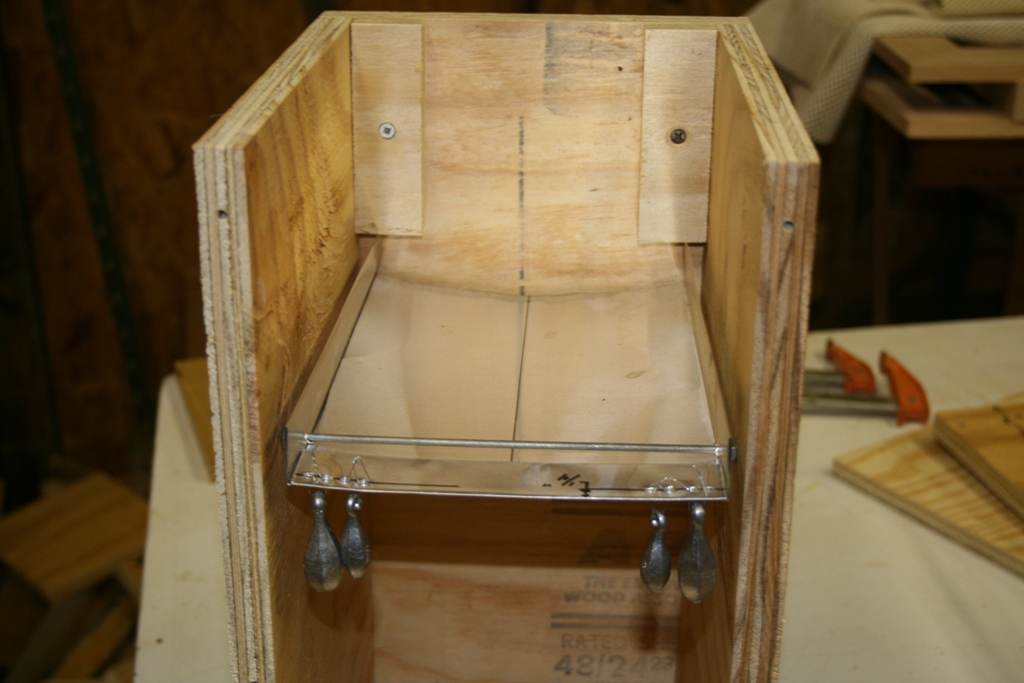
At this point, your main trap body is complete.
First, lay the front up against the front of the trap and check the floor actuation making sure all is clear and that it's working properly. There should be 1/4" between the back of the face plate and the front of the false floor. If all is good, then the face and roof can be replaced.
The reason I suggest that no glue be used is, if for any reason you ever need to get into the trap, it can easily be done by simply removing the 6 screws holding the front on, and you're in...
Now, you need to add an attachment board. This is the method used to hang your trap. This is nothing more than 2 long pieces screwed together to form an " L " bracket with clearance holes for mounting screws and then screwed to the side of the trap that will mount to where ever you plan to mount it. (See photo below). Since I had planned to put my trap on a post at the corner of my pole barn, I put my attachment board on the right side of the trap. This allows the down spout which comes out the back of the trap to set beside and then run down the post. You can make this 'attachment' board, (size and shape), to fit your own needs. Or if you want my dimensions, they are 12" long and 4 1/2" wide. I used 3 screws to screw them together. If, for what ever reason I ever need or want to move the trap, all I have to do is make me a new hanging board to match my situation, or unscrew the present one and simply put it somewhere else on the trap.
(And yes, this attachment board could even be added to the roof to hang it from above, just make it shorter to match the roof width).
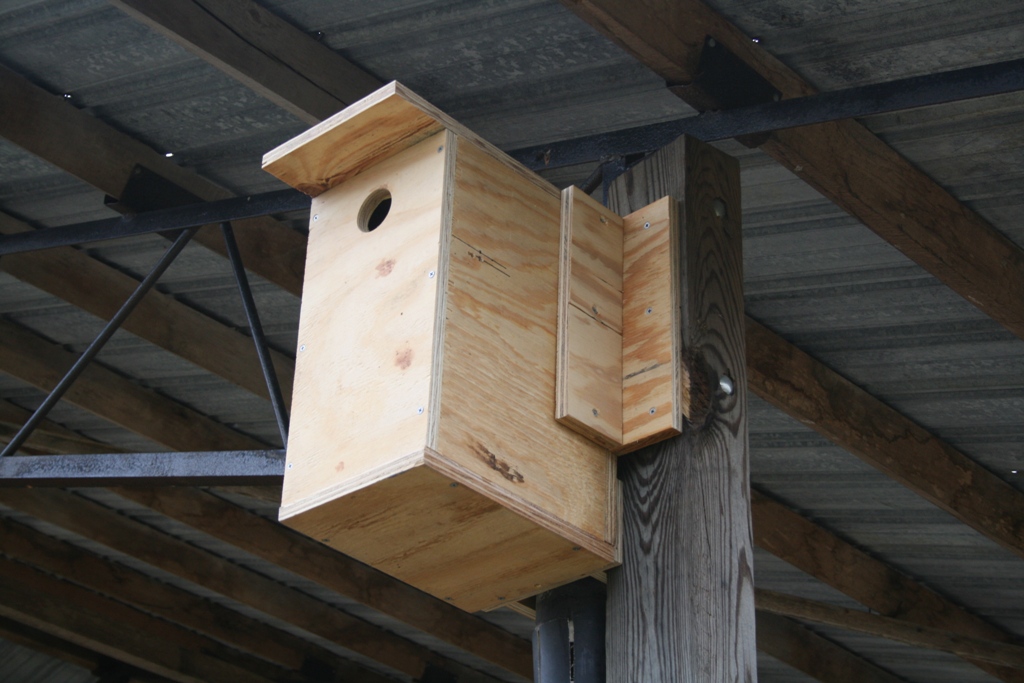
When adding the attachment board to the trap, remember to angle the screws at about 15 degrees. The ones that go into the post (or wall) can be straight. I used 3 screws at the trap and 3 at the post.
Painting:
If you plan to paint your trap, a good coating of Latex Primer and then a couple good coats of good Exterior Latex (what ever color you desire) will make things really look good and will help make it last a lot longer.
I didn't paint mine because, since nothing else in my pole barn is painted, I want it to get sun bleached gray just like the posts. Once it gets that gray look I want, I'll throw some Thompson's Water sealer on it.
I did however, make the down spout black so that it is less conspicuous.
Now, you can put your trap where ever you plan to put it. This should be done now. You'll need a dimension before you can make the down shut.
This is what my trap looks like from the rear.
The Down Spout and Cage:
Now, lets make a down spout with a catch cage at the bottom. This is the part of the trap that will deliver the trapped birds to the cage near the ground where you can get at them. (No ladders)!
You now can approximate where and how high you want your catch cage to be. Once you have that, (mark it if you have to) measure from where the cage will be up to the bottom of the tube on the trap. That dimension is how long you'll have to cut our down shut tube to. Measure the tube from the 'flange' down to the dimension you just got and cut the tube to that length. This will be the bottom of your tube and is where we're going to attach the cage. The flared end of the tube has to be up so that it can be slid over the piece in the down chute frame assembly.
First, you have to measure the circumference of your tube. If you have a normal tube, it should measure about 13 1/2".
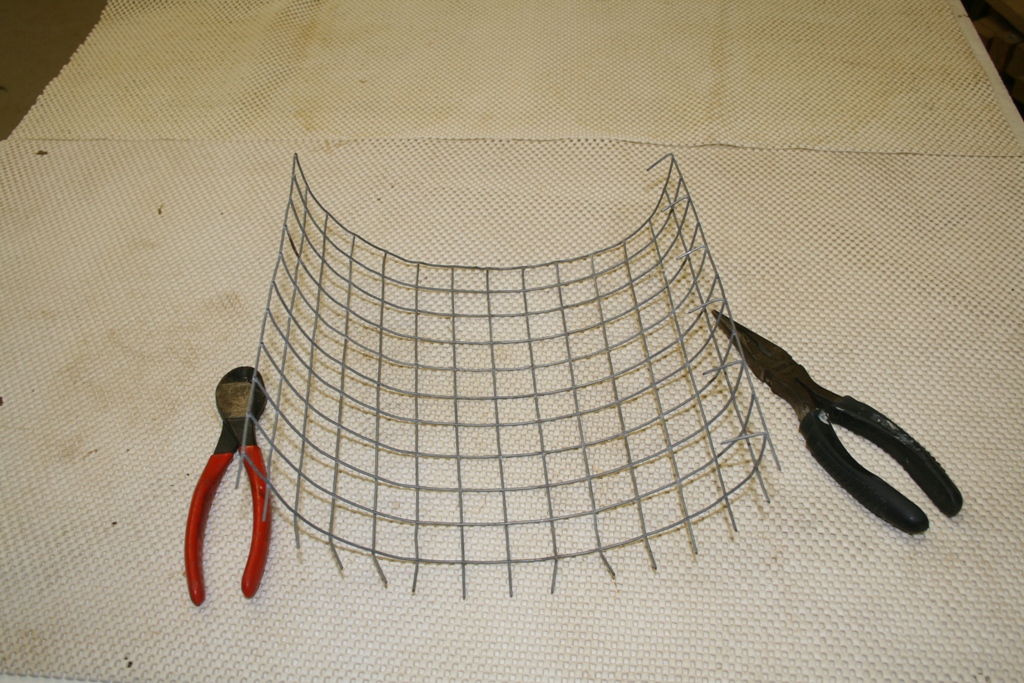
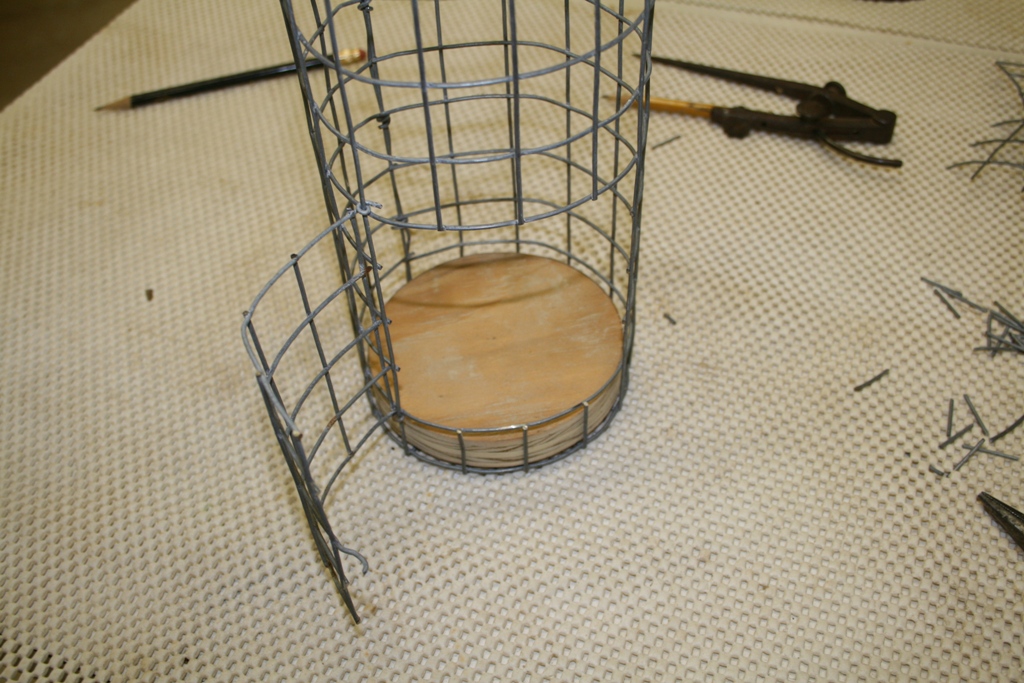
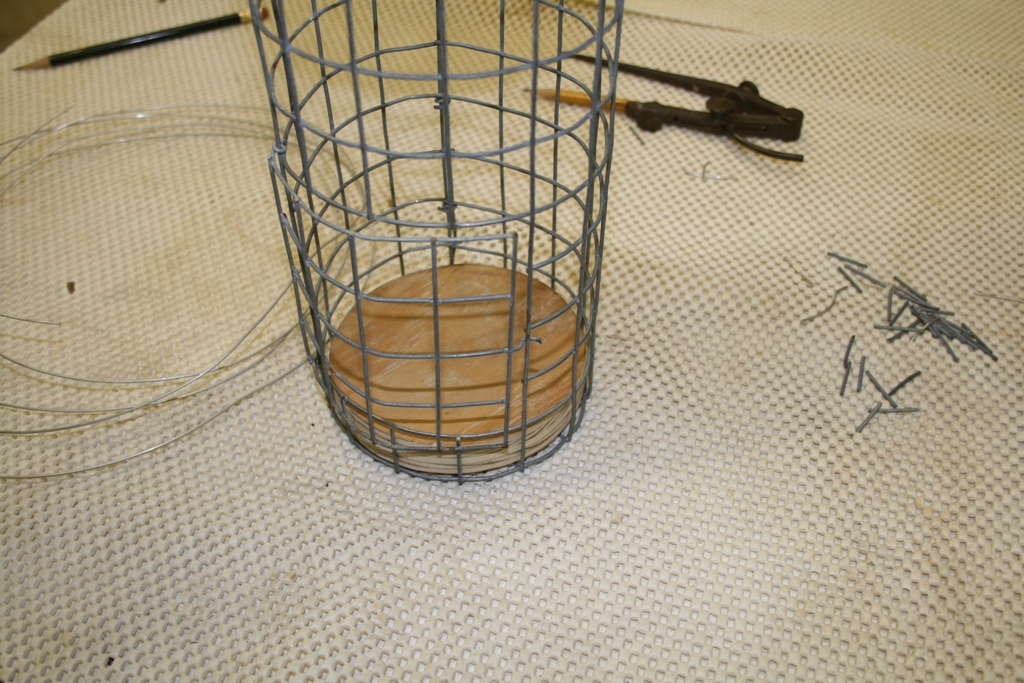
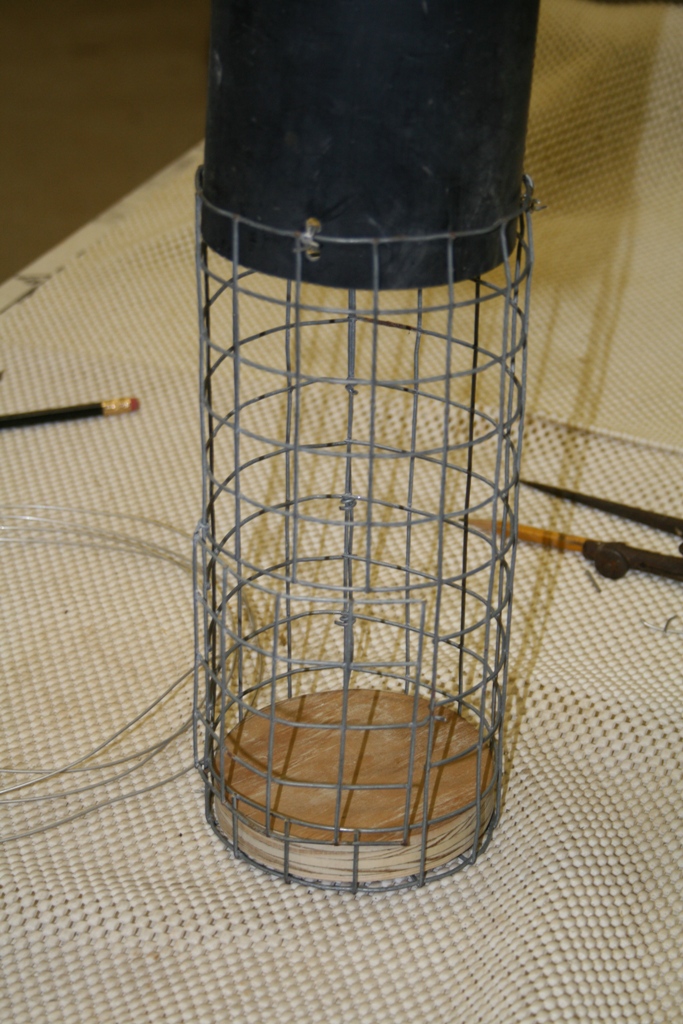
Look at the photo below. I used 1" square welded hardware wire to make this cage... a couple of reasons...
One, it's easier to count by 1",
Two, much less cutting,
Three, it's easier to make an escape hole,
And four, a starling cannot get out of a 1" square hole nor a 1 1/2" round hole!
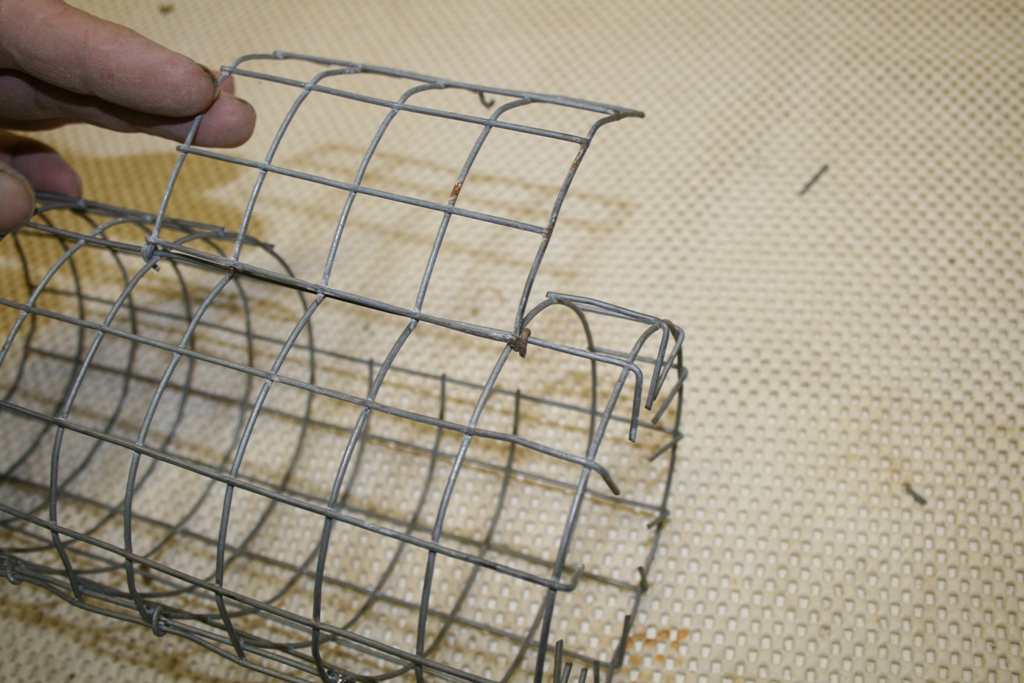
Cut the wire to be 15 full squares wide and 11 full squares high. On the right and bottom, cut off the outside wire, leaving the wires from that square, then cut off every other wire on the right side and on the bottom.
It's easier to bend the wires inward at this stage so using your needle nose pliers, bend them as shown.
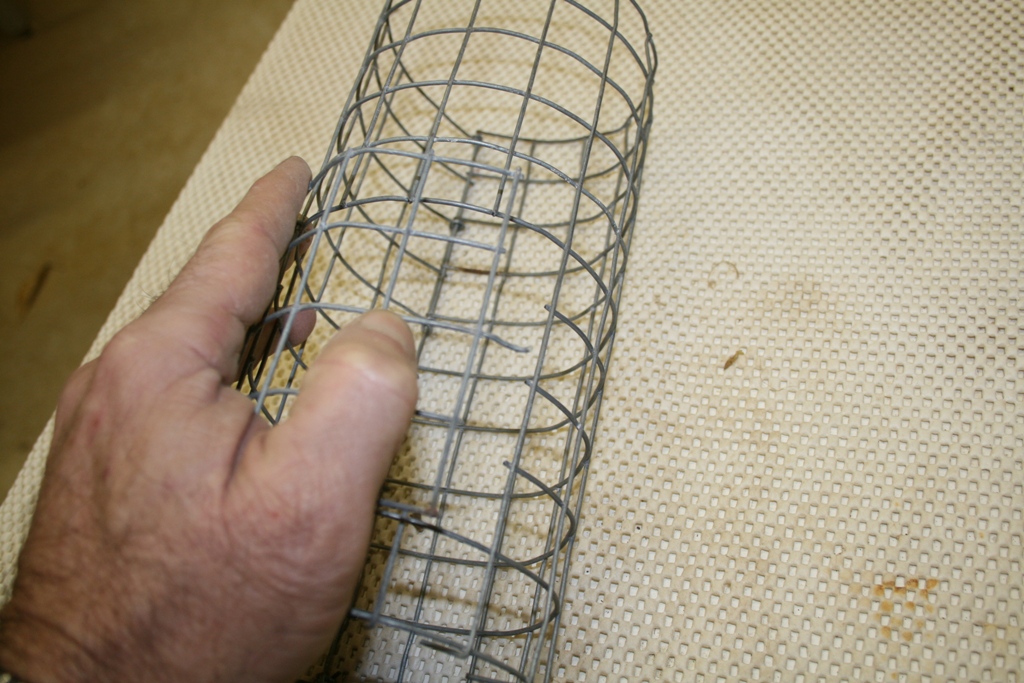
Roll the cage into a cylinder hooking the bent wires over the left vertical wire of the opposite side. Using needle nose pliers, curl the ends of the side wires around the first vertical wire so that the cage is now closed. Work the cage till it's nice and round.
Then, on the bottom, bend the wires in towards the center of the cage at 90 degrees.
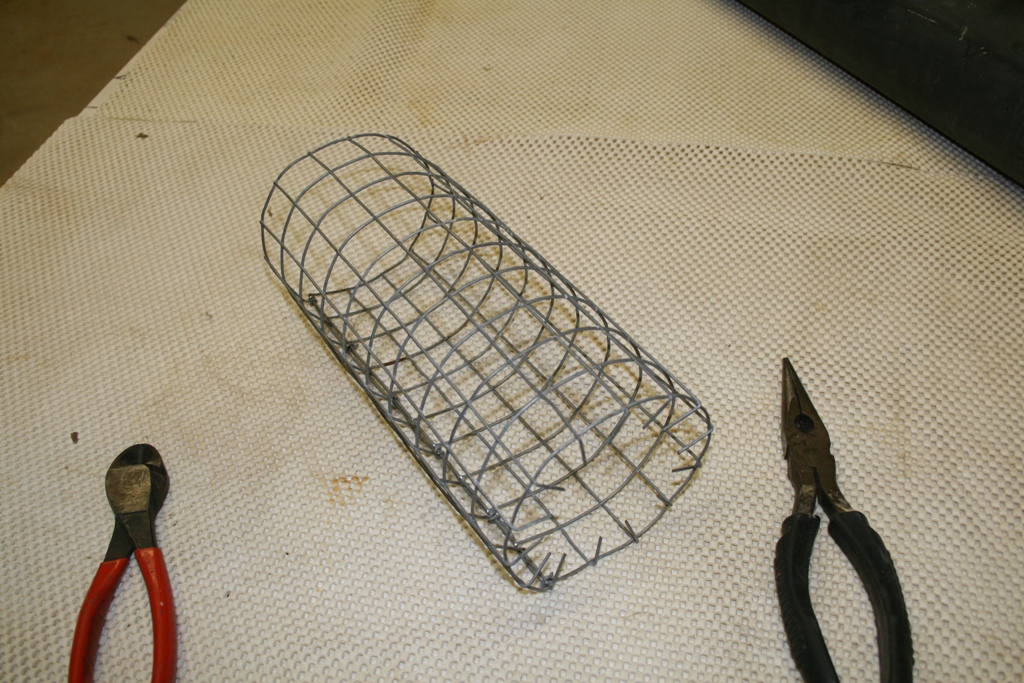
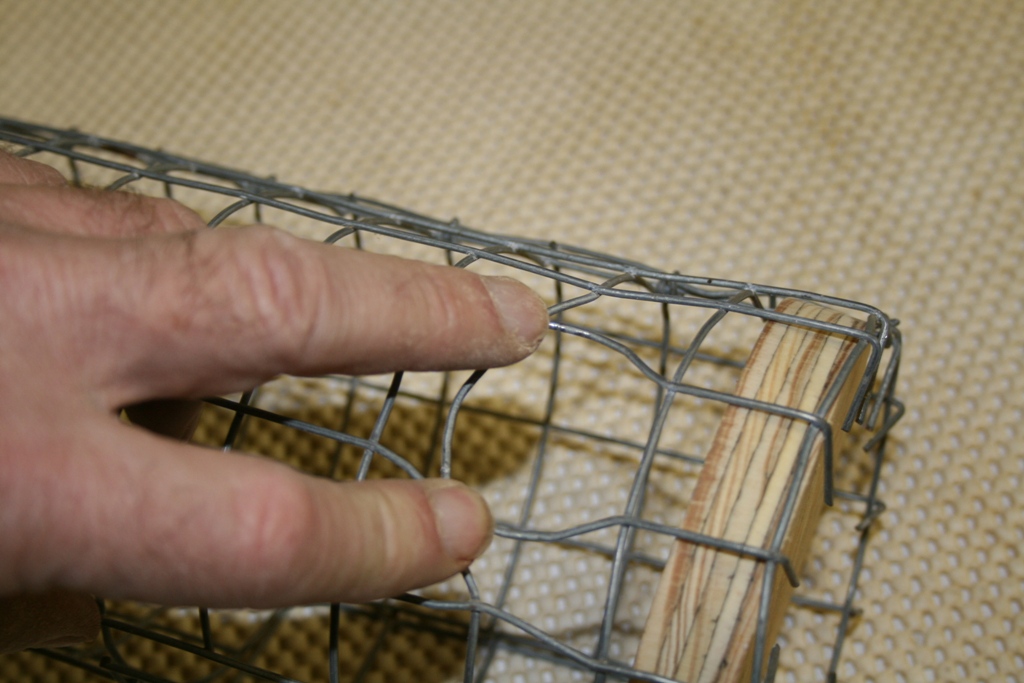
Next, up one square from the bottom and opposite from the wire seam, cut out a section of the cage, 4 squares on each side.

Now we have to make a door.
Look at the photo below. Cut out a piece of wire that has 6 full squares wide by
4
full squares high.
On
the left side, cut away the left square, leaving the top and bottom wires. On the right side,
repeat leaving
the middle wire.
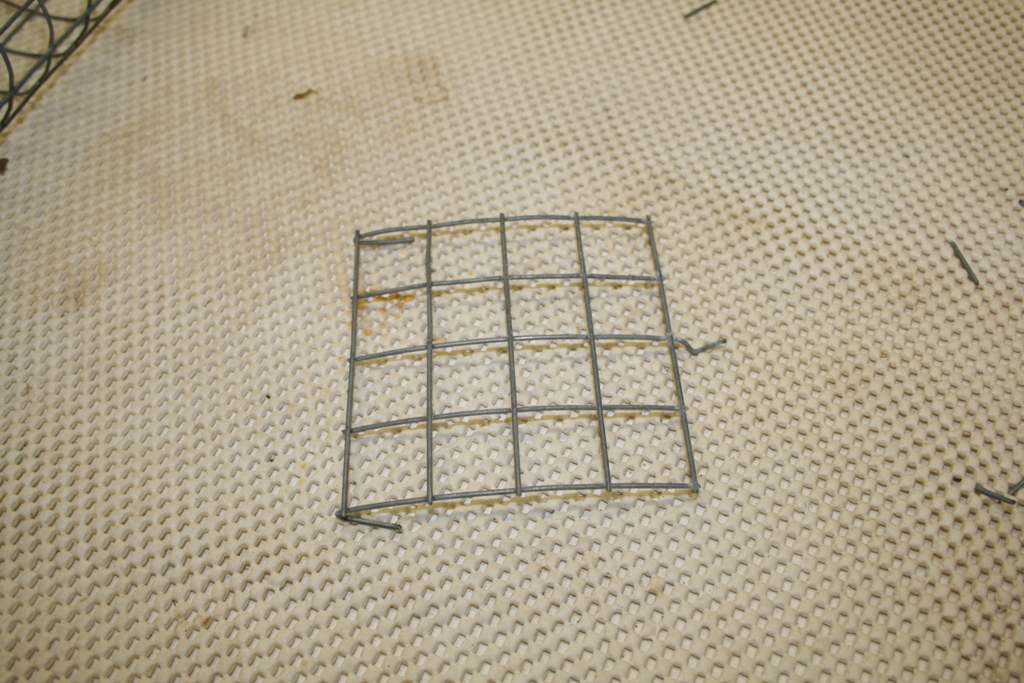
Next, using needle nose pliers, bend the top and bottom wire around the left vertical wire of the cutout. This will create a hinge for the cage door. Don't make it too tight, you want it to pivot fully open. This can be done by bending the hinge in the middle of the two wires. Make sure the top wire (hinge) goes over the top horizontal wire of the cutout and the bottom wire (hinge) goes under the bottom wire of the cutout. This will prevent the door from sliding either up or down in the cage.
To make a hook for the door, bend the single wire on the right into a hook shape as shown below. Be careful! Bending the wire too many times may break it off and you'll have to start the door all over again.
NOW! Let me "strongly" suggest...either take a small file, or use a Dremel Tool with a grinding disk as I did, and remove ALL the sharp points that are present on both the cage and the door. Take your time, miss any sharp points and you'll be bleeding on your new trap cage...
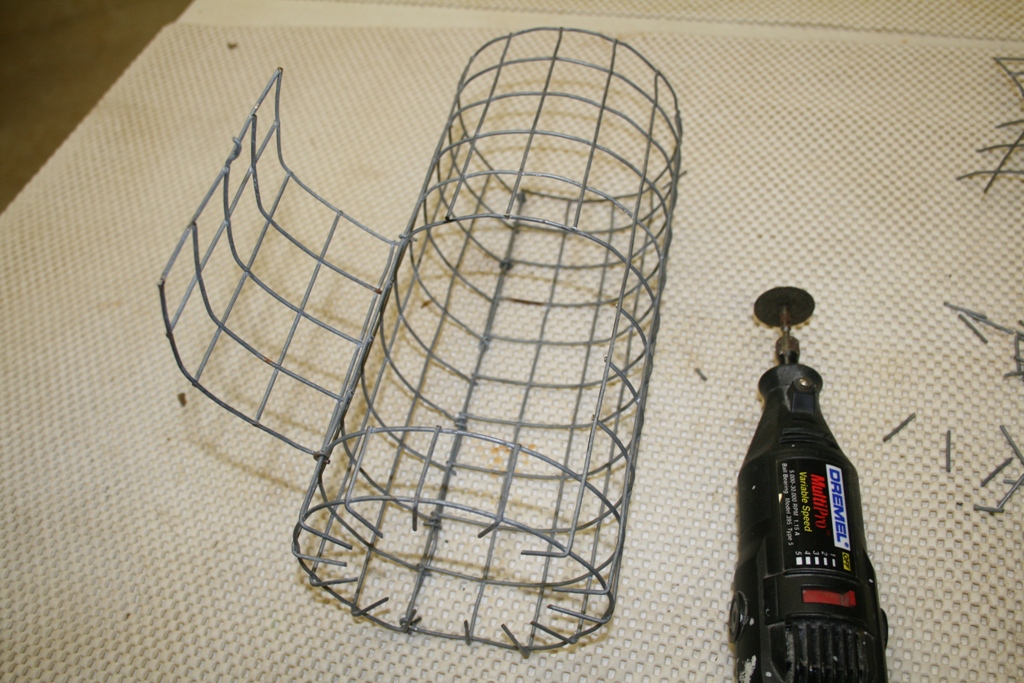
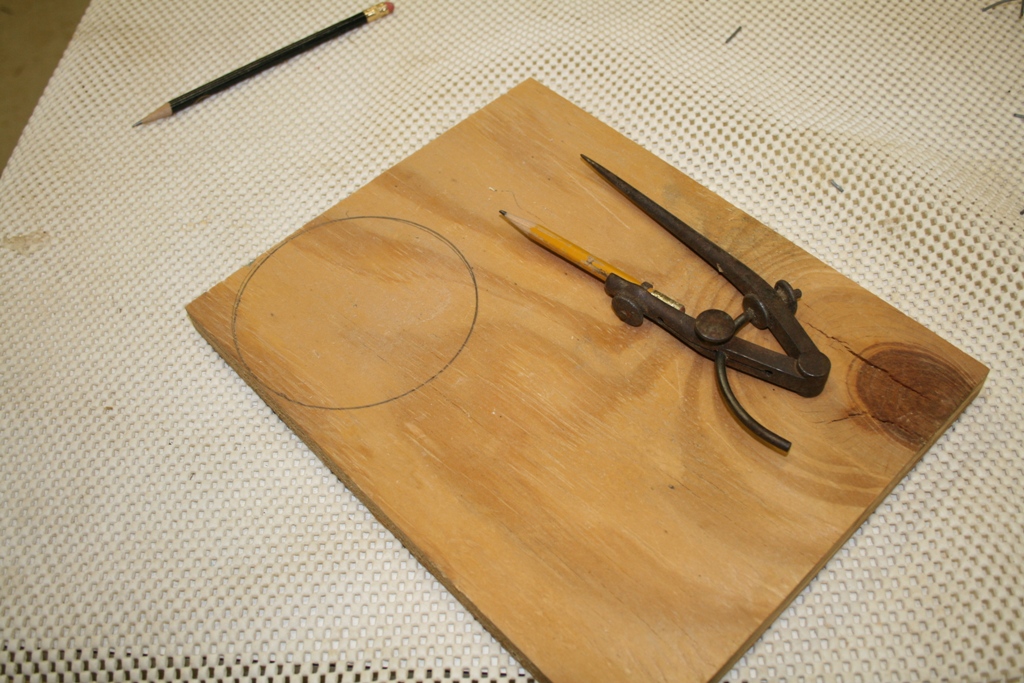
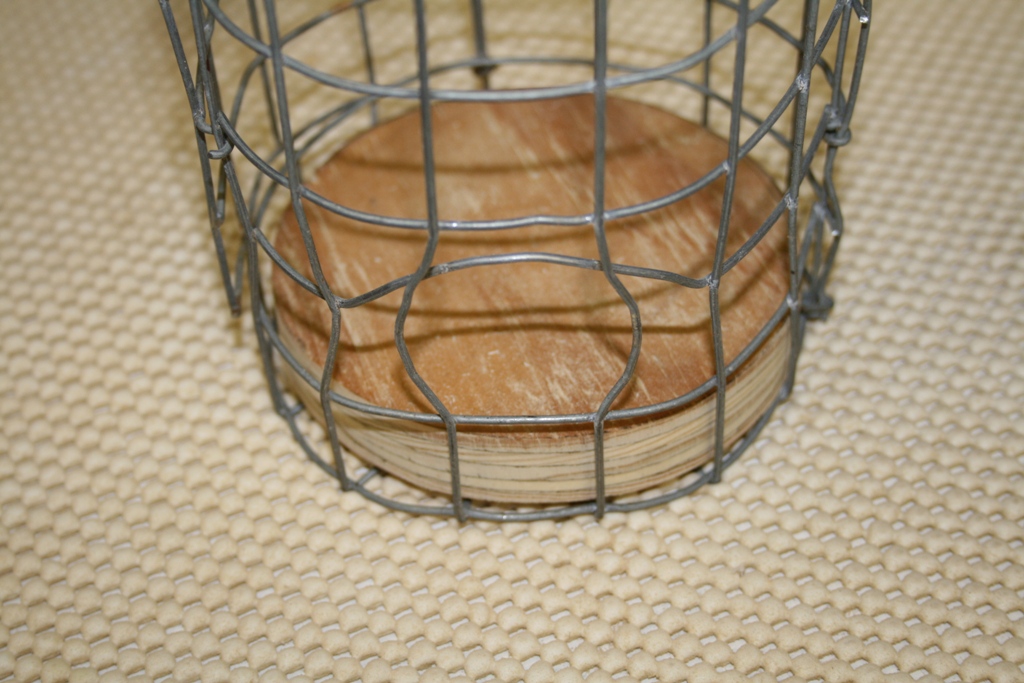
Now for the cage floor. All I did was measure the outside diameter (4 1/4") of my tube. Then, using a compass, I drew a round circle on a piece of scrap plywood, cut it out and sanded it round. (If you don't have a compass, set the tube on the wood and trace the outside of it).
It lays right down in the bottom of the cage on those wires that you bent in at 90 degrees.
Now to add the cage to the tube. First drill a pair of holes on 3 different sides of the tube, equally spaced. Put the first hole up about 1/2" from the end of the tube and the second one about 3/8" above the first hole.
Cut 3 strips of wire approximately 3" or 4" long. I used some soft aluminum wire I had laying around. Bends much easier and is plenty strong enough for this project.
Slide the cage over the tube with the top wire placed between the two holes. Wind the wire thru the two holes over the top cage wire. You can reach thru the door entrance of the cage to get your other hand inside the tube. I wound mine twice and pulled it nice and snug and then twisted the ends... (Now, aren't you glad you filed those sharp points off...)
Now, adjust the cage door hook. I bent the door to give me plenty of spring to keep the door closed while at the same time, allowing me to squeeze it enough to open it.
You might want to practice opening the door with one hand and then reaching into the cage with the other one. You'll need it....! You don't want to allow your hard caught prey to escape.
The Escape Hole
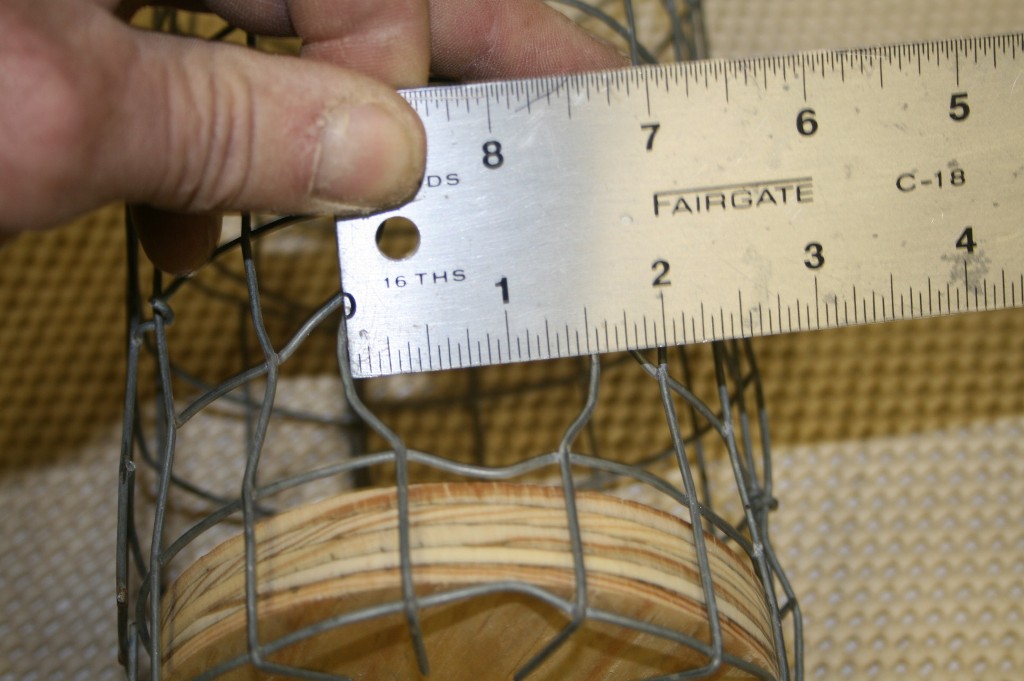
Because I am not home all the time I know that if a Bluebird were to get trapped in the cage with a startling, that the starling, out of its frustration of not being able to get out, would surely kill the Bluebird thus, I've created an escape hole for the Bluebird or any other small bird that might get caught. Because I know that a starling cannot get out of a 1 1/2 hole, it's very easy to put one in the base of the cage and any small bird that gets caught can easily vacate the cage without harm.
To add the Escape Hole, on the 3rd and 4th vertical wire to the right of the door, and on the 3rd horizontal wire up from the very bottom horizontal, break the weld of the wires. This is easily done by using a 'square' set of pliers. Grab the outside wire at the joints mentioned and gently twist it back and forth (left to right). Just a little is all it takes. After gently twisting a couple of times, squeeze the pliers really hard and then twist down with the handles of the pliers and this will snap it loose.
Now that both joints are broken, simply use the needle nose pliers and begin working the wires into the shape of a hole as shown. Work slowly! Don't want to break any of the wires.
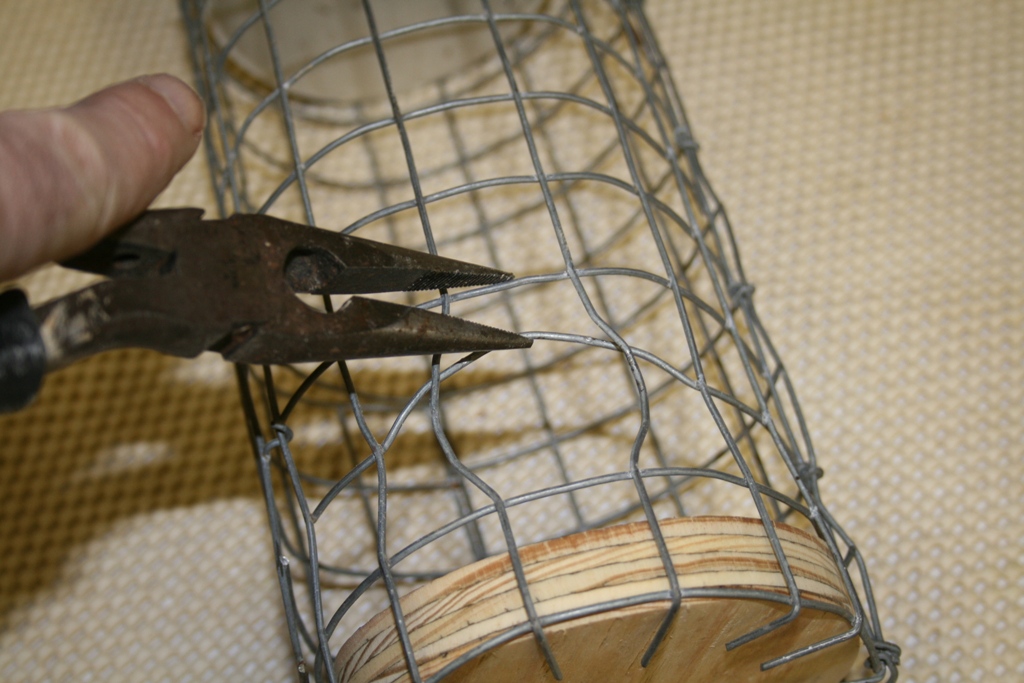
The idea is to form them into a 'somewhat' round hole that any small caged bird can escape from. I show a 1 1/2" diameter hole here, but I know that a Bluebird can easily escape from a 1 7/16" hole, (and a starling CAN'T) so you might want to start with that.
And the final results are An Escape Hole for any small bird that may get caught in the trap. Yes, I know, a sparrow can easily escape too, but I would much rather lose a sparrow or two than kill one of my Bluebirds or any of the other small native species that might get caught. (And besides, I already have a 'sparrow trap' and they can't escape from that).
Attaching the down shut to the trap
Now, since your trap is already up, all you have to do is mount your down shut and cage. Slide the 'flange' of the tube up over the small piece of tubing in the trap and then simply hold it in place.
How I did it:
Once I set the tube in place, I marked the post (or what ever your hanging it on) under one of the upper wires on the cage. Next, I drove a sturdy nail (8 penny) into my post, bent it up slightly and, once I raised the tube back in place, I "hung" the back of the basket on this nail. It makes for easy removal if necessary and the head of the nail keeps it 'hooked' in place. And make sure your cage door and escape hole faces out.
And that's all there is to it. I know starlings like corners of out buildings a lot. They seem to look for little nooks and crannies or little holes that they can nest in. This is why I hung mine on a post of my pole barn. They are constantly frequenting that area looking for nesting spaces.
As stated before, just BEWARE! Bluebirds and other cavity nesting birds will also be looking for the same thing, so make sure you monitor your trap very closely and let them go when they get caught. Usually one or two trips down the tube will make them look elsewhere. If you are going to be away from the trap for any length of time, then open the door so that any desirable bird can escape should it get caught. Yes, you might miss a starling or two, but you don't want to kill the natives. That's the whole reason for building this trap, to protect our native species of birds. And besides, believe it or not, the starlings will return again and again.
One more thing!
If you are not able to build one of these home made nest traps, there is another option. A guy by the name of Blaine Johnson, "Uncle" Blaine, that makes a repeating trap that works on the starling's food drive. In this case, the starling isn't looking for a place to nest, but instead, is looking for food. If you like, go to this web page Uncle Blaine's Sparrow Traps and take a look and see if his 'starling' trap will fit your needs. All the information and directions for its use is there.
I also very strongly suggest that if you catch an unwanted starling, that it be dealt with properly...
Back
to Chuck's Purple Martin Page
This page created and maintained
by Chuck Abare